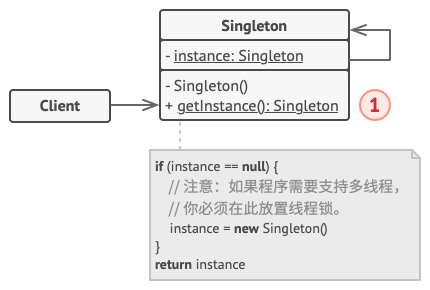
namespaceSingleton { // The Singleton class defines the `GetInstance` method that serves as an // alternative to constructor and lets clients access the same instance of // this class over and over. classSingleton { // The Singleton's constructor should always be private to prevent // direct construction calls with the `new` operator. privateSingleton() { }
// The Singleton's instance is stored in a static field. There there are // multiple ways to initialize this field, all of them have various pros // and cons. In this example we'll show the simplest of these ways, // which, however, doesn't work really well in multithreaded program. privatestatic Singleton _instance;
// This is the static method that controls the access to the singleton // instance. On the first run, it creates a singleton object and places // it into the static field. On subsequent runs, it returns the client // existing object stored in the static field. publicstatic Singleton GetInstance() { if (_instance == null) { _instance = new Singleton(); } return _instance; }
// Finally, any singleton should define some business logic, which can // be executed on its instance. publicstaticvoidsomeBusinessLogic() { // ... } }
namespaceSingleton { // This Singleton implementation is called "double check lock". It is safe // in multithreaded environment and provides lazy initialization for the // Singleton object. classSingleton { privateSingleton() { }
privatestatic Singleton _instance;
// We now have a lock object that will be used to synchronize threads // during first access to the Singleton. privatestaticreadonlyobject _lock = newobject();
publicstatic Singleton GetInstance(stringvalue) { // This conditional is needed to prevent threads stumbling over the // lock once the instance is ready. if (_instance == null) { // Now, imagine that the program has just been launched. Since // there's no Singleton instance yet, multiple threads can // simultaneously pass the previous conditional and reach this // point almost at the same time. The first of them will acquire // lock and will proceed further, while the rest will wait here. lock (_lock) { // The first thread to acquire the lock, reaches this // conditional, goes inside and creates the Singleton // instance. Once it leaves the lock block, a thread that // might have been waiting for the lock release may then // enter this section. But since the Singleton field is // already initialized, the thread won't create a new // object. if (_instance == null) { _instance = new Singleton(); _instance.Value = value; } } } return _instance; }
// We'll use this property to prove that our Singleton really works. publicstring Value { get; set; } }
classProgram { staticvoidMain(string[] args) { // The client code. Console.WriteLine( "{0}\n{1}\n\n{2}\n", "If you see the same value, then singleton was reused (yay!)", "If you see different values, then 2 singletons were created (booo!!)", "RESULT:" ); Thread process1 = new Thread(() => { TestSingleton("FOO"); }); Thread process2 = new Thread(() => { TestSingleton("BAR"); }); process1.Start(); process2.Start(); process1.Join(); process2.Join(); } publicstaticvoidTestSingleton(stringvalue) { Singleton singleton = Singleton.GetInstance(value); Console.WriteLine(singleton.Value); } } }
/** * The Singleton class defines the `GetInstance` method that serves as an * alternative to constructor and lets clients access the same instance of this * class over and over. */ classSingleton {
/** * The Singleton's constructor should always be private to prevent direct * construction calls with the `new` operator. */
/** * Singletons should not be cloneable. */ Singleton(Singleton &other) = delete; /** * Singletons should not be assignable. */ voidoperator=(const Singleton &) = delete; /** * This is the static method that controls the access to the singleton * instance. On the first run, it creates a singleton object and places it * into the static field. On subsequent runs, it returns the client existing * object stored in the static field. */
static Singleton *GetInstance(const std::string& value); /** * Finally, any singleton should define some business logic, which can be * executed on its instance. */ voidSomeBusinessLogic() { // ... }
std::string value()const{ return value_; } };
Singleton* Singleton::singleton_= nullptr;;
/** * Static methods should be defined outside the class. */ Singleton *Singleton::GetInstance(const std::string& value) { /** * This is a safer way to create an instance. instance = new Singleton is * dangeruous in case two instance threads wants to access at the same time */ if(singleton_==nullptr){ singleton_ = newSingleton(value); } return singleton_; }
intmain() { std::cout <<"If you see the same value, then singleton was reused (yay!\n" << "If you see different values, then 2 singletons were created (booo!!)\n\n" << "RESULT:\n"; std::thread t1(ThreadFoo); std::thread t2(ThreadBar); t1.join(); t2.join();
return0; }
Output.txt: 执行结果
1 2 3 4 5 6
If you see the same value, then singleton was reused (yay! If you see different values, then 2 singletons were created (booo!!)
/** * The Singleton class defines the `GetInstance` method that serves as an * alternative to constructor and lets clients access the same instance of this * class over and over. */ classSingleton {
/** * The Singleton's constructor/destructor should always be private to * prevent direct construction/desctruction calls with the `new`/`delete` * operator. */ private: static Singleton * pinstance_; static std::mutex mutex_;
public: /** * Singletons should not be cloneable. */ Singleton(Singleton &other) = delete; /** * Singletons should not be assignable. */ voidoperator=(const Singleton &) = delete; /** * This is the static method that controls the access to the singleton * instance. On the first run, it creates a singleton object and places it * into the static field. On subsequent runs, it returns the client existing * object stored in the static field. */
static Singleton *GetInstance(const std::string& value); /** * Finally, any singleton should define some business logic, which can be * executed on its instance. */ voidSomeBusinessLogic() { // ... } std::string value()const{ return value_; } };
/** * Static methods should be defined outside the class. */
/** * The first time we call GetInstance we will lock the storage location * and then we make sure again that the variable is null and then we * set the value. RU: */ Singleton *Singleton::GetInstance(const std::string& value) { std::lock_guard<std::mutex> lock(mutex_); if (pinstance_ == nullptr) { pinstance_ = newSingleton(value); } return pinstance_; }
intmain() { std::cout <<"If you see the same value, then singleton was reused (yay!\n" << "If you see different values, then 2 singletons were created (booo!!)\n\n" << "RESULT:\n"; std::thread t1(ThreadFoo); std::thread t2(ThreadBar); t1.join(); t2.join(); return0; }
Output.txt: 执行结果
1
2
3
4
5
6
If you see the same value, then singleton was reused (yay! If you see different values, then 2 singletons were created (booo!!)
publicclassDemoSingleThread { publicstaticvoidmain(String[] args) { System.out.println("If you see the same value, then singleton was reused (yay!)" + "\n" + "If you see different values, then 2 singletons were created (booo!!)" + "\n\n" + "RESULT:" + "\n"); Singletonsingleton= Singleton.getInstance("FOO"); SingletonanotherSingleton= Singleton.getInstance("BAR"); System.out.println(singleton.value); System.out.println(anotherSingleton.value); } }
OutputDemoSingleThread.txt: 执行结果
1 2 3 4 5 6 7
If you see the same value, then singleton was reused (yay!) If you see different values, then 2 singletons were created (booo!!)
publicclassDemoMultiThread { publicstaticvoidmain(String[] args) { System.out.println("If you see the same value, then singleton was reused (yay!)" + "\n" + "If you see different values, then 2 singletons were created (booo!!)" + "\n\n" + "RESULT:" + "\n"); ThreadthreadFoo=newThread(newThreadFoo()); ThreadthreadBar=newThread(newThreadBar()); threadFoo.start(); threadBar.start(); }
publicfinalclassSingleton { // The field must be declared volatile so that double check lock would work // correctly. privatestaticvolatile Singleton instance;
publicstatic Singleton getInstance(String value) { // The approach taken here is called double-checked locking (DCL). It // exists to prevent race condition between multiple threads that may // attempt to get singleton instance at the same time, creating separate // instances as a result. // // It may seem that having the `result` variable here is completely // pointless. There is, however, a very important caveat when // implementing double-checked locking in Java, which is solved by // introducing this local variable. // // You can read more info DCL issues in Java here: // https://refactoring.guru/java-dcl-issue Singletonresult= instance; if (result != null) { return result; } synchronized(Singleton.class) { if (instance == null) { instance = newSingleton(value); } return instance; } } }
publicclassDemoMultiThread { publicstaticvoidmain(String[] args) { System.out.println("If you see the same value, then singleton was reused (yay!)" + "\n" + "If you see different values, then 2 singletons were created (booo!!)" + "\n\n" + "RESULT:" + "\n"); ThreadthreadFoo=newThread(newThreadFoo()); ThreadthreadBar=newThread(newThreadBar()); threadFoo.start(); threadBar.start(); }
/** * The Singleton class defines the `GetInstance` method that serves as an * alternative to constructor and lets clients access the same instance of this * class over and over. */ classSingleton { /** * The Singleton's instance is stored in a static field. This field is an * array, because we'll allow our Singleton to have subclasses. Each item in * this array will be an instance of a specific Singleton's subclass. You'll * see how this works in a moment. */ privatestatic$instances = [];
/** * The Singleton's constructor should always be private to prevent direct * construction calls with the `new` operator. */ protectedfunction__construct() { }
/** * Singletons should not be cloneable. */ protectedfunction__clone() { }
/** * Singletons should not be restorable from strings. */ publicfunction__wakeup() { thrownew\Exception("Cannot unserialize a singleton."); }
/** * This is the static method that controls the access to the singleton * instance. On the first run, it creates a singleton object and places it * into the static field. On subsequent runs, it returns the client existing * object stored in the static field. * * This implementation lets you subclass the Singleton class while keeping * just one instance of each subclass around. */ publicstaticfunctiongetInstance(): Singleton { $cls = static::class; if (!isset(self::$instances[$cls])) { self::$instances[$cls] = newstatic(); }
returnself::$instances[$cls]; }
/** * Finally, any singleton should define some business logic, which can be * executed on its instance. */ publicfunctionsomeBusinessLogic() { // ... } }
/** * The client code. */ functionclientCode() { $s1 = Singleton::getInstance(); $s2 = Singleton::getInstance(); if ($s1 === $s2) { echo"Singleton works, both variables contain the same instance."; } else { echo"Singleton failed, variables contain different instances."; } }
clientCode();
Output.txt: 执行结果
1
Singleton works, both variables contain the same instance.
/** * If you need to support several types of Singletons in your app, you can * define the basic features of the Singleton in a base class, while moving the * actual business logic (like logging) to subclasses. */ classSingleton { /** * The actual singleton's instance almost always resides inside a static * field. In this case, the static field is an array, where each subclass of * the Singleton stores its own instance. */ privatestatic$instances = [];
/** * Singleton's constructor should not be public. However, it can't be * private either if we want to allow subclassing. */ protectedfunction__construct() { }
/** * Cloning and unserialization are not permitted for singletons. */ protectedfunction__clone() { }
/** * The method you use to get the Singleton's instance. */ publicstaticfunctiongetInstance() { $subclass = static::class; if (!isset(self::$instances[$subclass])) { // Note that here we use the "static" keyword instead of the actual // class name. In this context, the "static" keyword means "the name // of the current class". That detail is important because when the // method is called on the subclass, we want an instance of that // subclass to be created here.
/** * The logging class is the most known and praised use of the Singleton pattern. * In most cases, you need a single logging object that writes to a single log * file (control over shared resource). You also need a convenient way to access * that instance from any context of your app (global access point). */ classLoggerextendsSingleton { /** * A file pointer resource of the log file. */ private$fileHandle;
/** * Since the Singleton's constructor is called only once, just a single file * resource is opened at all times. * * Note, for the sake of simplicity, we open the console stream instead of * the actual file here. */ protectedfunction__construct() { $this->fileHandle = fopen('php://stdout', 'w'); }
/** * Write a log entry to the opened file resource. */ publicfunctionwriteLog(string$message): void { $date = date('Y-m-d'); fwrite($this->fileHandle, "$date: $message\n"); }
/** * Just a handy shortcut to reduce the amount of code needed to log messages * from the client code. */ publicstaticfunctionlog(string$message): void { $logger = static::getInstance(); $logger->writeLog($message); } }
/** * Applying the Singleton pattern to the configuration storage is also a common * practice. Often you need to access application configurations from a lot of * different places of the program. Singleton gives you that comfort. */ classConfigextendsSingleton { private$hashmap = [];
/** * The client code. */ Logger::log("Started!");
// Compare values of Logger singleton. $l1 = Logger::getInstance(); $l2 = Logger::getInstance(); if ($l1 === $l2) { Logger::log("Logger has a single instance."); } else { Logger::log("Loggers are different."); }
// Check how Config singleton saves data... $config1 = Config::getInstance(); $login = "test_login"; $password = "test_password"; $config1->setValue("login", $login); $config1->setValue("password", $password); // ...and restores it. $config2 = Config::getInstance(); if ($login == $config2->getValue("login") && $password == $config2->getValue("password") ) { Logger::log("Config singleton also works fine."); }
Logger::log("Finished!");
Output.txt: 执行结果
1
2
3
4
2018-06-04: Started!
2018-06-04: Logger has a single instance.
2018-06-04: Config singleton also works fine.
2018-06-04: Finished!
classSingletonMeta(type): """ The Singleton class can be implemented in different ways in Python. Some possible methods include: base class, decorator, metaclass. We will use the metaclass because it is best suited for this purpose. """
_instances = {}
def__call__(cls, *args, **kwargs): """ Possible changes to the value of the `__init__` argument do not affect the returned instance. """ if cls notin cls._instances: instance = super().__call__(*args, **kwargs) cls._instances[cls] = instance return cls._instances[cls]
classSingleton(metaclass=SingletonMeta): defsome_business_logic(self): """ Finally, any singleton should define some business logic, which can be executed on its instance. """
# ...
if __name__ == "__main__": # The client code.
s1 = Singleton() s2 = Singleton()
ifid(s1) == id(s2): print("Singleton works, both variables contain the same instance.") else: print("Singleton failed, variables contain different instances.")
Output.txt: 执行结果
1
Singleton works, both variables contain the same instance.
classSingletonMeta(type): """ This is a thread-safe implementation of Singleton. """
_instances = {}
_lock: Lock = Lock() """ We now have a lock object that will be used to synchronize threads during first access to the Singleton. """
def__call__(cls, *args, **kwargs): """ Possible changes to the value of the `__init__` argument do not affect the returned instance. """ # Now, imagine that the program has just been launched. Since there's no # Singleton instance yet, multiple threads can simultaneously pass the # previous conditional and reach this point almost at the same time. The # first of them will acquire lock and will proceed further, while the # rest will wait here. with cls._lock: # The first thread to acquire the lock, reaches this conditional, # goes inside and creates the Singleton instance. Once it leaves the # lock block, a thread that might have been waiting for the lock # release may then enter this section. But since the Singleton field # is already initialized, the thread won't create a new object. if cls notin cls._instances: instance = super().__call__(*args, **kwargs) cls._instances[cls] = instance return cls._instances[cls]
classSingleton(metaclass=SingletonMeta): value: str = None """ We'll use this property to prove that our Singleton really works. """
def__init__(self, value: str) -> None: self.value = value
defsome_business_logic(self): """ Finally, any singleton should define some business logic, which can be executed on its instance. """
print("If you see the same value, then singleton was reused (yay!)\n" "If you see different values, " "then 2 singletons were created (booo!!)\n\n" "RESULT:\n")
# The Singleton class defines the `instance` method that lets clients access the # unique singleton instance. classSingleton @instance = new
private_class_method :new
# The static method that controls the access to the singleton instance. # # This implementation let you subclass the Singleton class while keeping just # one instance of each subclass around. defself.instance @instance end
# Finally, any singleton should define some business logic, which can be # executed on its instance. defsome_business_logic # ... end end
# The client code.
s1 = Singleton.instance s2 = Singleton.instance
if s1.equal?(s2) print 'Singleton works, both variables contain the same instance.' else print 'Singleton failed, variables contain different instances.' end
output.txt: 执行结果
1
Singleton works, both variables contain the same instance.
# The Singleton class defines the `intance` method that lets clients access the # unique singleton instance. classSingleton attr_reader:value
@instance_mutex = Mutex.new
private_class_method :new
definitialize(value) @value = value end
# The static method that controls the access to the singleton instance. # # This implementation let you subclass the Singleton class while keeping just # one instance of each subclass around. defself.instance(value) return@instanceif@instance
@instance_mutex.synchronize do @instance ||= new(value) end
@instance end
# Finally, any singleton should define some business logic, which can be # executed on its instance. defsome_business_logic # ... end end
# @param [String] value deftest_singleton(value) singleton = Singleton.instance(value) puts singleton.value end
# The client code.
puts "If you see the same value, then singleton was reused (yay!)\n"\ "If you see different values, then 2 singletons were created (booo!!)\n\n"\ "RESULT:\n\n"
/// The Singleton class defines the `shared` field that lets clients access the /// unique singleton instance. classSingleton {
/// The static field that controls the access to the singleton instance. /// /// This implementation let you extend the Singleton class while keeping /// just one instance of each subclass around. staticvar shared: Singleton= { let instance =Singleton() // ... configure the instance // ... return instance }()
/// The Singleton's initializer should always be private to prevent direct /// construction calls with the `new` operator. privateinit() {}
/// Finally, any singleton should define some business logic, which can be /// executed on its instance. funcsomeBusinessLogic() -> String { // ... return"Result of the 'someBusinessLogic' call" } }
/// Singletons should not be cloneable. extensionSingleton: NSCopying {
funccopy(withzone: NSZone? =nil) -> Any { returnself } }
/// The client code. classClient { // ... staticfuncsomeClientCode() { let instance1 =Singleton.shared let instance2 =Singleton.shared
if (instance1 === instance2) { print("Singleton works, both variables contain the same instance.") } else { print("Singleton failed, variables contain different instances.") } } // ... }
/// Let's see how it all works together. classSingletonConceptual: XCTestCase {
/// Singleton Design Pattern /// /// Intent: Ensure that class has a single instance, and provide a global point /// of access to it.
classSingletonRealWorld: XCTestCase {
functestSingletonRealWorld() {
/// There are two view controllers. /// /// MessagesListVC displays a list of last messages from a user's chats. /// ChatVC displays a chat with a friend. /// /// FriendsChatService fetches messages from a server and provides all /// subscribers (view controllers in our example) with new and removed /// messages. /// /// FriendsChatService is used by both view controllers. It can be /// implemented as an instance of a class as well as a global variable. /// /// In this example, it is important to have only one instance that /// performs resource-intensive work.
funcaccept(newmessages: [Message]) { /// handle new messages in the base class }
funcaccept(removedmessages: [Message]) { /// handle removed messages in the base class }
funcstartReceiveMessages() {
/// The singleton can be injected as a dependency. However, from an /// informational perspective, this example calls FriendsChatService /// directly to illustrate the intent of the pattern, which is: "...to /// provide the global point of access to the instance..."
/** * The Singleton class defines the `getInstance` method that lets clients access * the unique singleton instance. */ classSingleton { privatestaticinstance: Singleton;
/** * The Singleton's constructor should always be private to prevent direct * construction calls with the `new` operator. */ privateconstructor() { }
/** * The static method that controls the access to the singleton instance. * * This implementation let you subclass the Singleton class while keeping * just one instance of each subclass around. */ publicstaticgetInstance(): Singleton { if (!Singleton.instance) { Singleton.instance = newSingleton(); }
returnSingleton.instance; }
/** * Finally, any singleton should define some business logic, which can be * executed on its instance. */ publicsomeBusinessLogic() { // ... } }
if (s1 === s2) { console.log('Singleton works, both variables contain the same instance.'); } else { console.log('Singleton failed, variables contain different instances.'); } }
clientCode();
Output.txt: 执行结果
1
Singleton works, both variables contain the same instance.
// Scanln is similar to Scan, but stops scanning at a newline and // after the final item there must be a newline or EOF. fmt.Scanln() }
output.txt: 执行结果
1
2
3
4
5
6
Creating single instance now.
Single instance already created.
Single instance already created.
Single instance already created.
Single instance already created.
...