k8s高可用集群部署
https://jimmysong.io/kubernetes-handbook
https://kubernetes.feisky.xyz/
https://kubernetes.io/docs/reference/kubernetes-api/workload-resources/
https://kubernetes.io/docs/reference/generated/kubernetes-api/v1.23/
环境&介质
虚拟化平台: VMWare Workstation 16 Pro
操作系统: CentOS Linux release 7.9.2009 (Core)
操作用户: root
电脑型号: Lenovo Legion Y7000P 2020H
CPU: Intel(R) Core(TM) I7-10750H CPU @2.60HZ
RAM: 16G
Kubernetes: 1.20.5
Docker: 20.10.5
Flannel: 0.14.0
注: etd/coredns等版本信息可以使用命令kubeadm config images list --kubernetes-version=v1.20.5查看.
集群节点信息:
主机节点名称
IP
配置
角色
k8s-master-01 ~ 02
192.168.0.106 ~ 107
2C/2G/50G
Master/Worker
k8s-node-01
192.168.0.108
2C/2G/50G
Worker
k8s-master-lb
192.168.0.200
VIP不占用机器
vip
信息
网段
Pod网段
172.168.0.0/16
Service网段
10.96.0.0/12
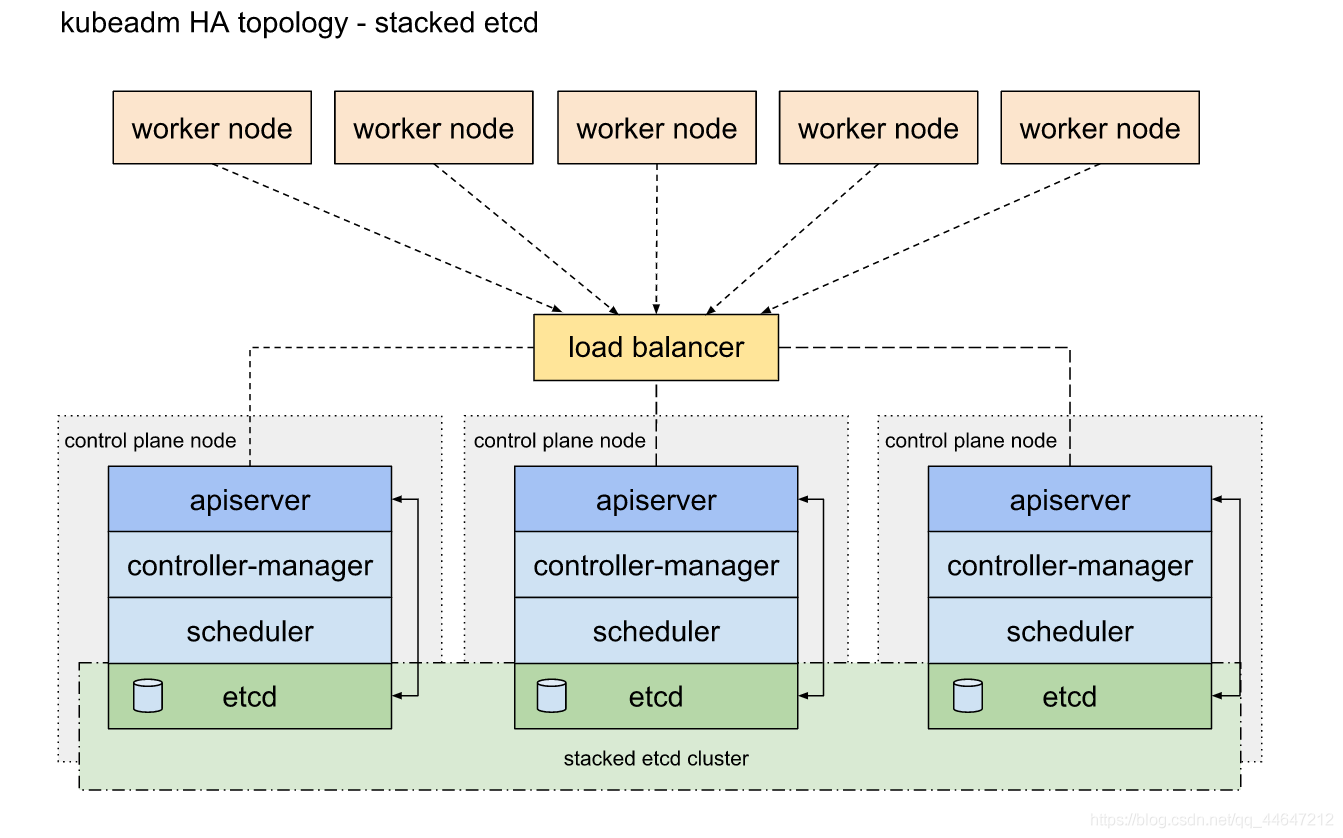
stacked etcd
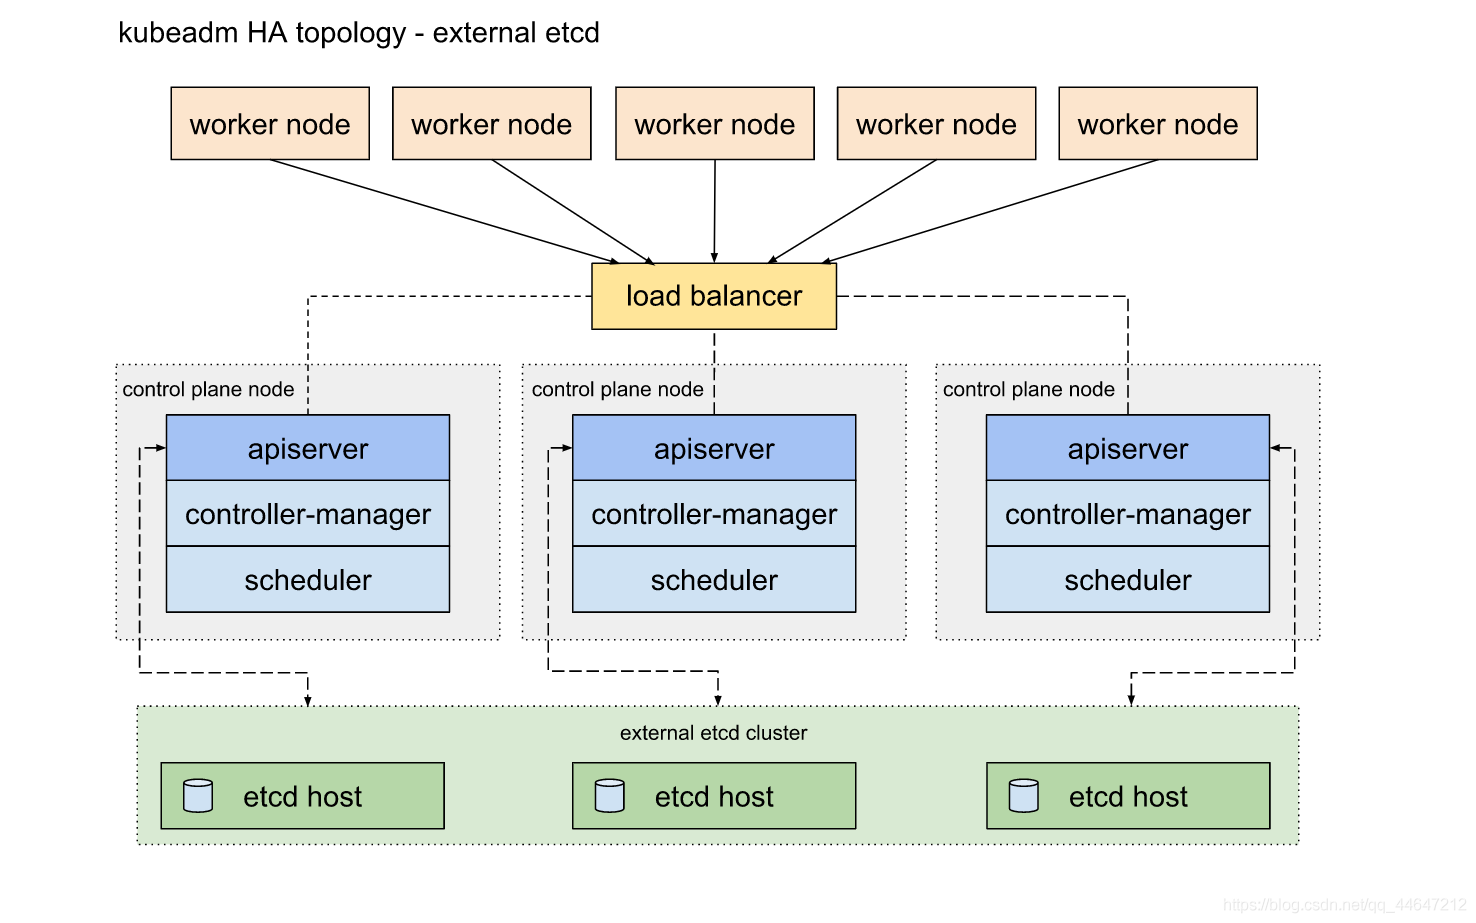
external etcd
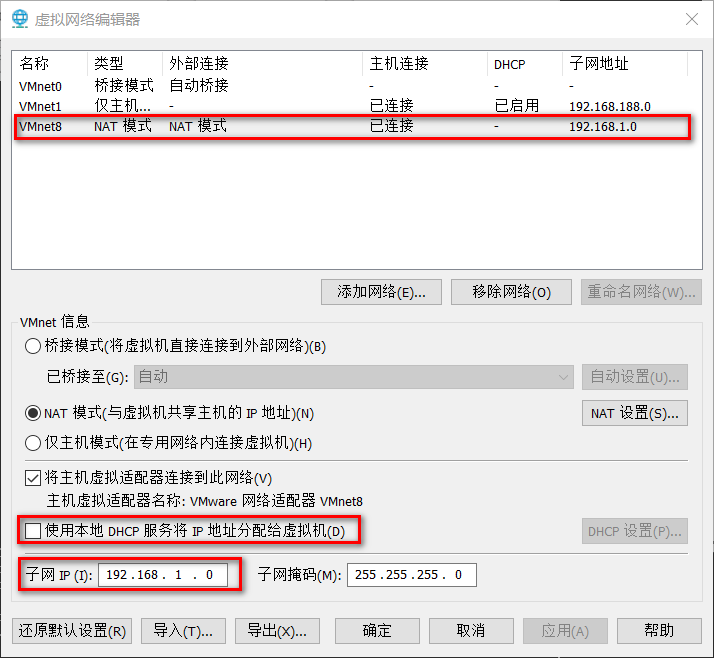
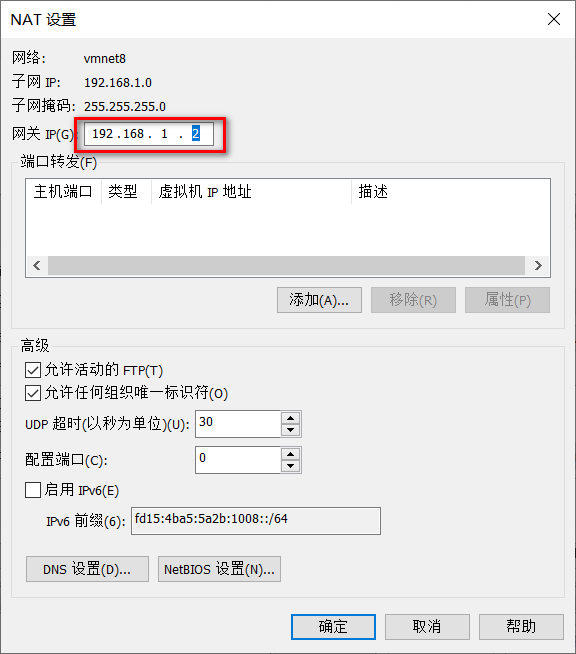
网络配置 在VMWare中设置NAT
设置静态ip
1
2
3
4
5
6
7
8
9
10
11
12
13
14
15
16
17
18
19
20
21
22
23
24
25
26
27
28
29
30
31
32
33
34
35
36
37
38
39
40
41
42
43
44
45
# ifcfg-ens33,具体什么文件可以通过ifconfig查看 vi /etc/sysconfig/network-scripts/ifcfg-ens33 TYPE=Ethernet PROXY_METHOD=none BROWSER_ONLY=no BOOTPROTO=static #设置静态ip DEFROUTE=yes IPV4_FAILURE_FATAL=no IPV6INIT=yes IPV6_AUTOCONF=yes IPV6_DEFROUTE=yes IPV6_FAILURE_FATAL=no IPV6_ADDR_GEN_MODE=stable-privacy NAME=ens33 UUID=fa11e783-2f96-489a-b904-98166afbd7fb DEVICE=ens33 ONBOOT=yes IPV6_PRIVACY=no # 增加以下内容 PREFIX=24 NM_CONTROLLED=no #网络配置文件进行配置 IPADDR=192.168.1.106 #设置ip地址 NETMASK=255.255.255.0 #子网掩码 GATEWAY=192.168.1.2 #网关地址,虚拟机nat中指定的网关 vi /etc/sysconfig/network # 增加以下内容 NETWORKING=yes GATEWAY=192.168.1.2 #对应网关 虚拟机nat中指定的网关 DNS1=8.8.8.8 DNS2=114.114.114.114 DNS3=223.6.6.6 DNS4=223.5.5.5 # 修改后重启网络服务 $ systemctl restart network # 测试 $ ping www.baidu.com # 如果重启后没有生效,可以尝试给网卡的网络配置文件重新申请一个UUID # 生成后将下面的UUID配置到ifcfg-ens33,重启网络服务 $ uuidgen af9d7267-df0f-468d-a7a5-657efd623829
添加主机信息 k8s-master-01 1 2 3 4 5 6 7 8 9 10 11 12 13 14 15 yum -y install lrzsz hostnamectl set-hostname k8s-master-01 cat >> /etc/sysconfig/network <<'EOF' hostname=k8s-master-01 EOF cat >> /etc/hosts <<'EOF' 192.168.1.106 k8s-master-01 192.168.1.107 k8s-master-02 192.168.1.108 k8s-master-03 192.168.1.109 k8s-node-01 192.168.1.200 k8s-master-lb EOF
k8s-master-02 1 2 3 4 5 6 7 8 9 10 11 12 13 14 15 yum -y install lrzsz hostnamectl set-hostname k8s-master-02 cat >> /etc/sysconfig/network <<'EOF' hostname=k8s-master-02 EOF cat >> /etc/hosts <<'EOF' 192.168.1.106 k8s-master-01 192.168.1.107 k8s-master-02 192.168.1.108 k8s-master-03 192.168.1.109 k8s-node-01 192.168.1.200 k8s-master-lb EOF
k8s-master-03 1 2 3 4 5 6 7 8 9 10 11 12 13 14 15 yum -y install lrzsz hostnamectl set-hostname k8s-master-03 cat >> /etc/sysconfig/network <<'EOF' hostname=k8s-master-03 EOF cat >> /etc/hosts <<'EOF' 192.168.1.106 k8s-master-01 192.168.1.107 k8s-master-02 192.168.1.108 k8s-master-03 192.168.1.109 k8s-node-01 192.168.1.200 k8s-master-lb EOF
k8s-node-01 1 2 3 4 5 6 7 8 9 10 11 12 13 14 15 yum -y install lrzsz hostnamectl set-hostname k8s-node-01 cat >> /etc/sysconfig/network <<'EOF' hostname=k8s-node-01 EOF cat >> /etc/hosts <<'EOF' 192.168.1.106 k8s-master-01 192.168.1.107 k8s-master-02 192.168.1.108 k8s-master-03 192.168.1.109 k8s-node-01 192.168.1.200 k8s-master-lb EOF
服务器初始化
centos7 centos8
1 2 3 4 5 6 7 8 9 10 11 12 13 14 15 16 17 18 19 20 21 22 23 24 25 26 27 28 29 30 31 32 33 34 35 36 37 38 39 40 41 42 43 44 45 46 47 48 49 50 51 52 53 54 55 56 57 58 59 60 61 62 63 64 65 66 67 68 69 70 71 72 73 74 75 76 77 78 79 80 81 82 83 84 85 86 87 88 89 90 91 92 93 94 95 96 97 98 99 100 101 102 103 104 105 106 107 108 109 110 111 112 113 114 115 116 117 118 119 120 121 122 123 124 125 126 127 128 129 130 131 132 133 134 135 136 137 138 139 140 141 142 143 144 145 146 147 148 149 150 151 152 153 154 155 156 157 158 159 160 161 162 163 164 165 166 167 168 169 170 171 172 173 174 175 176 177 178 179 180 181 182 183 184 185 186 187 188 189 190 191 192 193 194 195 196 197 198 199 200 201 202 203 204 205 206 207 208 209 210 211 212 213 214 215 216 217 218 219 220 221 222 223 224 225 226 227 228 229 230 231 232 233 234 235 236 237 238 239 240 241 242 243 244 245 246 247 248 249 250 251 252 253 254 255 256 257 258 259 260 261 262 263 264 265 266 267 268 269 270 271 272 273 274 275 276 277 278 279 280 281 282 283 284 285 286 287 288 289 290 # !/bin/bash # # centos init # cd `dirname $0` # 关闭selinux sed -i 's/SELINUX=enforcing/SELINUX=disabled/' /etc/sysconfig/selinux sed -i "s/SELINUX=enforcing/SELINUX=disabled/g" /etc/selinux/config setenforce 0 # 禁用NetworkManager # systemctl stop NetworkManager # systemctl disable NetworkManager # systemctl start NetworkManager # 所有节点关闭防火墙、selinux、dnsmasq、swap systemctl stop firewalld systemctl disable --now firewalld # systemctl disable --now dnsmasq # systemctl disable --now NetworkManager # 调整log 级别 # sed -i 's/\#LogLevel=info/LogLevel=notice/g' /etc/systemd/system.conf # systemctl daemon-reexec # 配置ssh sed -i -e "/GSSAPIAuthentication/s/yes/no/g" -e "/GSSAPICleanupCredentials/s/yes/no/g" -e"s/^#UseDNS\ no/UseDNS\ no/" -e"s/^#UseDNS\ yes/UseDNS\ no/" /etc/ssh/sshd_config echo -ne "ClientAliveInterval 60\nClientAliveCountMax 10" >> /etc/ssh/sshd_config cat >> /etc/ssh/ssh_config <<'EOF' Host * StrictHostKeyChecking no UserKnownHostsFile=/dev/null EOF systemctl restart sshd # 阿里源 mv /etc/yum.repos.d/CentOS-Base.repo /etc/yum.repos.d/CentOS-Base.repo.bak curl -o /etc/yum.repos.d/CentOS-Base.repo http://mirrors.aliyun.com/repo/Centos-7.repo # 阿里epel源 mv /etc/yum.repos.d/epel.repo /etc/yum.repos.d/epel.repo.bak mv /etc/yum.repos.d/epel-testing.repo /etc/yum.repos.d/epel-testing.repo.bak curl -o /etc/yum.repos.d/epel.repo http://mirrors.aliyun.com/repo/epel-7.repo # 安装软件 yum clean all yum update -y yum install -y yum-utils device-mapper-persistent-data iptables-services vim wget net-tools iperf3 telnet lvm2 tree screen tmux rsync lrzsz zip unzip xz ntpdate zlib sysstat hdparm htop iotop iftop dstat nmap mtr mlocate bind-utils ipmitool pciutils parted acpid man bash-completion* lsof bc ncdu psmisc jq ipvsadm ipset conntrack libseccomp systemctl start acpid && systemctl enable acpid systemctl stop firewalld && systemctl disable firewalld # iptables设置 iptables -F service iptables save # systemctl enable iptables service iptables stop systemctl disable iptables # ubuntu # ufw disable &> /dev/null chmod +x /etc/rc.d/rc.local # 时区 # timedatectl set-timezone Asia/Shanghai # 修改时区,设置ntp时间更新 mv -f /etc/localtime /etc/localtime.bak /bin/cp -rf /usr/share/zoneinfo/Asia/Shanghai /etc/localtime echo 'ZONE="CST"' > /etc/sysconfig/clock ntpdate cn.pool.ntp.org echo "* */1 * * * /usr/sbin/ntpdate cn.pool.ntp.org" >> /etc/crontab # ntpdate time2.aliyun.com # echo "* */1 * * * /usr/sbin/ntpdate time2.aliyun.com" >> /etc/crontabservice crond restart # custom cat >> /etc/bashrc <<'EOF' export PATH=/usr/local/bin:$PATH export TERM=xterm-256color export EDITOR=/usr/bin/vim # man page export LESS_TERMCAP_mb=$(printf '\e[01;31m') export LESS_TERMCAP_md=$(printf '\e[01;35m') export LESS_TERMCAP_me=$(printf '\e[0m') export LESS_TERMCAP_se=$(printf '\e[0m') export LESS_TERMCAP_so=$(printf '\e[1;31;46m') export LESS_TERMCAP_ue=$(printf '\e[0m') export LESS_TERMCAP_us=$(printf '\e[04;36m') # history tuneshopt -s histappend export HISTTIMEFORMAT="%F %T " export HISTCONTROL=ignoredups:erasedups export HISTSIZE=100000 export HISTFILESIZE=100000 export PROMPT_COMMAND="history -a" # PS1 export PS1="\[\e[36m\]\u\[\e[m\]\[\e[37m\]@\[\033[01;32m\]\h\[\033[00m\]:\[\033[01;34m\]\W\[\033[00m\]\\$ " EOF # 抑制systemd session的log echo 'if $programname == "systemd" and ($msg contains "Starting Session" or $msg contains "Started Session" or $msg contains "Created slice" or $msg contains "Starting user-" or $msg contains "Starting User Slice of" or $msg contains "Removed session" or $msg contains "Removed slice User Slice of" or $msg contains "Stopping User Slice of") then stop' > /etc/rsyslog.d/ignore-systemd-session-slice.conf systemctl restart rsyslog.service # vim cat >> /etc/vimrc <<'EOF' set ts=4 set paste set encoding=utf-8 set nocompatible syntax on EOF # 禁用ipv6 cat >> /etc/sysctl.d/99-sysctl.conf <<'EOF' # disable ipv6net.ipv6.conf.all.disable_ipv6 = 1 net.ipv6.conf.default.disable_ipv6 = 1 net.ipv6.conf.lo.disable_ipv6 = 1 EOF # 优化 cat >> /etc/sysctl.conf <<'EOF' sunrpc.tcp_slot_table_entries = 128 net.core.rmem_default = 4194304 net.core.wmem_default = 4194304 net.core.rmem_max = 4194304 net.core.wmem_max = 4194304 net.ipv4.tcp_rmem = 4096 1048576 4194304 net.ipv4.tcp_wmem = 4096 1048576 4194304 net.ipv4.tcp_timestamps = 0 net.ipv4.tcp_syncookies = 1 net.core.netdev_max_backlog = 300000 net.bridge.bridge-nf-call-iptables = 1 net.bridge.bridge-nf-call-ip6tables = 1 net.ipv4.ip_forward = 1 vm.swappiness = 0 EOF # echo 1 > /proc/sys/net/bridge/bridge-nf-call-iptables# echo 1 >/proc/sys/net/bridge/bridge-nf-call-ip6tablessysctl -p # ulimit 相关cat > /etc/security/limits.d/20-nproc.conf <<'EOF' # Default limit for number of user's processes to prevent # accidental fork bombs. # See rhbz #432903 for reasoning. # nproc root soft nproc unlimited root hard nproc unlimited * hard nproc 65535 * soft nproc 65535 # nofile * soft nofile 65535 * hard nofile 65535 EOF # ulimit和limits.conf只对登录用户有效,对systemd无效,需要增加如下systemd和user的ulimit # 修改systemd系统ulimit cat >> /etc/systemd/system.conf <<'EOF' DefaultLimitCORE=infinity DefaultLimitNOFILE=100000 DefaultLimitNPROC=100000 EOF # 修改systemd用户ulimit cat >> /etc/systemd/user.conf <<'EOF' DefaultLimitCORE=infinity DefaultLimitNOFILE=100000 DefaultLimitNPROC=100000 EOF # 关闭swap分区 swapoff -a sed -i 's/.*swap.*/#&/' /etc/fstab # 开启ipvs,不开启ipvs将会使用iptables,但是效率低,所以官网推荐需要开通ipvs内核 # 注意:在内核4.19版本nf_conntrack_ipv4已经改为nf_conntrack cat > /etc/sysconfig/modules/ipvs.modules <<EOF # !/bin/bash ipvs_modules="ip_vs ip_vs_lc ip_vs_wlc ip_vs_rr ip_vs_wrr ip_vs_lblc ip_vs_lblcr ip_vs_dh ip_vs_sh ip_vs_fo ip_vs_nq ip_vs_sed ip_vs_ftp nf_conntrack ip_vs_sh nf_conntrack_ipv4 ip_tables ip_set xt_set ipt_set ipt_rpfilter ipt_REJECT ipip" for kernel_module in \${ipvs_modules}; do /sbin/modinfo -F filename \${kernel_module} > /dev/null 2>&1 if [ $? -eq 0 ]; then /sbin/modprobe \${kernel_module} fi done EOF chmod 755 /etc/sysconfig/modules/ipvs.modules bash /etc/sysconfig/modules/ipvs.modules lsmod | grep -e ip_vs -e nf_conntrack # ################################################# # docker # # ################################################# rm -rf /etc/yum.repos.d/docker-ce.repo /etc/yum.repos.d/mirrors.aliyun.com_docker-ce_linux_centos_docker-ce.rep.repo # sudo yum-config-manager --add-repo https://download.docker.com/linux/centos/docker-ce.repo # 设置docker仓库 sudo yum-config-manager --add-repo https://mirrors.aliyun.com/docker-ce/linux/centos/docker-ce.repo sudo yum makecache fast # 安装docker-ce # docker-ce-18.06.2.ce yum install docker-ce docker-ce-cli containerd.io -y # start docker service sudo usermod -aG docker root # 加入开机启动并启动 sudo service docker start systemctl enable docker systemctl start docker # 测试运行并查看版本信息 docker run hello-world docker version # docker文件驱动改成 systemd,阿里加速镜像 sudo mkdir -p /etc/docker cat > /etc/docker/daemon.json <<EOF { "exec-opts": ["native.cgroupdriver=systemd"], "log-driver": "json-file", "log-opts": { "max-size": "100m" }, "storage-driver": "overlay2", "storage-opts": [ "overlay2.override_kernel_check=true" ], "registry-mirrors": ["https://n3jwp4vw.mirror.aliyuncs.com"] } EOF # 重启docker sudo mkdir -p /etc/systemd/system/docker.service.d sudo systemctl daemon-reload sudo systemctl restart docker # 查看docker配置信息 docker info docker info | grep Driver # install docker-compose curl -L https://get.daocloud.io/docker/compose/releases/download/1.29.2/docker-compose-`uname -s`-`uname -m` > /usr/local/bin/docker-compose chmod +x /usr/local/bin/docker-compose # ################################################# # k8s # # ################################################# cat > /etc/sysctl.d/k8s.conf << EOF net.bridge.bridge-nf-call-ip6tables = 1 net.bridge.bridge-nf-call-iptables = 1 EOF sysctl -p cat > /etc/yum.repos.d/kubernetes.repo <<EOF [kubernetes] name=Kubernetes baseurl=https://mirrors.aliyun.com/kubernetes/yum/repos/kubernetes-el7-x86_64/ enabled=1 gpgcheck=1 repo_gpgcheck=1 gpgkey=https://mirrors.aliyun.com/kubernetes/yum/doc/yum-key.gpg https://mirrors.aliyun.com/kubernetes/yum/doc/rpm-package-key.gpg EOF # yum install -y kubeadm kubelet kubectl yum install kubeadm-1.20.5 kubelet-1.20.5 kubectl-1.20.5 -y systemctl enable kubelet systemctl start kubelet # 配置kubelet使用国内pause镜像 # 配置kubelet的cgroups # 获取docker的cgroups # DOCKER_CGROUPS=$(docker info | grep ' Cgroup' | cut -d' ' -f3) # echo $DOCKER_CGROUPS # cat >/etc/sysconfig/kubelet<<EOF # KUBELET_EXTRA_ARGS="--cgroup-driver=$DOCKER_CGROUPS --pod-infra-container-image=registry.cn-hangzhou.aliyuncs.com/google_containers/pause-amd64:3.1" # EOF # 启动 # systemctl daemon-reload # systemctl enable kubelet && systemctl restart kubelet
1 2 3 4 5 6 7 8 9 10 11 12 13 14 15 16 17 18 19 20 21 22 23 24 25 26 27 28 29 30 31 32 33 34 35 36 37 38 39 40 41 42 43 44 45 46 47 48 49 50 51 52 53 54 55 56 57 58 59 60 61 62 63 64 65 66 67 68 69 70 71 72 73 74 75 76 77 78 79 80 81 82 83 84 85 86 87 88 89 90 91 92 93 94 95 96 97 98 99 100 101 102 103 104 105 106 107 108 109 110 111 112 # !/bin/bash cd `dirname $0` # 关闭selinux setenforce 0 sed -i '/SELINUX/s/enforcing/disabled/g' /etc/selinux/config # 关闭firewalld systemctl stop firewalld && systemctl disable firewalld # 建立用户并免密码sudo # useradd sysit # echo 'sysit@sysit.cn' | passwd sysit --stdin# echo 'sysit ALL=(ALL) NOPASSWD: ALL' >> /etc/sudoers# 配置ssh sed -i 's/#Port 22/Port 51668/g' /etc/ssh/sshd_config sed -i -e "/GSSAPIAuthentication/s/yes/no/g" -e "/GSSAPICleanupCredentials/s/yes/no/g" -e"s/^#UseDNS\ no/UseDNS\ no/" -e"s/^#UseDNS\ yes/UseDNS\ no/" /etc/ssh/sshd_config echo -ne "ClientAliveInterval 60\nClientAliveCountMax 10\n" >> /etc/ssh/sshd_config sed -i 's/#PermitRootLogin yes/PermitRootLogin no/' /etc/ssh/sshd_config # 系统升级 & 安装基础软件. # 阿里源 mv /etc/yum.repos.d/CentOS-Base.repo /etc/yum.repos.d/CentOS-Base.repo.ori curl -o /etc/yum.repos.d/CentOS-Base.repo http://mirrors.aliyun.com/repo/Centos-8.repo # 阿里epel源 mv /etc/yum.repos.d/epel.repo /etc/yum.repos.d/epel.repo.backup > /dev/null 2>&1 mv /etc/yum.repos.d/epel-testing.repo /etc/yum.repos.d/epel-testing.repo.backup > /dev/null 2>&1 curl -o /etc/yum.repos.d/epel.repo http://mirrors.aliyun.com/repo/epel-8.repo dnf clean all && dnf makecache dnf -y upgrade dnf install -y vim wget net-tools ncurses-devel rsync lrzsz zip unzip xz p7zip ntpdate gcc zlib sysstat bash-completion epel-release dnf install smartmontools hdparm htop iotop dstat nmap mtr mlocate bind-utils pciutils sar parted OpenIPMI OpenIPMI-devel OpenIPMI-tools OpenIPMI-libs man # chrony&timezone dnf -y install chrony rm -f /etc/localtime ln -s /usr/share/zoneinfo/Asia/Shanghai /etc/localtime systemctl enable chronyd systemctl restart chronyd chronyc add server cn.ntp.org.cn # disable Ctrl+Alt+Delsystemctl mask ctrl-alt-del.target systemctl daemon-reload # history mkdir /usr/share/.usermonitor/ && touch /usr/share/.usermonitor/usermonitor.log && chmod 002 /usr/share/.usermonitor/usermonitor.log cat >> /etc/profile << 'EOF' export HISTORY_FILE=/usr/share/.usermonitor/usermonitor.log export PROMPT_COMMAND='{ echo "time="$(date "+%Y-%m-%dT%H:%M:%S")"#user="$(who am i |awk "{print \$1}")"#ip="$(who am i | awk "{print \$NF}" | grep -oP "[\d.]+")"#command="$(history 1 | { read x cmd; echo "$cmd"; });} >> $HISTORY_FILE' shopt -s histappend EOF cat >> /etc/sysctl.conf << EOF net.ipv4.ip_forward = 1 # net.core.somaxconn = 262144 net.core.netdev_max_backlog = 262144 net.core.wmem_default = 8388608 net.core.rmem_default = 8388608 net.core.rmem_max = 16777216 net.core.wmem_max = 16777216 net.ipv4.route.gc_timeout = 20 net.ipv4.ip_local_port_range = 1025 65535 net.ipv4.tcp_retries2 = 5 net.ipv4.tcp_fin_timeout = 30 net.ipv4.tcp_syn_retries = 1 net.ipv4.tcp_synack_retries = 1 net.ipv4.tcp_timestamps = 0 net.ipv4.tcp_tw_recycle = 0 net.ipv4.tcp_tw_reuse = 1 net.ipv4.tcp_keepalive_time = 120 net.ipv4.tcp_keepalive_probes = 3 net.ipv4.tcp_keepalive_intvl = 15 net.ipv4.tcp_max_tw_buckets = 60000 net.ipv4.tcp_max_orphans = 3276800 net.ipv4.tcp_max_syn_backlog = 262144 net.ipv4.tcp_wmem = 8192 131072 16777216 net.ipv4.tcp_rmem = 32768 131072 16777216 net.ipv4.tcp_mem = 94500000 915000000 927000000 vm.swappiness = 10 EOF /usr/sbin/sysctl -p # ulimit 相关cat > /etc/security/limits.conf <<'EOF' # Default limit for number of user's processes to prevent # accidental fork bombs. # See rhbz #432903 for reasoning. # nproc * soft nproc 65535 * hard nproc 65535 # nofile * soft nofile 65535 * hard nofile 65535 EOF # ulimit和limits.conf只对登录用户有效,对systemd无效,需要增加如下systemd和user的ulimit # 修改systemd系统ulimit cat >> /etc/systemd/system.conf <<'EOF' DefaultLimitCORE=infinity DefaultLimitNOFILE=100000 DefaultLimitNPROC=100000 EOF # 修改systemd用户ulimit cat >> /etc/systemd/user.conf <<'EOF' DefaultLimitCORE=infinity DefaultLimitNOFILE=100000 DefaultLimitNPROC=100000 EOF systemctl daemon-reload
配置免密 1 2 3 4 cd /root ssh-keygen -t rsa # 一路回车 for i in k8s-master-01 k8s-master-02 k8s-master-03 k8s-node-01;do ssh-copy-id -i .ssh/id_rsa.pub $i;done
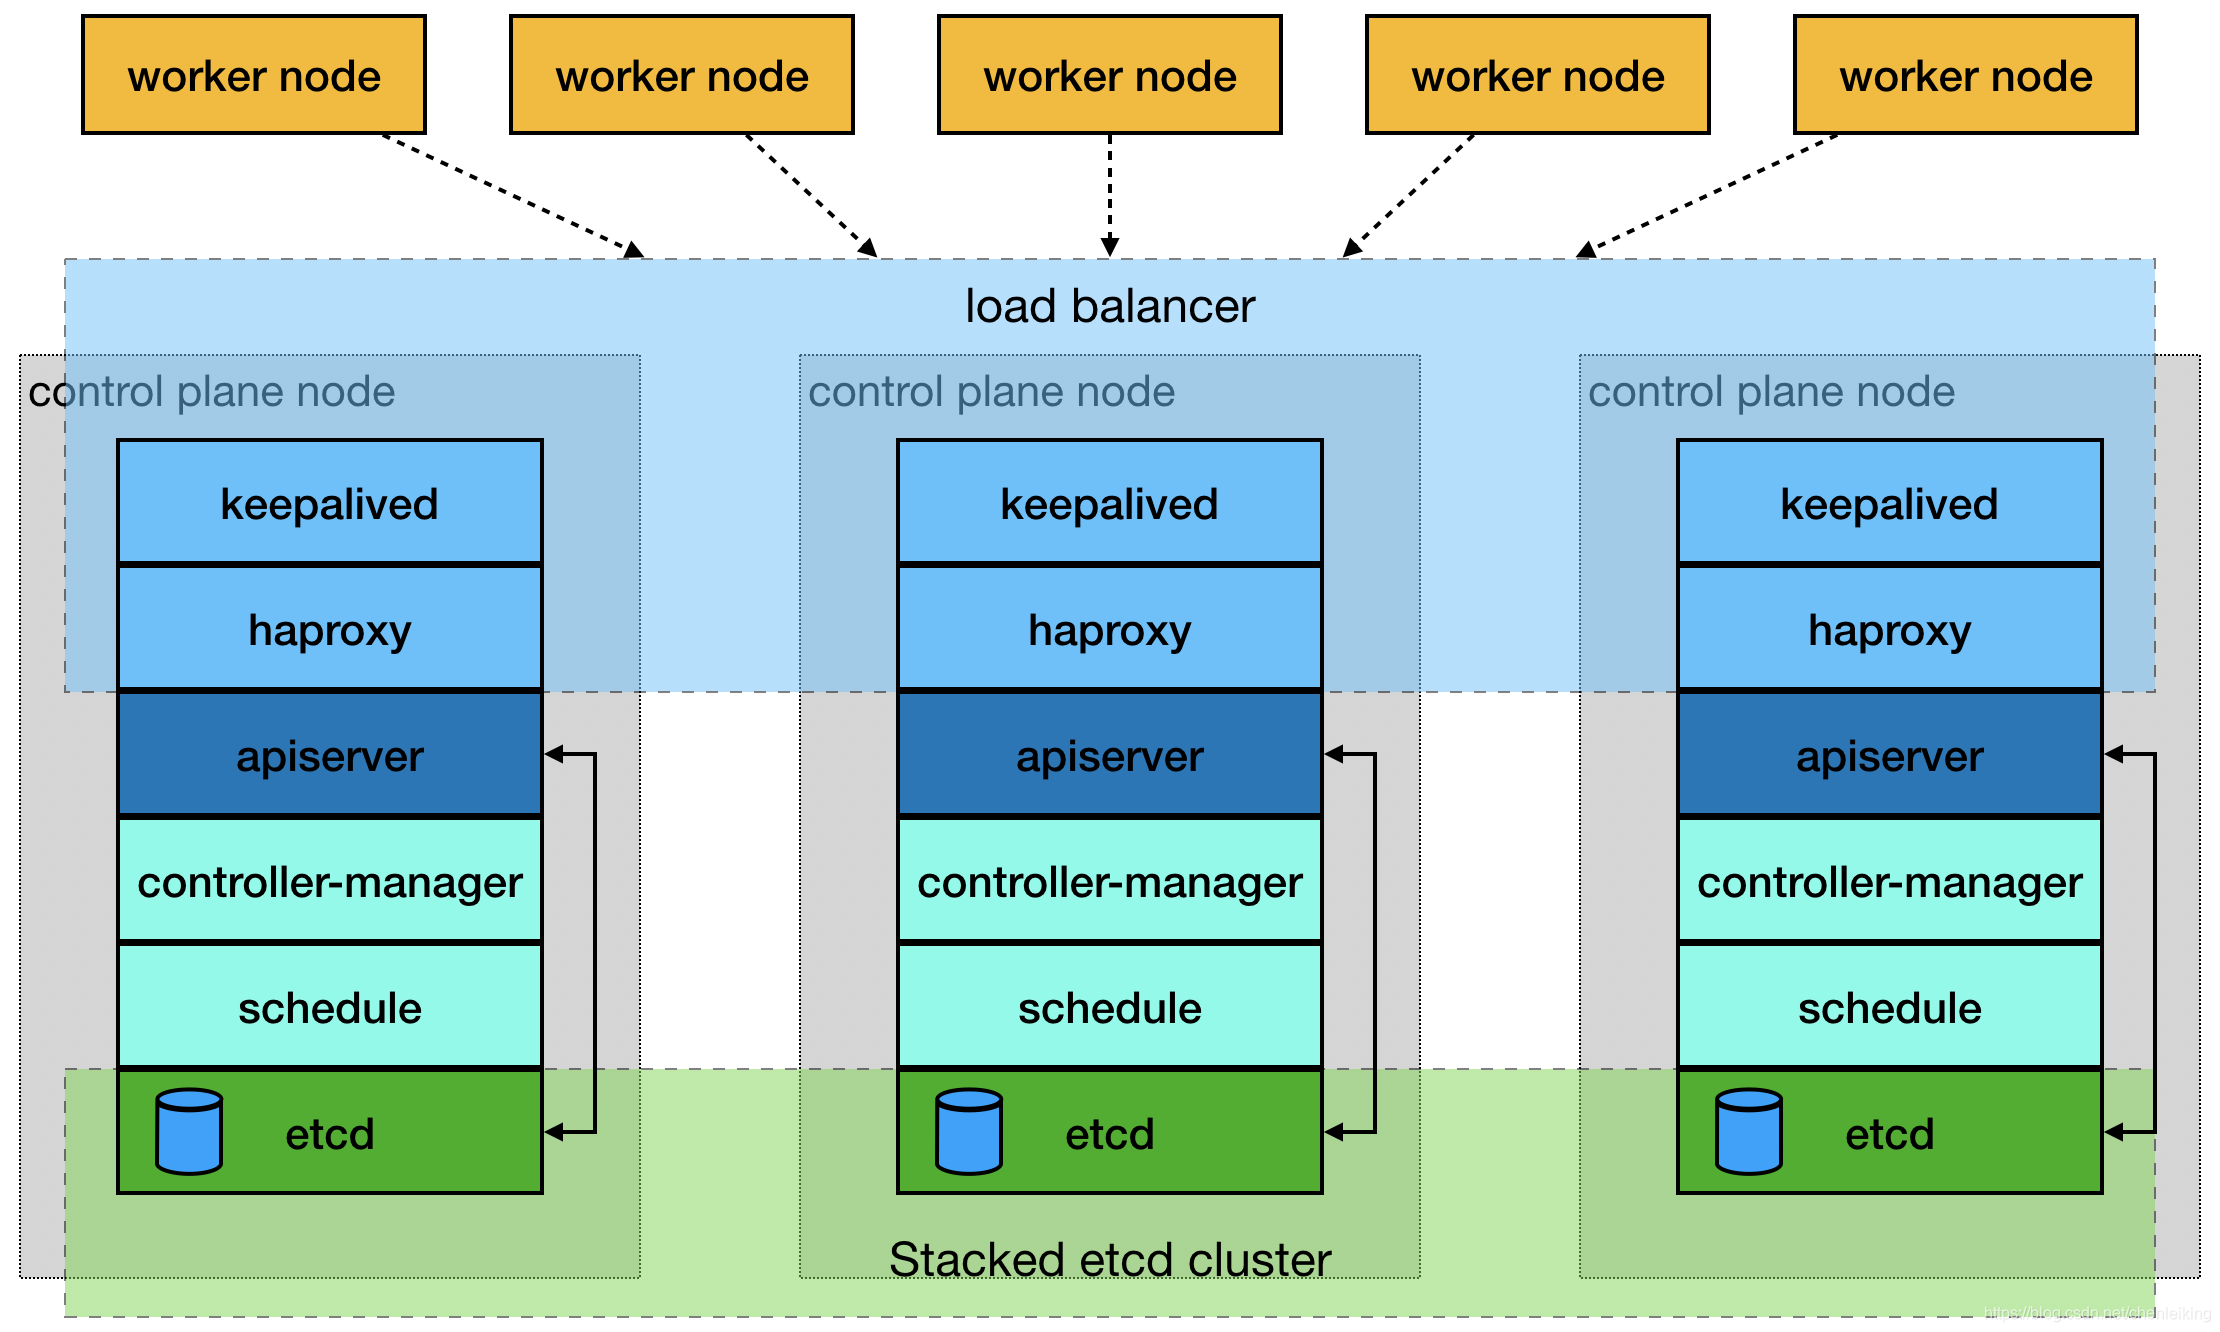
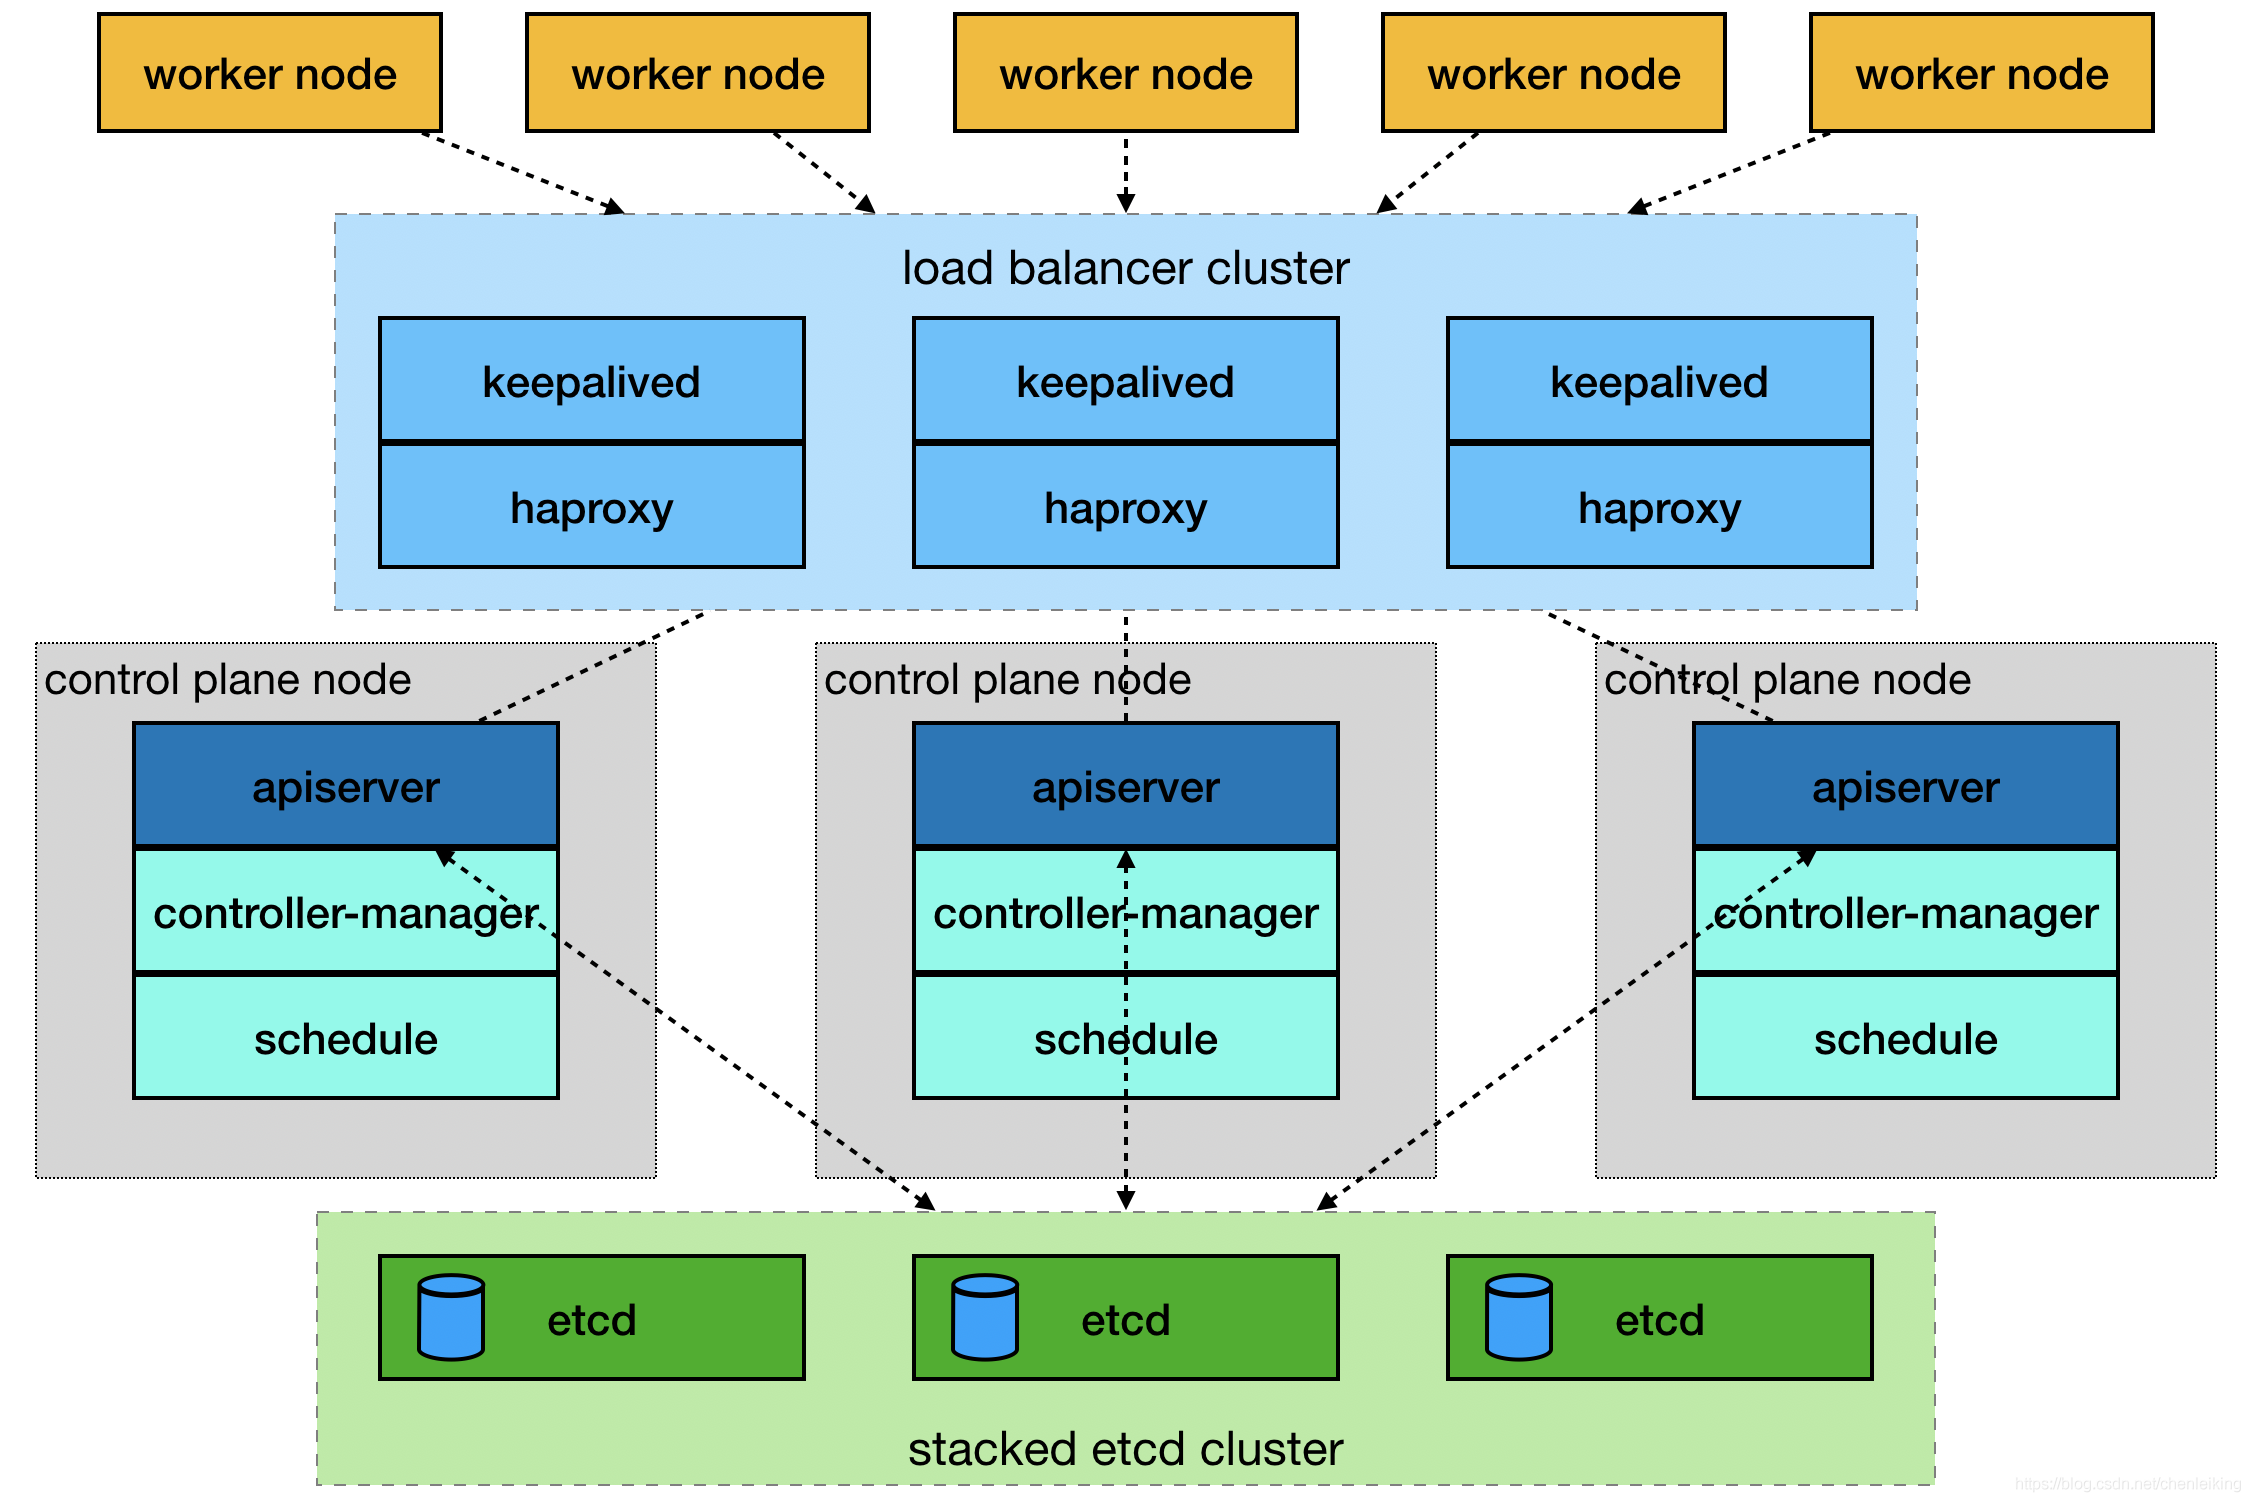
配置代理 以下使用haproxy来搭建
haproxy
如下操作在节点master-01,master-02,master-03操作
1 2 3 4 5 6 7 8 9 10 11 12 13 14 15 16 17 18 19 20 21 22 23 24 25 26 27 28 29 30 31 32 33 34 35 36 37 38 39 40 41 42 43 44 45 46 47 48 49 50 51 52 53 54 55 56 57 58 59 60 61 62 63 64 65 # 拉取haproxy镜像 docker pull haproxy:2.0.13-alpine mkdir /etc/haproxy cat >/etc/haproxy/haproxy.cfg<<EOF global log 127.0.0.1 local0 err maxconn 50000 #每个进程的最大连接数 uid 99 gid 99 daemon #以后台进程运行 nbproc 1 #进程数,该值可以设置小于或等于cpu核心数 pidfile haproxy.pid defaults mode http #设置http(七层模式),也可设置为tcp(四层模式),另外还有一个Health健康监测模式。对mysql进行负载均衡的话,这里记得修改为tcp log 127.0.0.1 local0 err maxconn 50000 retries 3 timeout connect 5s timeout client 30s timeout server 30s timeout check 2s listen admin_stats #配置haproxy管理页面 mode http bind 0.0.0.0:1080 log 127.0.0.1 local0 err stats refresh 30s stats uri /haproxy-status stats realm Haproxy\ Statistics stats auth admin:admin stats hide-version stats admin if TRUE # 4443端口,因为haproxy是和k8s apiserver是部署在同一台服务器上,都用6443会冲突。 frontend k8s-https #配置前端访问端口 bind 0.0.0.0:4443 #通过该端口进行负载均衡 mode tcp # maxconn 50000 default_backend k8s-https #指定后端服务器 # 端口和apiserver的端口一致 backend k8s-https mode tcp balance roundrobin # 建议加上check,否则后台服务器A宕机了,负载均衡还会把请求发送到该宕机服务器上,inter 2000指check检测时间为2000毫秒,rise 3检测3次均正常则表示后天服务器正常,fall 3检测3次失败,则会把该后天服务器标志宕机,不再玩该后台服务器发送请求,weight 1指权重,取消weight改为backup,则是所有后台服务器宕机后才会启用该backup后台服务器 server k8s-master-01 192.168.1.106:6443 weight 1 maxconn 1000 check inter 2000 rise 2 fall 3 server k8s-master-02 192.168.1.107:6443 weight 1 maxconn 1000 check inter 2000 rise 2 fall 3 server k8s-master-03 192.168.1.108:6443 weight 1 maxconn 1000 check inter 2000 rise 2 fall 3 EOF # 启动haproxy docker run -d --name my-haproxy \ -v /etc/haproxy:/usr/local/etc/haproxy:ro \ -p 4443:4443 \ -p 1080:1080 \ --restart always \ haproxy:2.0.13-alpine # 查看日志 docker logs my-haproxy docker rm -f my-haproxy # 浏览器查看状态 # 账号密码,haproxy.cfg中定义 admin:admin http://192.168.1.106:1080/haproxy-status http://192.168.1.107:1080/haproxy-status http://192.168.1.108:1080/haproxy-status
nginx
如下操作在节点master-01,master-02,master-03操作
1 2 3 4 5 6 7 8 9 10 11 12 13 14 15 16 17 18 19 20 21 22 23 24 25 26 27 28 29 30 31 32 33 34 35 36 37 38 39 40 41 42 43 44 45 46 47 48 49 50 51 52 53 54 55 56 57 58 59 60 61 62 63 64 docker pull nginx mkdir /etc/nginx cat >/etc/nginx/nginx.conf<<EOF user nginx; worker_processes 1; error_log /var/log/nginx/error.log warn; pid /var/run/nginx.pid; events { worker_connections 1024; } http { include /etc/nginx/mime.types; default_type application/octet-stream; log_format main '$remote_addr - $remote_user [$time_local] "$request" ' '$status $body_bytes_sent "$http_referer" ' '"$http_user_agent" "$http_x_forwarded_for"'; access_log /var/log/nginx/access.log main; sendfile on; #tcp_nopush on; keepalive_timeout 65; #gzip on; include /etc/nginx/conf.d/*.conf; } stream { log_format main '$remote_addr $upstream_addr - [$time_local] $status $upstream_bytes_sent'; access_log /var/log/nginx/k8s-access.log main; upstream k8s-apiserver { #轮询的加强版 server 192.168.1.106:6443 weight=1 max_fails=3 fail_timeout=20s; server 192.168.1.107:6443 weight=2 max_fails=3 fail_timeout=20s; server 192.168.1.108:6443 weight=3 max_fails=3 fail_timeout=20s; } #ip_hash #upstream k8s-apiserver { # ip_hash; # server 192.168.1.106:6443 weight=1 max_fails=3 fail_timeout=20s; # server 192.168.1.107:6443 weight=2 max_fails=3 fail_timeout=20s; # server 192.168.1.108:6443 weight=3 max_fails=3 fail_timeout=20s; #} server { listen 4443; proxy_pass k8s-apiserver; } } EOF docker run -d --name my-nginx \ -p 4443:4443 \ -v /etc/nginx/nginx.conf:/etc/nginx/nginx.conf \ --restart always \ nginx
配置keepalived
如下操作在节点master-01,master-02操作
k8s-master-01 1 2 3 4 5 6 7 8 9 10 11 12 13 14 15 16 17 18 19 20 21 22 23 24 25 26 27 28 29 30 31 32 33 34 35 36 37 38 39 40 41 42 43 44 45 46 47 48 49 50 51 52 mkdir /etc/keepalived cat > /etc/keepalived/keepalived.conf <<EOF ! Configuration File for keepalived global_defs { router_id LVS_DEVEL script_user root enable_script_security } vrrp_script check_apiserver { script '/etc/keepalived/check_apiserver.sh' interval 5 weight -5 Rise = 2 Fall = 5 } vrrp_script check_haproxy { script '/etc/keepalived/check_haproxy.sh' interval 5 weight -5 Rise = 2 Fall = 5 } # vrrp_script check_nginx { # script "/etc/keepalived/check_nginx.sh" # interval 5 # weight -5 # Rise = 2 # Fall = 5 # } vrrp_instance VI_1 { state MASTER interface ens33 #mcast_src_ip 192.168.1.106 virtual_router_id 51 priority 101 advert_int 2 authentication { auth_type PASS auth_pass K8SHA_KA_AUTH } #可以指定多个 virtual_ipaddress { 192.168.1.200 #192.168.1.201 } track_script { check_apiserver check_haproxy # check_nginx } } EOF
k8s-master-02 1 2 3 4 5 6 7 8 9 10 11 12 13 14 15 16 17 18 19 20 21 22 23 24 25 26 27 28 29 30 31 32 33 34 35 36 37 38 39 40 41 42 43 44 45 46 47 48 49 50 51 52 mkdir /etc/keepalived cat > /etc/keepalived/keepalived.conf <<EOF ! Configuration File for keepalived global_defs { router_id LVS_DEVEL script_user root enable_script_security } vrrp_script check_apiserver { script '/etc/keepalived/check_apiserver.sh' interval 5 weight -5 Rise = 2 Fall = 5 } vrrp_script check_haproxy { script '/etc/keepalived/check_haproxy.sh' interval 5 weight -5 Rise = 2 Fall = 5 } # vrrp_script check_nginx { # script "/etc/keepalived/check_nginx.sh" # interval 5 # weight -5 # Rise = 2 # Fall = 5 # } vrrp_instance VI_1 { state BACKUP interface ens33 #mcast_src_ip 192.168.1.107 virtual_router_id 51 priority 100 advert_int 2 authentication { auth_type PASS auth_pass K8SHA_KA_AUTH } #可以指定多个 virtual_ipaddress { 192.168.1.200 #192.168.1.201 } track_script { check_apiserver check_haproxy # check_nginx } } EOF
k8s-master-03 1 2 3 4 5 6 7 8 9 10 11 12 13 14 15 16 17 18 19 20 21 22 23 24 25 26 27 28 29 30 31 32 33 34 35 36 37 38 39 40 41 42 43 44 45 46 47 48 49 50 51 52 53 mkdir /etc/keepalived cat > /etc/keepalived/keepalived.conf <<EOF ! Configuration File for keepalived global_defs { router_id LVS_DEVEL script_user root enable_script_security } vrrp_script check_apiserver { script '/etc/keepalived/check_apiserver.sh' interval 5 weight -5 Rise = 2 Fall = 5 } vrrp_script check_haproxy { script '/etc/keepalived/check_haproxy.sh' interval 5 weight -5 Rise = 2 Fall = 5 } # vrrp_script check_nginx { # script "/etc/keepalived/check_nginx.sh" # interval 5 # weight -5 # Rise = 2 # Fall = 5 # } vrrp_instance VI_1 { state BACKUP interface ens33 #mcast_src_ip 192.168.1.108 virtual_router_id 51 priority 100 advert_int 2 authentication { auth_type PASS auth_pass K8SHA_KA_AUTH } #可以指定多个 virtual_ipaddress { 192.168.1.200 #192.168.1.201 } track_script { check_apiserver check_haproxy # check_nginx } } EOF
注意上述的健康检查是关闭的,集群建立完成后再开启:
1 2 3 4 5 # track_script { # check_apiserver # check_haproxy # check_nginx # }
check_apiserver.sh
1 2 3 4 5 6 7 8 cat > /etc/keepalived/check_apiserver.sh <<EOF # !/bin/bash if [[ $(netstat -nlp | grep 6443) ]]; then exit 0; else exit 1; fi EOF chmod +x /etc/keepalived/check_apiserver.sh
check_haproxy.sh
1 2 3 4 5 6 7 8 cat > /etc/keepalived/check_haproxy.sh <<EOF # !/bin/bash if [[ $(netstat -nlp | grep 4443) ]]; then exit 0; else exit 1; fi EOF chmod +x /etc/keepalived/check_haproxy.sh
check_nginx.sh
1 2 3 4 5 6 7 8 9 10 11 12 cat > /etc/keepalived/check_nginx.sh <<EOF # !/bin/bash count=$(ps -ef |grep nginx |egrep -cv "grep|$$") if [ "$count" -eq 0 ];then exit 1 else exit 0 fi EOF chmod +x /etc/keepalived/check_nginx.sh
启动keepalived
1 2 3 4 5 6 7 8 9 10 11 12 13 14 15 16 17 18 19 20 21 22 23 24 25 26 27 28 29 30 31 32 33 34 35 # 拉取keepalived镜像 docker pull osixia/keepalived:2.0.20 # 启动keepalived # ens33为本次实验192.168.0.0/24网段的所在网卡 docker run --net=host --cap-add=NET_ADMIN --cap-add=NET_BROADCAST --cap-add=NET_RAW \ -e KEEPALIVED_INTERFACE=ens33 \ -e KEEPALIVED_VIRTUAL_IPS="#PYTHON2BASH:['192.168.1.200']" \ -e KEEPALIVED_UNICAST_PEERS="#PYTHON2BASH:['192.168.1.106','192.168.1.107','192.168.1.108']" \ -e KEEPALIVED_PASSWORD=hello \ -v /etc/keepalived/keepalived.conf:/container/service/keepalived/assets/keepalived.conf \ -v /etc/keepalived/check_apiserver.sh:/etc/keepalived/check_apiserver.sh \ -v /etc/keepalived/check_haproxy.sh:/etc/keepalived/check_haproxy.sh \ --name k8s-keepalived \ --restart always \ -d osixia/keepalived:2.0.20 \ --copy-service # 查看日志 # 会看到两个成为backup 一个成为master docker logs k8s-keepalived # 查看虚拟ip ip addr # 此时会配置 192.168.1.200 到其中一台机器 # ping测试 ping -c4 192.168.1.200 # 如果失败后清理后,重新实验 # docker rm -f k8s-keepalived # ip a del 192.168.1.200/32 dev ens33 # 暂停keepalived master节点haproxy docker stop $(docker ps -a | grep haproxy)
配置master k8s-master-01 1 2 3 4 5 6 7 8 9 10 11 12 13 14 15 16 17 18 19 20 21 22 23 24 25 26 27 28 29 30 31 32 33 34 35 36 37 38 39 40 41 42 43 44 45 46 47 48 49 50 51 52 53 54 55 56 57 58 59 60 61 62 63 64 65 66 67 68 69 70 71 72 73 74 75 76 77 78 79 80 81 82 83 84 85 86 87 88 89 90 91 92 93 94 95 96 97 98 99 100 101 102 103 104 105 106 107 108 109 110 111 112 113 114 115 116 117 118 119 120 121 122 # centos下使用 ipvs 模式问题已解决 # 参考 https://github.com/kubernetes/kubernetes/issues/65461 # kubeadm config print init-defaults # 生成配置文件 cd /etc/kubernetes cat > kubeadm-master.config<<EOF apiVersion: kubeadm.k8s.io/v1beta2 bootstrapTokens: - groups: - system:bootstrappers:kubeadm:default-node-token token: 7t2weq.bjbawausm0jaxury ttl: 24h0m0s usages: - signing - authentication kind: InitConfiguration localAPIEndpoint: advertiseAddress: 192.168.1.106 bindPort: 6443 nodeRegistration: criSocket: /var/run/dockershim.sock name: k8s-master-01 taints: - effect: NoSchedule key: node-role.kubernetes.io/master --- apiServer: certSANs: - 192.168.1.106 - 192.168.1.107 - 192.168.1.108 - 192.168.1.200 - k8s-master-01 - k8s-master-02 - k8s-master-03 - k8s-master-lb timeoutForControlPlane: 4m0s apiVersion: kubeadm.k8s.io/v1beta2 certificatesDir: /etc/kubernetes/pki clusterName: kubernetes controlPlaneEndpoint: 192.168.1.200:4443 controllerManager: {} dns: type: CoreDNS # stacked etcd etcd: local: dataDir: /var/lib/etcd # external etcd # etcd: # external: # endpoints: # - https://192.168.1.106:2379 # - https://192.168.1.107:2379 # - https://192.168.1.108:2379 # caFile: /etc/kubernetes/pki/ca.pem #certFile: /etc/kubernetes/pki/etcd.pem #keyFile: /etc/kubernetes/pki/etcd-key.pem imageRepository: registry.cn-hangzhou.aliyuncs.com/google_containers kind: ClusterConfiguration kubernetesVersion: v1.20.5 networking: dnsDomain: cluster.local podSubnet: 172.168.0.0/16 serviceSubnet: 10.96.0.0/12 scheduler: {} --- apiVersion: kubeproxy.config.k8s.io/v1alpha1 kind: KubeProxyConfiguration mode: ipvs # iptables: # masqueradeAll: false # masqueradeBit: null # minSyncPeriod: 0s # syncPeriod: 0s ipvs: # 如果node提供lvs服务,排除以下CIDR 不受kube-proxy管理,避免刷掉lvs规则 excludeCIDRs: [1.1.1.0/24,2.2.2.0/24] minSyncPeriod: 1s scheduler: "wrr" syncPeriod: 10s # --- # apiVersion: kubelet.config.k8s.io/v1beta1 # kind: KubeletConfiguration # cgroupDriver: systemd EOF # 注意:如果不是高可用集群,192.168.1.200:8443改为k8s-master-01的地址,8443改为apiserver的端口,默认是6443,注意更改v1.20.0为自己服务器kubeadm的版本:kubeadm version # 提前拉取镜像 # 如果执行失败 可以多次执行 kubeadm config images pull --config kubeadm-master.config docker images systemctl enable --now kubelet # 初始化 # 注意保存返回的 join 命令 kubeadm init --config kubeadm-master.config --upload-certs # 初始化失败时使用 # kubeadm reset # 将ca相关文件传至其他master节点 USER=root # customizable CONTROL_PLANE_IPS=(k8s-master-02 k8s-master-03) for host in ${CONTROL_PLANE_IPS[@]}; do scp /etc/kubernetes/pki/ca.crt "${USER}"@$host:/etc/kubernetes/pki/ca.crt scp /etc/kubernetes/pki/ca.key "${USER}"@$host:/etc/kubernetes/pki/ca.key scp /etc/kubernetes/pki/sa.key "${USER}"@$host:/etc/kubernetes/pki/sa.key scp /etc/kubernetes/pki/sa.pub "${USER}"@$host:/etc/kubernetes/pki/sa.pub scp /etc/kubernetes/pki/front-proxy-ca.crt "${USER}"@$host:/etc/kubernetes/pki/front-proxy-ca.crt scp /etc/kubernetes/pki/front-proxy-ca.key "${USER}"@$host:/etc/kubernetes/pki/front-proxy-ca.key ssh "${USER}"@$host "mkdir -p /etc/kubernetes/pki/etcd" scp /etc/kubernetes/pki/etcd/ca.crt "${USER}"@$host:/etc/kubernetes/pki/etcd/ca.crt scp /etc/kubernetes/pki/etcd/ca.key "${USER}"@$host:/etc/kubernetes/pki/etcd/ca.key scp /etc/kubernetes/admin.conf "${USER}"@$host:/etc/kubernetes/admin.conf done
记住初始化成功的信息
1 2 3 4 5 6 7 8 9 10 11 12 13 14 15 16 17 18 19 20 21 22 23 24 25 26 27 28 29 30 Your Kubernetes control-plane has initialized successfully! To start using your cluster, you need to run the following as a regular user: mkdir -p $HOME/.kube sudo cp -i /etc/kubernetes/admin.conf $HOME/.kube/config sudo chown $(id -u):$(id -g) $HOME/.kube/config Alternatively, if you are the root user, you can run: export KUBECONFIG=/etc/kubernetes/admin.conf You should now deploy a pod network to the cluster. Run "kubectl apply -f [podnetwork].yaml" with one of the options listed at: https://kubernetes.io/docs/concepts/cluster-administration/addons/ You can now join any number of the control-plane node running the following command on each as root: kubeadm join 192.168.1.200:8443 --token 7t2weq.bjbawausm0jaxury \ --discovery-token-ca-cert-hash sha256:c6de1ceec2d3c52d655af62d4299f736b7a112eae7b35e35dc80c592544b2c8e \ --control-plane --certificate-key 64bd9859171a64f280955404ba5e8399cc728441747015bf55a84e03bdbba16c Please note that the certificate-key gives access to cluster sensitive data, keep it secret! As a safeguard, uploaded-certs will be deleted in two hours; If necessary, you can use "kubeadm init phase upload-certs --upload-certs" to reload certs afterward. Then you can join any number of worker nodes by running the following on each as root: kubeadm join 192.168.1.200:8443 --token 7t2weq.bjbawausm0jaxury \ --discovery-token-ca-cert-hash sha256:c6de1ceec2d3c52d655af62d4299f736b7a112eae7b35e35dc80c592544b2c8e
配置使用kubectl
1 2 3 4 5 6 7 8 9 10 11 12 13 14 15 rm -rf $HOME/.kube mkdir -p $HOME/.kube sudo cp -i /etc/kubernetes/admin.conf $HOME/.kube/config sudo chown $(id -u):$(id -g) $HOME/.kube/config cat <<EOF >> /root/.bashrc export KUBECONFIG=$HOME/.kube/config EOF source /root/.bashrc # 查看node节点 kubectl get nodes kubectl get pods -n kube-system # 只有网络插件也安装配置完成之后,才能会显示为ready状态
k8s-master-02 1 2 3 4 5 6 7 8 9 10 11 12 13 14 15 16 17 18 19 20 21 22 23 24 25 26 27 28 29 30 31 32 33 34 35 36 37 38 39 40 41 42 43 44 45 46 47 48 49 50 51 52 53 54 55 56 57 58 59 60 61 62 63 64 65 66 67 68 69 70 71 72 73 74 75 76 77 78 79 80 81 82 83 84 85 86 87 88 89 90 91 92 93 94 95 96 97 98 99 100 # centos下使用 ipvs 模式问题已解决 # 参考 https://github.com/kubernetes/kubernetes/issues/65461 cd /etc/kubernetes # 生成配置文件 cat > kubeadm-master.config<<EOF apiVersion: kubeadm.k8s.io/v1beta2 bootstrapTokens: - groups: - system:bootstrappers:kubeadm:default-node-token token: 7t2weq.bjbawausm0jaxury ttl: 24h0m0s usages: - signing - authentication kind: InitConfiguration localAPIEndpoint: advertiseAddress: 192.168.1.106 bindPort: 6443 nodeRegistration: criSocket: /var/run/dockershim.sock name: k8s-master-01 taints: - effect: NoSchedule key: node-role.kubernetes.io/master --- apiServer: certSANs: - 192.168.1.106 - 192.168.1.107 - 192.168.1.108 - 192.168.1.200 - k8s-master-01 - k8s-master-02 - k8s-master-03 - k8s-master-lb timeoutForControlPlane: 4m0s apiVersion: kubeadm.k8s.io/v1beta2 certificatesDir: /etc/kubernetes/pki clusterName: kubernetes controlPlaneEndpoint: 192.168.1.200:4443 controllerManager: {} dns: type: CoreDNS # stacked etcd etcd: local: dataDir: /var/lib/etcd # external etcd # etcd: # external: # endpoints: # - https://192.168.1.106:2379 # - https://192.168.1.107:2379 # - https://192.168.1.108:2379 # caFile: /etc/kubernetes/pki/ca.pem #certFile: /etc/kubernetes/pki/etcd.pem #keyFile: /etc/kubernetes/pki/etcd-key.pem imageRepository: registry.cn-hangzhou.aliyuncs.com/google_containers kind: ClusterConfiguration kubernetesVersion: v1.20.5 networking: dnsDomain: cluster.local podSubnet: 172.168.0.0/16 serviceSubnet: 10.96.0.0/12 scheduler: {} --- apiVersion: kubeproxy.config.k8s.io/v1alpha1 kind: KubeProxyConfiguration mode: ipvs # iptables: # masqueradeAll: false # masqueradeBit: null # minSyncPeriod: 0s # syncPeriod: 0s ipvs: # 如果node提供lvs服务,排除以下CIDR 不受kube-proxy管理,避免刷掉lvs规则 excludeCIDRs: [1.1.1.0/24,2.2.2.0/24] minSyncPeriod: 1s scheduler: "wrr" syncPeriod: 10s # --- # apiVersion: kubelet.config.k8s.io/v1beta1 # kind: KubeletConfiguration # cgroupDriver: systemd EOF # 注意:如果不是高可用集群,192.168.1.200:8443改为k8s-master-01的地址,8443改为apiserver的端口,默认是6443,注意更改v1.20.5为自己服务器kubeadm的版本:kubeadm version # 提前拉取镜像 # 如果执行失败 可以多次执行 kubeadm config images pull --config kubeadm-master.config docker images systemctl enable --now kubelet kubeadm join 192.168.1.200:8443 --token 7t2weq.bjbawausm0jaxury \ --discovery-token-ca-cert-hash sha256:2bdcb627482946406cb5a7019d9edcec3ffb5623d903da535d4bd586f57d5643 \ --control-plane --certificate-key 1d71cd7bfa911bf64d28560b7b08513173b754f8a9a377cff8a51cfe443e8744
配置使用kubectl
1 2 3 4 5 6 7 8 9 10 11 12 13 14 rm -rf $HOME/.kube mkdir -p $HOME/.kube sudo cp -i /etc/kubernetes/admin.conf $HOME/.kube/config sudo chown $(id -u):$(id -g) $HOME/.kube/config cat <<EOF >> /root/.bashrc export KUBECONFIG=$HOME/.kube/config EOF source /root/.bashrc # 查看node节点 kubectl get nodes # 只有网络插件也安装配置完成之后,才能会显示为ready状态
k8s-master-03 1 2 3 4 5 6 7 8 9 10 11 12 13 14 15 16 17 18 19 20 21 22 23 24 25 26 27 28 29 30 31 32 33 34 35 36 37 38 39 40 41 42 43 44 45 46 47 48 49 50 51 52 53 54 55 56 57 58 59 60 61 62 63 64 65 66 67 68 69 70 71 72 73 74 75 76 77 78 79 80 81 82 83 84 85 86 87 88 89 90 91 92 93 94 95 96 97 98 99 100 # centos下使用 ipvs 模式问题已解决 # 参考 https://github.com/kubernetes/kubernetes/issues/65461 cd /etc/kubernetes # 生成配置文件 cat > kubeadm-master.config<<EOF apiVersion: kubeadm.k8s.io/v1beta2 bootstrapTokens: - groups: - system:bootstrappers:kubeadm:default-node-token token: 7t2weq.bjbawausm0jaxury ttl: 24h0m0s usages: - signing - authentication kind: InitConfiguration localAPIEndpoint: advertiseAddress: 192.168.1.106 bindPort: 6443 nodeRegistration: criSocket: /var/run/dockershim.sock name: k8s-master-01 taints: - effect: NoSchedule key: node-role.kubernetes.io/master --- apiServer: certSANs: - 192.168.1.106 - 192.168.1.107 - 192.168.1.108 - 192.168.1.200 - k8s-master-01 - k8s-master-02 - k8s-master-03 - k8s-master-lb timeoutForControlPlane: 4m0s apiVersion: kubeadm.k8s.io/v1beta2 certificatesDir: /etc/kubernetes/pki clusterName: kubernetes controlPlaneEndpoint: 192.168.1.200:4443 controllerManager: {} dns: type: CoreDNS # stacked etcd etcd: local: dataDir: /var/lib/etcd # external etcd # etcd: # external: # endpoints: # - https://192.168.1.106:2379 # - https://192.168.1.107:2379 # - https://192.168.1.108:2379 # caFile: /etc/kubernetes/pki/ca.pem #certFile: /etc/kubernetes/pki/etcd.pem #keyFile: /etc/kubernetes/pki/etcd-key.pem imageRepository: registry.cn-hangzhou.aliyuncs.com/google_containers kind: ClusterConfiguration kubernetesVersion: v1.20.5 networking: dnsDomain: cluster.local podSubnet: 172.168.0.0/16 serviceSubnet: 10.96.0.0/12 scheduler: {} --- apiVersion: kubeproxy.config.k8s.io/v1alpha1 kind: KubeProxyConfiguration mode: ipvs # iptables: # masqueradeAll: false # masqueradeBit: null # minSyncPeriod: 0s # syncPeriod: 0s ipvs: # 如果node提供lvs服务,排除以下CIDR 不受kube-proxy管理,避免刷掉lvs规则 excludeCIDRs: [1.1.1.0/24,2.2.2.0/24] minSyncPeriod: 1s scheduler: "wrr" syncPeriod: 10s # --- # apiVersion: kubelet.config.k8s.io/v1beta1 # kind: KubeletConfiguration # cgroupDriver: systemd EOF # 注意:如果不是高可用集群,192.168.1.200:8443改为k8s-master-01的地址,8443改为apiserver的端口,默认是6443,注意更改v1.20.5为自己服务器kubeadm的版本:kubeadm version # 提前拉取镜像 # 如果执行失败 可以多次执行 kubeadm config images pull --config kubeadm-master.config docker images systemctl enable --now kubelet kubeadm join 192.168.1.200:8443 --token 7t2weq.bjbawausm0jaxury \ --discovery-token-ca-cert-hash sha256:2bdcb627482946406cb5a7019d9edcec3ffb5623d903da535d4bd586f57d5643 \ --control-plane --certificate-key 1d71cd7bfa911bf64d28560b7b08513173b754f8a9a377cff8a51cfe443e8744
配置使用kubectl
1 2 3 4 5 6 7 8 9 10 11 12 13 14 rm -rf $HOME/.kube mkdir -p $HOME/.kube sudo cp -i /etc/kubernetes/admin.conf $HOME/.kube/config sudo chown $(id -u):$(id -g) $HOME/.kube/config cat <<EOF >> /root/.bashrc export KUBECONFIG=$HOME/.kube/config EOF source /root/.bashrc # 查看node节点 kubectl get nodes # 只有网络插件也安装配置完成之后,才能会显示为ready状态
我们的高可用目前环境是三个master,因为etcd集群至少要保证2个节点,所以当我们挂了一个master节点时是对于我们高可用环境是不受影响的,生产环境至少要保证三个master节点以上即可。
配置node k8s-node-01 1 2 3 4 5 6 7 8 9 10 # k8s-master-01初始化成功后输出的token kubeadm join 192.168.1.200:4443 --token 7t2weq.bjbawausm0jaxury \ --discovery-token-ca-cert-hash sha256:2bdcb627482946406cb5a7019d9edcec3ffb5623d903da535d4bd586f57d5643 # 配置角色 # 先安装网络插件 # 增加node节点的节点role名称 kubectl label nodes k8s-node-01 node-role.kubernetes.io/node= # 删除node节点的节点role名称 kubectl label nodes k8s-node-01 node-role.kubernetes.io/node-
配置使用网络插件
如下操作在任意一个master节点操作
flannel 1 2 3 4 5 6 7 8 9 10 11 12 13 14 15 16 17 18 19 20 21 22 23 24 25 26 27 28 29 30 31 32 33 34 35 36 37 38 39 40 41 42 43 44 45 46 47 48 49 50 51 52 53 54 55 # 下载配置 cd /etc/kubernetes mkdir flannel && cd flannel # wget https://raw.githubusercontent.com/coreos/flannel/master/Documentation/kube-flannel.yml wget https://raw.fastgit.org/coreos/flannel/master/Documentation/kube-flannel.yml # 修改配置 # 此处的ip配置要与上面kubeadm的pod-network一致 net-conf.json: | { "Network": "172.168.0.0/16", "Backend": { "Type": "vxlan" } } # 修改镜像,两处 # image: registry.cn-shanghai.aliyuncs.com/gcr-k8s/flannel:v0.14.0-amd64 # 如果Node有多个网卡的话,参考flannel issues 39701, # https://github.com/kubernetes/kubernetes/issues/39701 # 目前需要在kube-flannel.yml中使用--iface参数指定集群主机内网网卡的名称, # 否则可能会出现dns无法解析。容器无法通信的情况,需要将kube-flannel.yml下载到本地, # flanneld启动参数加上--iface=<iface-name> # yaml中不支持tab,使用空格代替缩进 containers: - name: kube-flannel image: quay.io/coreos/flannel:v0.14.0 command: - /opt/bin/flanneld args: - --ip-masq - --kube-subnet-mgr - --iface=ens33 # 启动 kubectl apply -f kube-flannel.yml # 卸载flannel网络 kubectl delete -f kube-flannel.yml ifconfig cni0 down ip link delete cni0 ifconfig flannel.1 down ip link delete flannel.1 rm -rf /var/lib/cni/ rm -f /etc/cni/net.d/* # 查看 kubectl get pods --namespace kube-system kubectl get svc --namespace kube-system kubectl get pods -n kube-system kubectl --namespace kube-system logs kube-flannel-ds-28p8p kubectl describe pod coredns-54d67798b7-8k96g --namespace=kube-system
calico 1 2 3 4 5 6 7 8 9 10 11 12 13 14 15 16 17 18 19 20 21 22 23 24 25 26 27 28 29 30 31 32 33 34 35 36 37 38 39 40 41 42 43 44 45 46 # 配置calico网络(Master) kubectl apply -f https://docs.projectcalico.org/manifests/calico.yaml # 查看calico网络状态, STATUS为Running后查看集群信息 kubectl get pods -n kube-system kubectl get nodes NAME STATUS ROLES AGE VERSION k8s-master Ready master 45m v1.19.3 containers: # Runs calico-node container on each Kubernetes node. This # container programs network policy and routes on each # host. - name: calico-node image: calico/node:v3.8.8-1 env: # Use Kubernetes API as the backing datastore. - name: DATASTORE_TYPE value: "kubernetes" # Wait for the datastore. - name: IP_AUTODETECTION_METHOD # DaemonSet中添加该环境变量 value: interface=ens33 # 指定内网网卡 - name: WAIT_FOR_DATASTORE value: "true" # Set based on the k8s node name. - name: NODENAME valueFrom: fieldRef: fieldPath: spec.nodeName # 查看配置各组件信息configmap [root@k8s-master ~]# kubectl get -n kube-system configmap NAME DATA AGE calico-config 4 29m coredns 1 29m extension-apiserver-authentication 6 29m kube-proxy 2 29m kubeadm-config 2 29m kubelet-config-1.19 1 29m
Metrics Server部署 在新版的Kubernetes中系统资源的采集均使用Metrics-server,可以通过Metrics采集节点和Pod的内存、磁盘、CPU和网络的使用率。
1 2 scp /etc/kubernetes/pki/front-proxy-ca.crt k8s-node-01:/etc/kubernetes/pki/front-proxy-ca.crt scp /etc/kubernetes/pki/front-proxy-ca.crt k8s-node-xx(其他节点自行拷贝):/etc/kubernetes/pki/front-proxy-ca.crt
安装Metrics Server
1 2 3 4 5 6 7 8 9 10 11 12 13 14 15 16 17 18 19 20 21 22 23 24 25 # https://github.com/kubernetes-sigs/metrics-server/releases cd /etc/kubernetes mkdir metrics-server && cd metrics-server wget https://hub.fastgit.org/kubernetes-sigs/metrics-server/releases/download/v0.5.0/components.yaml -O ./metrics-server.yaml # 修改 template: metadata: labels: k8s-app: metrics-server spec: hostNetwork: true #增加 containers: - args: - --cert-dir=/tmp - --secure-port=443 - --kubelet-insecure-tls #增加 - --kubelet-preferred-address-types=InternalIP,ExternalIP,Hostname - --kubelet-use-node-status-port - --metric-resolution=15s image: willdockerhub/metrics-server:v0.5.0 # 修改 kubectl apply -f metrics-server.yaml kubectl top node
启用KeepAlived健康 去掉k8s-master-01,k8s-master-02和k8s-master-03节点/etc/keepalived/keepalived.conf中注释部分
1 2 3 4 # track_script { # chk_apiserver # check_haproxy # }
重启keepalived容器
1 docker restart k8s-keepalived
配置dashboard 默认是没web界面的,可以在master机器上安装一个dashboard插件,实现通过web来管理。
安装Dashboard插件
如下操作在k8s-master-01节点操作
1 2 3 4 cd /etc/kuberneteswget https://raw.fastgit.org/kubernetes/dashboard/v2.0.5/aio/deploy/recommended.yaml -O ./kubernetes-dashboard.yaml
编辑kubernetes-dashboard.yaml文件`:
1 2 - name: kubernetes-dashboard image: registry.cn-hangzhou.aliyuncs.com/google_containers/kubernetes-dashboard-amd64:v2.0.5
执行命令
1 2 3 4 kubectl create -f kubernetes-dashboard.yaml kubectl get svc,pod --all-namespaces | grep dashboard
可以看到kubernetes-dashboard已正常运行。
1 2 3 4 kubernetes-dashboard service/dashboard-metrics-scraper ClusterIP 10.106.178.80 <none> 8000/TCP 7s kubernetes-dashboard service/kubernetes-dashboard ClusterIP 10.109.64.48 <none> 443/TCP 7s kubernetes-dashboard pod/dashboard-metrics-scraper-7b59f7d4df-ls7dc 0/1 ContainerCreating 0 7s kubernetes-dashboard pod/kubernetes-dashboard-74d688b6bc-g48b2 0/1 ContainerCreating 0 7s
授予Dashboard账户集群管理权限 需要一个管理集群admin的权限,新建dashboard-adminuser.yaml文件,内容如下
1 2 3 4 5 6 7 8 9 10 11 12 13 14 15 16 17 18 19 20 21 22 23 24 cd /etc/kubernetes cat > dashboard-adminuser.yaml << EOF apiVersion: v1 kind: ServiceAccount metadata: name: admin-user namespace: kube-system --- apiVersion: rbac.authorization.k8s.io/v1 kind: ClusterRoleBinding metadata: name: admin-user roleRef: apiGroup: rbac.authorization.k8s.io kind: ClusterRole name: cluster-admin subjects: - kind: ServiceAccount name: admin-user namespace: kube-system EOF
执行命令
1 2 kubectl apply -f dashboard-adminuser.yaml
找到kubernete-dashboard-admin的token,用户登录使用
执行命令并查看结果
1 2 root@k8s-master-01:kubernetes# kubectl -n kube-system get secret | grep admin-user admin-user-token-bv5nd kubernetes.io/service-account-token 3 55s
可以看到名称是kubernetes-dashboard-admin-token-ddskx,使用该名称执行如下命令
1 2 3 4 5 6 7 8 9 10 11 12 13 14 root@k8s-master-01:kubernetes# kubectl -n kube-system describe secret $(kubectl -n kube-system get secret | grep admin-user | awk '{print $1}') Name: admin-user-token-fgjcq Namespace: kube-system Labels: <none> Annotations: kubernetes.io/service-account.name: admin-user kubernetes.io/service-account.uid: 23d73dcd-c07e-4ecc-be52-ed185d389b3a Type: kubernetes.io/service-account-token Data ==== ca.crt: 1066 bytes namespace: 11 bytes token: eyJhbGciOiJSUzI1NiIsImtpZCI6ImVoX0FrNmhrZnhmVTBIeU9SbHhPQWdhM3NmQmduc0pBbXY3MmswdVJmaEEifQ.eyJpc3MiOiJrdWJlcm5ldGVzL3NlcnZpY2VhY2NvdW50Iiwia3ViZXJuZXRlcy5pby9zZXJ2aWNlYWNjb3VudC9uYW1lc3BhY2UiOiJrdWJlLXN5c3RlbSIsImt1YmVybmV0ZXMuaW8vc2VydmljZWFjY291bnQvc2VjcmV0Lm5hbWUiOiJhZG1pbi11c2VyLXRva2VuLWZnamNxIiwia3ViZXJuZXRlcy5pby9zZXJ2aWNlYWNjb3VudC9zZXJ2aWNlLWFjY291bnQubmFtZSI6ImFkbWluLXVzZXIiLCJrdWJlcm5ldGVzLmlvL3NlcnZpY2VhY2NvdW50L3NlcnZpY2UtYWNjb3VudC51aWQiOiIyM2Q3M2RjZC1jMDdlLTRlY2MtYmU1Mi1lZDE4NWQzODliM2EiLCJzdWIiOiJzeXN0ZW06c2VydmljZWFjY291bnQ6a3ViZS1zeXN0ZW06YWRtaW4tdXNlciJ9.W91T6pI8W_wTZmE_VWQQi6n3ewjGEgfxwCFUz6qpPs1DTeqGQeeG-yvIwVRh98fM4mRhWV3yQ6QGBKcT4wZTVIZCsPEszM7xTECy3oUeYIFnYCxftQbns6DHvkP1mM5EwQGSQ2oAtZUaWU9QsCXeTFMSBN2GBlRGVgJ_zGRl70kdmbh3YrUnR53KMouuJVIHp1wHYpcXbCGLhgDk3yX-96g8xSLk9xeF-Hq_M1BRoTwNPn3Wh2W6VwIIqfYQcCp3WPKq5pZgtEQZwp4IRb3JFC4ttGaptypFnJxUoDkX37Wjzs3cZB9PXDgTdNFyr4jzTkIxCbhcHamHdZ3Y77bsOQ
记下这串token,等下登录使用,这个token默认是永久的。
dashboard访问方式 此处推荐API Server方式访问。(谷歌内核浏览器)
kubectl proxy方式访问
如下操作在k8s-master-01上操作
1 kubectl proxy --address=0.0.0.0 --disable-filter=true
即可通过浏览器访问: http://192.168.1.200:8001/api/v1/namespaces/kube-system/services/https:kubernetes-dashboard:/proxy/#!/login
注意
此方式只允许开发测试使用。为了便于开发测试,以下配置用于提升默认权限为超级用户权限。
1 2 3 4 5 6 7 8 9 10 11 12 13 14 15 16 17 18 19 20 vim kubernetes-dashboard-test.yaml apiVersion: v1 kind: ServiceAccount metadata: name: kubernetes-dashboard namespace: kube-system --- apiVersion: rbac.authorization.k8s.io/v1 kind: ClusterRoleBinding metadata: name: kubernetes-dashboard roleRef: apiGroup: rbac.authorization.k8s.io kind: ClusterRole name: cluster-admin subjects: - kind: ServiceAccount name: kubernetes-dashboard namespace: kube-system
NodePort方式访问 这种访问方式仪表板只建议在单个节点上设置开发环境。
编辑kubernetes-dashboard.yaml文件,添加type: NodePort和nodePort: 30001,暴露Dashboard服务为30001端口,参考如下。
1 2 3 4 5 6 7 8 9 10 11 12 13 14 15 16 kind: Service apiVersion: v1 metadata: labels: k8s-app: kubernetes-dashboard name: kubernetes-dashboard namespace: kube-system spec: type: NodePort ports: - port: 443 targetPort: 8443 nodePort: 30001 selector: k8s-app: kubernetes-dashboard
注意 https://<master-ip>:<nodePort> 和 https://<node-ip>:<nodePort>都可以访问。
API Server方式访问 1 2 3 # https://<master-ip>:<apiserver-port>/api/v1/namespaces/kube-system/services/https:kubernetes-dashboard:/proxy/ https://192.168.1.200:4443/api/v1/namespaces/kubernetes-dashboard/services/https:kubernetes-dashboard:/proxy/#/login
注意
浏览器访问问题:
1 2 3 4 5 6 7 8 9 10 11 12 13 14 15 { "kind": "Status", "apiVersion": "v1", "metadata": { }, "status": "Failure", "message": "services \"https:kubernetes-dashboard:\" is forbidden: User \"system:anonymous\" cannot get services/proxy in the namespace \"kube-system\"", "reason": "Forbidden", "details": { "name": "https:kubernetes-dashboard:", "kind": "services" }, "code": 403 }
这是因为最新版的k8s默认启用了RBAC,并为未认证用户赋予了一个默认的身份:anonymous。
对于API Server来说,它是使用证书进行认证的,我们需要先创建一个证书:
首先找到kubectl命令的配置文件,默认情况下为/etc/kubernetes/admin.conf,在 上文中,我们已经复制到了$HOME/.kube/config中。
然后我们使用client-certificate-data和client-key-data生成一个p12文件,可使用下列命令:
1 2 3 4 5 6 7 8 9 10 grep 'client-certificate-data' ~/.kube/config | head -n 1 | awk '{print $2}' | base64 -d >> kubecfg.crt grep 'client-key-data' ~/.kube/config | head -n 1 | awk '{print $2}' | base64 -d >> kubecfg.key openssl pkcs12 -export -clcerts -inkey kubecfg.key -in kubecfg.crt -out kubecfg.p12 -name "kubernetes-client"
最后导入上面生成的p12文件,重新打开浏览器,显示出现选择证书选项,选OK,然后就可以看到熟悉的登录界面了。我们可以使用一开始创建的admin-user用户的token进行登录,一切OK。
注意
nginx ingress方式访问 可以动态的更新Nginx配置等,是比较灵活,更为推荐的暴露服务的方式,但也相对比较复杂,业务环境推荐使用。
Kubernetes桌面客户端 Lens:https://github.com/lensapp/lens
官网下载:https://k8slens.dev/
导入~/.kube/config文件即可
基础测试 测试容器间的通信和DNS
如下测试可以在配置kubectl的节点上操作
1 2 3 4 5 6 7 8 9 10 11 12 13 14 15 16 17 18 19 20 21 22 23 24 25 26 27 28 29 30 31 32 33 34 35 36 37 38 39 40 41 42 43 44 45 46 47 48 49 50 51 52 53 54 55 56 57 # 检查dns可用性 cat > pod-nginx.yaml <<EOF apiVersion: v1 kind: Pod metadata: name: nginx-ds spec: containers: - name: nginx image: nginx:1.7.9 ports: - containerPort: 80 EOF # 创建pod kubectl create -f pod-nginx.yaml # 进入pod,查看dns kubectl exec nginx -i -t -- /bin/bash # 查看dns配置 root@nginx:/# cat /etc/resolv.conf # 查看名字是否可以正确解析 root@nginx:/# ping nginx-ds # DNS解析 kubectl run curl --image=radial/busyboxplus:curl -i --tty nslookup kubernetes nslookup example-service curl example-service # 访问测试 # 10.103.184.0 为查看svc时获取到的clusterip curl "10.103.184.0:80" # 32223 为查看svc时获取到的 nodeport http://192.168.0.107:32223/ # 清理删除 kubectl delete svc example-service example-service-nodeport kubectl delete deploy nginx curl # 高可用测试 # 关闭任一master节点测试集群是能否正常执行上一步的基础测试,查看相关信息,不能同时关闭两个节点,因为3个节点组成的etcd集群,最多只能有一个当机。 # 查看组件状态 kubectl get pod --all-namespaces -o wide kubectl get pod --all-namespaces -o wide | grep k8s-master-01 kubectl get pod --all-namespaces -o wide | grep k8s-master-02 kubectl get pod --all-namespaces -o wide | grep k8s-master-03 kubectl get nodes -o wide kubectl get deploy kubectl get pods kubectl get svc kubectl describe svc example-service # 访问测试 CURL_POD=$(kubectl get pods | grep curl | grep Running | cut -d ' ' -f1) kubectl exec -it $CURL_POD -- sh --tty nslookup kubernetes nslookup example-service curl example-service
ingress的部署
https://kubernetes.github.io/ingress-nginx/
ingress是k8s集群的请求入口,可以理解为对多个service的再次抽象
通常说的ingress一般包括ingress资源对象及ingress-controller两部分组成
ingress-controller有多种实现,社区原生的是ingress-nginx,根据具体需求选择
ingress自身的暴露有多种方式,需要根据基础环境及业务类型选择合适的方式
ingress的部署,需要考虑两个方面:
ingress-controller是作为pod来运行的,以什么方式部署比较好
ingress解决了把如何请求路由到集群内部,那它自己怎么暴露给外部比较好
下面列举一些目前常见的部署和暴露方式,具体使用哪种方式还是得根据实际需求来考虑决定。
Deployment+LoadBalancer模式的Service
如果要把ingress部署在公有云,那用这种方式比较合适。用Deployment部署ingress-controller,创建一个type为LoadBalancer的service关联这组pod。大部分公有云,都会为LoadBalancer的service自动创建一个负载均衡器,通常还绑定了公网地址。只要把域名解析指向该地址,就实现了集群服务的对外暴露。
Deployment+NodePort模式的Service
同样用deployment模式部署ingress-controller,并创建对应的服务,但是type为NodePort。这样,ingress就会暴露在集群节点ip的特定端口上。由于nodeport暴露的端口是随机端口,一般会在前面再搭建一套负载均衡器来转发请求。该方式一般用于宿主机是相对固定的环境ip地址不变的场景。
DaemonSet+HostNetwork+nodeSelector
用DaemonSet结合nodeselector来部署ingress-controller到特定的node上,然后使用HostNetwork直接把该pod与宿主机node的网络打通,直接使用宿主机的80/433端口就能访问服务。这时,ingress-controller所在的node机器就很类似传统架构的边缘节点,比如机房入口的nginx服务器。该方式整个请求链路最简单,性能相对NodePort模式更好。缺点是由于直接利用宿主机节点的网络和端口,一个node只能部署一个ingress-controller pod。比较适合大并发的生产环境使用。
安装ingress-controller 给需要安装ingress-controller的master节点上
1 2 3 4 kubectl label nodes k8s-master-01 nginx-ingress=true kubectl label nodes k8s-master-02 nginx-ingress=true kubectl label nodes k8s-master-03 nginx-ingress=true kubectl get node --show-labels
修改ingress的yaml文件
1 2 3 4 5 6 7 8 9 10 11 12 13 14 15 16 17 18 19 20 21 22 23 24 25 26 27 28 29 30 31 32 33 34 35 36 37 38 39 40 41 42 43 44 45 46 47 48 49 50 51 52 53 54 55 56 57 58 59 60 61 62 63 64 65 66 67 68 69 70 71 72 73 74 75 76 77 78 79 80 81 82 83 84 85 86 87 88 89 90 91 92 93 94 95 96 97 98 99 100 101 102 103 104 105 106 107 108 109 110 111 112 113 114 115 116 117 118 119 120 121 122 123 124 125 126 127 128 129 130 131 132 133 134 135 136 137 138 139 140 141 142 143 144 145 146 147 148 149 150 151 152 153 154 155 156 157 158 159 160 161 162 163 164 165 166 167 168 169 170 171 172 173 174 175 176 177 178 179 180 181 182 183 184 185 186 187 188 189 190 191 192 193 194 195 196 197 198 199 200 201 202 203 204 205 206 207 208 209 210 211 212 213 214 215 216 217 218 219 220 221 222 223 224 225 226 227 228 cd /etc/kubernetes mkdir ingress && cd ingress wget https://raw.fastgit.org/kubernetes/ingress-nginx/blob/master/deploy/static/provider/baremetal/deploy.yaml -O ingress-nginx.yaml # 修改镜像 # Source: ingress-nginx/templates/controller-deployment.yaml apiVersion: apps/v1 kind: DaemonSet # 修改 metadata: labels: helm.sh/chart: ingress-nginx-3.33.0 app.kubernetes.io/name: ingress-nginx app.kubernetes.io/instance: ingress-nginx app.kubernetes.io/version: 0.47.0 app.kubernetes.io/managed-by: Helm app.kubernetes.io/component: controller name: ingress-nginx-controller namespace: ingress-nginx spec: selector: matchLabels: app.kubernetes.io/name: ingress-nginx app.kubernetes.io/instance: ingress-nginx app.kubernetes.io/component: controller revisionHistoryLimit: 10 minReadySeconds: 0 template: metadata: labels: app.kubernetes.io/name: ingress-nginx app.kubernetes.io/instance: ingress-nginx app.kubernetes.io/component: controller spec: hostNetwork: true # 增加 dnsPolicy: ClusterFirst containers: - name: controller image: pollyduan/ingress-nginx-controller:v0.46.0 imagePullPolicy: IfNotPresent lifecycle: preStop: exec: command: - /wait-shutdown args: - /nginx-ingress-controller - --election-id=ingress-controller-leader - --ingress-class=nginx - --configmap=$(POD_NAMESPACE)/ingress-nginx-controller - --validating-webhook=:8443 - --validating-webhook-certificate=/usr/local/certificates/cert - --validating-webhook-key=/usr/local/certificates/key securityContext: capabilities: drop: - ALL add: - NET_BIND_SERVICE runAsUser: 101 allowPrivilegeEscalation: true env: - name: POD_NAME valueFrom: fieldRef: fieldPath: metadata.name - name: POD_NAMESPACE valueFrom: fieldRef: fieldPath: metadata.namespace - name: LD_PRELOAD value: /usr/local/lib/libmimalloc.so livenessProbe: failureThreshold: 5 httpGet: path: /healthz port: 10254 scheme: HTTP initialDelaySeconds: 10 periodSeconds: 10 successThreshold: 1 timeoutSeconds: 1 readinessProbe: failureThreshold: 3 httpGet: path: /healthz port: 10254 scheme: HTTP initialDelaySeconds: 10 periodSeconds: 10 successThreshold: 1 timeoutSeconds: 1 ports: - name: http containerPort: 80 protocol: TCP - name: https containerPort: 443 protocol: TCP - name: webhook containerPort: 8443 protocol: TCP volumeMounts: - name: webhook-cert mountPath: /usr/local/certificates/ readOnly: true resources: requests: cpu: 100m memory: 90Mi nodeSelector: #kubernetes.io/os: linux nginx-ingress: "true" # 增加 tolerations: # 增加 - effect: NoSchedule key: node-role.kubernetes.io/master operator: Equal serviceAccountName: ingress-nginx terminationGracePeriodSeconds: 300 volumes: - name: webhook-cert secret: secretName: ingress-nginx-admission ------------------------------- # Source: ingress-nginx/templates/admission-webhooks/job-patch/job-createSecret.yaml apiVersion: batch/v1 kind: Job metadata: name: ingress-nginx-admission-create annotations: helm.sh/hook: pre-install,pre-upgrade helm.sh/hook-delete-policy: before-hook-creation,hook-succeeded labels: helm.sh/chart: ingress-nginx-3.33.0 app.kubernetes.io/name: ingress-nginx app.kubernetes.io/instance: ingress-nginx app.kubernetes.io/version: 0.47.0 app.kubernetes.io/managed-by: Helm app.kubernetes.io/component: admission-webhook namespace: ingress-nginx spec: template: metadata: name: ingress-nginx-admission-create labels: helm.sh/chart: ingress-nginx-3.33.0 app.kubernetes.io/name: ingress-nginx app.kubernetes.io/instance: ingress-nginx app.kubernetes.io/version: 0.47.0 app.kubernetes.io/managed-by: Helm app.kubernetes.io/component: admission-webhook spec: nodeSelector: # 增加 nginx-ingress: "true" tolerations: # 增加 - effect: NoSchedule key: node-role.kubernetes.io/master operator: Equal containers: - name: create image: docker.io/jettech/kube-webhook-certgen:v1.5.1 imagePullPolicy: IfNotPresent ------------------------ # Source: ingress-nginx/templates/admission-webhooks/job-patch/job-patchWebhook.yaml apiVersion: batch/v1 kind: Job metadata: name: ingress-nginx-admission-patch annotations: helm.sh/hook: post-install,post-upgrade helm.sh/hook-delete-policy: before-hook-creation,hook-succeeded labels: helm.sh/chart: ingress-nginx-3.33.0 app.kubernetes.io/name: ingress-nginx app.kubernetes.io/instance: ingress-nginx app.kubernetes.io/version: 0.47.0 app.kubernetes.io/managed-by: Helm app.kubernetes.io/component: admission-webhook namespace: ingress-nginx spec: template: metadata: name: ingress-nginx-admission-patch labels: helm.sh/chart: ingress-nginx-3.33.0 app.kubernetes.io/name: ingress-nginx app.kubernetes.io/instance: ingress-nginx app.kubernetes.io/version: 0.47.0 app.kubernetes.io/managed-by: Helm app.kubernetes.io/component: admission-webhook spec: nodeSelector: # 增加 nginx-ingress: "true" tolerations: # 增加 - effect: NoSchedule key: node-role.kubernetes.io/master operator: Equal containers: - name: patch image: docker.io/jettech/kube-webhook-certgen:v1.5.1 # k8s.gcr.io/ingress-nginx/controller:v0.47.0@sha256:a1e4efc107be0bb78f32eaec37bef17d7a0c81bec8066cdf2572508d21351d0b # docker.io/jettech/kube-webhook-certgen:v1.5.1 docker pull pollyduan/ingress-nginx-controller:v0.46.0 docker pull jettech/kube-webhook-certgen:v1.5.1 # 查看污点 # 容忍(Tolerations) # 设置了污点的node将根据taint的effect:NoSchedule、PreferNoSchedule、NoExecute和pod之间产生互斥的关系,pod将在一定程度上#不会被调度到node上。但我们可以在pod上设置容忍Toleration,设置了容忍的pod将可以容忍污点的存在,可以被调度到存在污点的node上。 # 1)NoScchedule:表示k8s将不会将pod调度到具有该污点的node上 # 2)PreferNoSchedule:表示k8s将尽量避免将pod调度到具有该污点的node上 # 3)NoExecute:表示k8s将不会将pod调度到具有该污点的node上,同时会将node上已经存在的pod驱逐出去 kubectl get nodes -o json | jq '.items[].spec' # kubectl taint node k8s-master-01 node-role.kubernetes.io/master:NoSchedule-#去除污点 # kubectl taint node k8s-master-02 node-role.kubernetes.io/master:NoSchedule- # kubectl taint node k8s-master-03 node-role.kubernetes.io/master:NoSchedule- # kubectl taint nodes --all node-role.kubernetes.io/master:NoSchedule- # kubectl describe nodes k8smaster |grep Taints # kubectl taint node k8s-master-01 node-role.kubernetes.io/master=:NoSchedule # kubectl delete -A ValidatingWebhookConfiguration ingress-nginx-admission kubectl apply -f ingress-nginx.yaml kubectl get pod -n ingress-nginx -o wide netstat -lntup | grep nginx
创建测项目
1 2 3 4 5 6 7 8 9 10 11 12 13 14 15 16 17 18 19 20 21 22 23 24 25 26 27 28 29 30 31 32 33 34 35 36 # 部署一个应用 kubectl create deployment myip --image=cloudnativelabs/whats-my-ip # 暴露端口 kubectl expose deployment myip --port=8080 --target-port=8080 # 创建 Ingress cat << EOF | kubectl apply -f - apiVersion: networking.k8s.io/v1beta1 kind: Ingress metadata: name: myip spec: ingressClassName: nginx rules: - host: wyy.wyy.com http: paths: - path: / pathType: Prefix backend: serviceName: myip servicePort: 8080 EOF # 测试 Ingress 是否可以访问 # 编辑 /etc/hosts 文件 # ipv4 测试 192.168.1.200 wyy.wyy.com curl wyy.wyy.com HOSTNAME:myip-75c9c47c7f-cg4dl IP:10.81.251.198 # ipv6 测试 # 编辑/etc/hosts fc00:bd4:efa8:1001:5054:ff:fe49:9888 wyy.wyy.com curl wyy.wyy.com HOSTNAME:myip-75c9c47c7f-cg4dl IP:10.81.251.198
pathType可以有以下三种值:
Prefix:基于URL路径前缀匹配。例如,路径/foo会匹配/foo、/foo/和/foo/bar。匹配时不考虑查询参数。
Exact:精确匹配URL路径,且区分大小写。只有完全相同的路径才会匹配。例如,路径/foo只会匹配/foo,不会匹配/foo/或/foo/bar。
ImplementationSpecific:这种类型的匹配取决于使用的Ingress控制器。控制器可能会将其视为Prefix或Exact,或者使用其他规则。如果不指定,默认可能会是ImplementationSpecific,但具体行为取决于控制器的实现。
https://kubernetes.github.io/ingress-nginx/user-guide/nginx-configuration/
配置ingress资源 1 2 3 4 5 6 7 8 9 10 11 12 13 14 15 16 17 18 19 20 21 22 23 24 25 26 27 28 29 30 31 32 33 34 35 36 37 38 39 40 41 42 43 44 45 46 47 48 49 50 51 52 53 54 55 56 apiVersion: networking.k8s.io/v1beta1 kind: Ingress metadata: name: nginx-web annotations: kubernetes.io/ingress.class: "nginx" nginx.ingress.kubernetes.io/use-regex: "true" nginx.ingress.kubernetes.io/proxy-connect-timeout: "600" nginx.ingress.kubernetes.io/proxy-send-timeout: "600" nginx.ingress.kubernetes.io/proxy-read-timeout: "600" nginx.ingress.kubernetes.io/proxy-body-size: "10m" nginx.ingress.kubernetes.io/rewrite-target: / nginx.ingress.kubernetes.io/ssl-redirect: "false" nginx.ingress.kubernetes.io/app-root: "test" nginx.ingress.kubernetes.io/force-ssl-redirect: "true" nginx.ingress.kubernetes.io/affinity: 'cookie' nginx.ingress.kubernetes.io/from-to-www-redirect: 'true' spec: rules: - host: k8s.test.com http: paths: - path: /test1 backend: serviceName: tomcat-http1 servicePort: 8080 - path: /test2 backend: serviceName: tomcat-http2 servicePort: 8080 - path: /something(/|$)(.*) backend: serviceName: ingress-test servicePort: 80
Ingress TLS 配置
证书必须是SANs
参考官方的配置步骤:https://kubernetes.github.io/ingress-nginx/examples/PREREQUISITES/
1 2 3 4 5 6 7 8 9 10 11 12 13 14 15 16 17 18 19 20 21 22 23 24 25 26 27 28 29 30 31 32 33 34 35 36 37 38 39 40 41 42 43 44 45 46 47 48 49 50 51 52 53 54 55 56 57 58 59 60 61 62 63 64 65 66 67 68 69 70 71 72 73 74 75 76 77 78 79 80 81 82 83 84 85 86 87 88 89 90 91 92 93 94 95 96 97 98 99 100 101 102 103 104 105 106 107 108 109 110 111 112 113 114 115 116 117 118 119 120 121 122 123 124 125 126 127 128 129 130 131 132 133 134 135 136 137 138 139 140 141 142 143 144 145 146 147 148 149 150 151 152 153 154 155 156 157 158 # 下载cfssl工具 curl -s -L -o /bin/cfssl https://pkg.cfssl.org/R1.2/cfssl_linux-amd64 curl -s -L -o /bin/cfssljson https://pkg.cfssl.org/R1.2/cfssljson_linux-amd64 curl -s -L -o /bin/cfssl-certinfo https://pkg.cfssl.org/R1.2/cfssl-certinfo_linux-amd64 chmod +x /bin/cfssl* # 预置配置:可以用这个命令生成模板,修改相关内容就可使用了 cfssl print-defaults config > ca-config.json cfssl print-defaults csr > ca-csr.json # 生成ca配置 # client certificate: 用于服务端认证客户端,例如etcdctl、etcd proxy、fleetctl、docker客户端 # server certificate: 服务端使用,客户端以此验证服务端身份,例如docker服务端、kube-apiserver # peer certificate: 双向证书,用于etcd集群成员间通信 # 创建ca配置文件 (ca-config.json) # "ca-config.json" :可以定义多个 profiles,分别指定不同的过期时间、使用场景等参数;后续在签名证书时使用某个 profile;# "signing" :表示该证书可用于签名其它证书;生成的 ca.pem 证书中 CA=TRUE;# "server auth" :表示client可以用该 CA 对server提供的证书进行验证;# "client auth" :表示server可以用该CA对client提供的证书进行验证;cat > ca-config.json <<EOF { "signing": { "default": { "expiry": "43800h" }, "profiles": { "server": { "expiry": "43800h", "usages": [ "signing", "key encipherment", "server auth" ] }, "client": { "expiry": "43800h", "usages": [ "signing", "key encipherment", "client auth" ] }, "peer": { "expiry": "43800h", "usages": [ "signing", "key encipherment", "server auth", "client auth" ] }, "kubernetes": { "expiry": "43800h", "usages": [ "signing", "key encipherment", "server auth", "client auth" ] }, "etcd": { "expiry": "43800h", "usages": [ "signing", "key encipherment", "server auth", "client auth" ] } } } } EOF # 创建ca证书签名(ca-csr.json) # "CN" :Common Name,从证书中提取该字段作为请求的用户名 (User Name);浏览器使用该字段验证网站是否合法;# "O" :Organization,从证书中提取该字段作为请求用户所属的组 (Group);# 这两个参数在后面的kubernetes启用RBAC模式中很重要,因为需要设置kubelet、admin等角色权限,那么在配置证书的时候就必须配置对了,具体后面在部署kubernetes的时候会进行讲解。 # "在etcd这两个参数没太大的重要意义,跟着配置就好。" # CN: Common Name,浏览器使用该字段验证网站是否合法,一般写的是域名。非常重要。浏览器使用该字段验证网站是否合法 # key:生成证书的算法 # hosts:表示哪些主机名(域名)或者IP可以使用此csr申请的证书,为空或者"" 表示所有的都可以使用(本例中没有hosts字段) # names:一些其它的属性 # C: Country, 国家 # ST: State,州或者是省份 # L: Locality Name,地区,城市 # O: Organization Name,组织名称,公司名称(在k8s中常用于指定Group,进行RBAC绑定) # OU: Organization Unit Name,组织单位名称,公司部门 # {"algo" :"ecdsa" ,"size" :256} {"algo" : "rsa" ,"size" : 2048} cat > ca-csr.json <<EOF { "CN": "SelfSignedCa", "key": { "algo": "rsa", "size": 2048 }, "names": [ { "C": "CN", "L": "shanghai", "O": "cfssl", "ST": "shanghai", "OU": "System" } ] } EOF # ca.csr ca.pem(ca公钥) ca-key.pem(ca私钥,妥善保管) cfssl gencert -initca ca-csr.json | cfssljson -bare ca - # 创建etcd证书签名(etcd-csr.json) cat > etcd-csr.json <<EOF { "CN": "etcd", "hosts": [ "wyy.wyy.com" ], "key": { "algo": "rsa", "size": 2048 }, "names": [ { "C": "CN", "L": "shanghai", "O": "etcd", "ST": "shanghai", "OU": "System" } ] } EOF cfssl gencert -ca=ca.pem -ca-key=ca-key.pem -config=ca-config.json -profile=etcd etcd-csr.json | cfssljson -bare etcd # 创建kubernetes证书签名(kubernetes-csr.json) cat > kubernetes-csr.json <<EOF { "CN": "kubernetes", "key": { "algo": "rsa", "size": 2048 }, "names": [ { "C": "CN", "L": "shanghai", "O": "kubernetes", "ST": "shanghai", "OU": "System" } ] } EOF cfssl gencert -ca=ca.pem -ca-key=ca-key.pem -config=ca-config.json -profile=kubernetes kubernetes-csr.json | cfssljson -bare kubernetes
ingress
1 2 3 4 5 6 7 8 9 10 11 12 13 14 15 16 17 18 19 20 21 22 23 24 25 26 27 28 29 kubectl create secret tls tls-secret --key etcd-key.pem --cert etcd.pem kubectl delete ingress myip cat << EOF | kubectl apply -f - apiVersion: networking.k8s.io/v1beta1 kind: Ingress metadata: name: myip annotations: kubernetes.io/ingress.class: "nginx" nginx.ingress.kubernetes.io/auth-type: basic nginx.ingress.kubernetes.io/auth-secret: basic-auth nginx.ingress.kubernetes.io/auth-realm: 'Authentication Required - admin' spec: tls: - hosts: - wyy.wyy.com secretName: tls-secret rules: - host: wyy.wyy.com http: paths: - path: / pathType: Prefix backend: serviceName: myip servicePort: 8080 EOF
Ingress 认证配置 1.生成auth认证文件
1 2 3 # yum -y install httpd htpasswd -c auth admin ## 生成认证用户,第一次创建必须用-c htpasswd auth tom ## 添加认证用户,如果用-c会覆盖已经存在的认证的用户
2.创建secret
1 2 3 4 5 kubectl create secret generic basic-auth --from-file=auth # # # #
3.修改并应用配置文件
1 2 3 4 5 6 7 8 9 10 11 12 13 14 15 16 17 18 19 20 21 22 23 24 25 26 27 kubectl delete ingress myip cat << EOF | kubectl apply -f - apiVersion: networking.k8s.io/v1beta1 kind: Ingress metadata: name: myip annotations: kubernetes.io/ingress.class: "nginx" nginx.ingress.kubernetes.io/auth-type: basic nginx.ingress.kubernetes.io/auth-secret: basic-auth nginx.ingress.kubernetes.io/auth-realm: 'Authentication Required - admin' spec: tls: - hosts: - wyy.wyy.com secretName: tls-secret rules: - host: wyy.wyy.com http: paths: - path: / pathType: Prefix backend: serviceName: myip servicePort: 8080 EOF
TCP四层代理 通过负载均衡的TCP四层代理,我们可以将集群内ClusterIP类型的服务暴露出来,使集群外部也可以访问。
Nginx负载均衡的TCP代理配置是存储在ConfigMap内的,在启动时需要指定配置文件。
修改ingress-nginx.yaml
1 2 3 4 5 6 7 8 9 10 11 12 13 14 15 16 17 18 19 20 21 22 23 24 25 26 27 28 29 30 31 32 33 34 35 36 37 38 39 40 41 42 43 44 45 containers: - name: controller image: pollyduan/ingress-nginx-controller:v0.46.0 imagePullPolicy: IfNotPresent lifecycle: preStop: exec: command: - /wait-shutdown args: - /nginx-ingress-controller - --election-id=ingress-controller-leader - --ingress-class=nginx - --configmap=$(POD_NAMESPACE)/ingress-nginx-controller - --validating-webhook=:8443 - --validating-webhook-certificate=/usr/local/certificates/cert - --validating-webhook-key=/usr/local/certificates/key - --tcp-services-configmap=$(POD_NAMESPACE)/tcp-services - --udp-services-configmap=$(POD_NAMESPACE)/udp-services kubectl apply -f ingress-nginx.yaml cat << EOF | kubectl apply -f - kind: ConfigMap apiVersion: v1 metadata: name: tcp-services namespace: ingress-nginx labels: app.kubernetes.io/name: ingress-nginx app.kubernetes.io/part-of: ingress-nginx --- kind: ConfigMap apiVersion: v1 metadata: name: udp-services namespace: ingress-nginx labels: app.kubernetes.io/name: ingress-nginx app.kubernetes.io/part-of: ingress-nginx EOF
测试4层负载 修改udp配置
1 2 3 4 5 6 7 8 9 10 11 12 13 14 15 16 17 18 19 20 21 cat << EOF | kubectl apply -f - kind: ConfigMap apiVersion: v1 metadata: name: udp-services namespace: ingress-nginx labels: app.kubernetes.io/name: ingress-nginx app.kubernetes.io/part-of: ingress-nginx data: 53: "kube-system/kube-dns:53" EOF $ host -t A nginx.default.svc.cluster.local 192.168 .1 .200 Using domain server: Name: 192.168 .1 .200 Address: 192.168 .1 .200 Aliases: Host nginx.default.svc.cluster.local not found: 3 (NXDOMAIN)
修改tcp配置
1 2 3 4 5 6 7 8 9 10 11 12 13 14 15 16 cat << EOF | kubectl apply -f - kind: ConfigMap apiVersion: v1 metadata: name: tcp-services namespace: ingress-nginx labels: app.kubernetes.io/name: ingress-nginx app.kubernetes.io/part-of: ingress-nginx data: 8081: "default/myip:8080" EOF http://192.168.1.200:8081/ http://wyy.wyy.com:8081/
ingress示例 转发到单个后端服务上
1 2 3 4 5 6 7 8 apiVersion: extensions/v1beta1 kind: Ingress metadata: name: test-ingress spec: backend: serviceName: myweb servicePort: 8080
通过域名转发
1 2 3 4 5 6 7 8 9 10 11 12 13 14 15 16 17 18 19 20 21 22 23 24 apiVersion: extensions/v1beta1 kind: Ingress metadata: annotations: nginx.ingress.kubernetes.io/server-snippet: | if ($host ~* "(.*).xxxxx.com") { return 301 http://m.xxxxx.com/$1$request_uri ; } name: m-web namespace: default spec: rules: - host: '*.xxxxx.com' http: paths: - backend: serviceName: m-web-nginx servicePort: 80 path: / tls: - hosts: - m.qa.hxtrip.com secretName: m.qa-https
path路径进行转发
1 2 3 4 5 6 7 8 9 10 11 12 13 14 15 16 17 apiVersion: extensions/v1beta1 kind: Ingress metadata: annotations: nginx.ingress.kubernetes.io/rewrite-target: /$2 name: rewrite namespace: default spec: rules: - host: rewrite.bar.com http: paths: - backend: serviceName: http-svc servicePort: 80 path: /something(/|$)(.*)
1 2 3 4 5 6 7 8 9 10 11 12 13 14 15 16 17 apiVersion: extensions/v1beta1 kind: Ingress metadata: annotations: nginx.ingress.kubernetes.io/app-root: /api name: approot namespace: default spec: rules: - host: approot.bar.com http: paths: - backend: serviceName: http-svc servicePort: 80 path: /
1 2 3 4 5 6 7 8 9 10 11 12 13 14 15 16 17 18 apiVersion: extensions/v1beta1 kind: Ingress metadata: name: example-ingress annotations: nginx.ingress.kubernetes.io/configuration-snippet: | rewrite /service/(.*) /s1/$1 break; spec: rules: - host: example.com http: paths: - path: /service/ backend: serviceName: app1 servicePort: 8080
1 2 3 4 5 6 7 8 9 10 11 12 13 14 15 16 17 18 19 20 21 22 23 24 25 26 27 28 29 30 31 32 33 34 35 36 37 38 39 40 41 apiVersion: extensions/v1beta1 kind: Ingress metadata: name: mywebsite-ingress spec: rules: - host: mywebsite.com http: paths: - path: /mywebsite backend: serviceName: mywebsite servicePort: 8080 - path: /tomcat backend: serviceName: tomcat servicePort: 8080 ------------------------------------------------------------ apiVersion: networking.k8s.io/v1beta1 kind: Ingress metadata: name: test-ingress namespace: default annotations: kubernetes.io/ingress.class: "nginx" nginx.ingress.kubernetes.io/rewrite-target: / spec: rules: - host: www.123.com http: paths: - path: / backend: serviceName: myapp-svc servicePort: 8080
1 2 3 4 5 6 7 8 9 10 11 12 13 14 15 16 17 18 19 20 21 apiVersion: extensions/v1beta1 kind: Ingress metadata: name: tengine-nginx annotations: kubernetes.io/ingress.class: "nginx" nginx.ingress.kubernetes.io/app-root: /10.48.22.145 nginx.ingress.kubernetes.io/rewrite-target: /$2 nginx.ingress.kubernetes.io/configuration-snippet: | rewrite ^(/10.48.22.145)$ $1/ redirect; spec: rules: - host: test.sy.com http: paths: - backend: serviceName: tengine-nginx servicePort: 8000 path: /10.48.22.145(/|$)(.*)
1 2 3 4 5 6 7 8 9 10 11 12 13 14 15 16 17 18 19 20 21 22 23 24 apiVersion: extensions/v1beta1 kind: Ingress metadata: name: tomcat-test namespace: test annotations: kubernetes.io/ingress.class: "nginx" nginx.ingress.kubernetes.io/ssl-redirect: 'true' nginx.ingress.kubernetes.io/rewrite-target: /$2 spec: rules: - host: test.sy.com http: paths: - path: /abb(/|$)(.*) backend: serviceName: tomcat-test servicePort: 6080 tls: - hosts: - test.sy.com secretName: tls-secret
不同域名转发到不同服务器上
1 2 3 4 5 6 7 8 9 10 11 12 13 14 15 16 17 18 apiVersion: extensions/v1beta1 kind: Ingress metadata: name: test spec: rules: - host: bbs.demo.com http: paths: - backend: serviceName: bbs-svc servicePort: 8080 - host: shop.demo.com http: paths: - backend: serviceName: shop-svc servicePort: 8080
不使用域名转发规则
1 2 3 4 5 6 7 8 9 10 11 12 13 14 15 16 apiVersion: extensions/v1beta1 kind: Ingress metadata: name: test-ingress annotations: ingress.kubernetes.io/ssl-redirect: "false" spec: rules: - http: paths: - path: /demo backend: serviceName: webapp servicePort: 8080
小技巧 忘记初始master节点时的node节点加入集群命令怎么办
1 2 3 4 5 6 kubeadm token create --print-join-command token=$(kubeadm token generate) kubeadm token create $token --print-join-command --ttl=0
相关命令 1 2 3 4 5 6 7 8 9 10 11 12 13 14 15 16 17 kubectl get nodes kubectl describe nodes kubectl get pods --all-namespaces kubectl get svc --all-namespaces kubectl cluster-info kubectl get secret -n kube-system kubectl describe secret/[token name] -n kube-system kubectl apply -f xxxxx.yml kubectl delete -f xxxxx.yml
其他 查看k8s中etcd数据 1.查看ETCD集群中运行的ETCD pod
1 2 3 4 root@k8s-master-01:~# kubectl get pod -n kube-system | grep etcd etcd-k8s-master-01 1/1 Running 5 20h etcd-k8s-master-02 1/1 Running 2 20h etcd-k8s-master-03 1/1 Running 2 20h
2.进入ETCD pod容器
1 [root@master1 ~]# kubectl exec -it etcd-k8s-master-01 -n kube-system -- /bin/sh
3.设置环境变量为v3
4.查看ETCD中所有的key,输入以下命令:
1 2 3 4 ETCDCTL_API=3 etcdctl --endpoints "https://192.168.1.106:2379,https://192.168.1.107:2379,https://192.168.1.108:2379" \ --cacert=/etc/kubernetes/pki/etcd/ca.crt \ --cert=/etc/kubernetes/pki/etcd/peer.crt \ --key=/etc/kubernetes/pki/etcd/peer.key get / --prefix --keys-only
5.查看etcd集群
1 2 3 4 5 6 7 8 9 10 11 12 13 ETCDCTL_API=3 etcdctl endpoint health \ --endpoints "https://192.168.1.106:2379" \ --cacert=/etc/kubernetes/pki/etcd/ca.crt \ --cert=/etc/kubernetes/pki/etcd/peer.crt \ --key=/etc/kubernetes/pki/etcd/peer.key \ --cluster=true ETCDCTL_API=3 etcdctl --endpoints "https://192.168.1.106:2379" \ --cacert=/etc/kubernetes/pki/etcd/ca.crt \ --cert=/etc/kubernetes/pki/etcd/server.crt \ --key=/etc/kubernetes/pki/etcd/server.key \ member list -w table
K8S集群中etcd备份和恢复 就像备份数据库一样,很多时候,我们也想对k8s资源配置进行备份。
1 kubectl get all --all-namespaces -o yaml > all-deploy-services.yaml
上面的方法,可以实现对k8s资源配置的备份。但是更好的办法,是对etcd进行备份。本文就学习一下k8s中etcd的备份和恢复方法。
etcd集群状态 1 2 3 4 5 6 7 HOST_1=10.240.0.17 HOST_2=10.240.0.18 HOST_3=10.240.0.19 ENDPOINTS=$HOST_1:2379,$HOST_2:2379,$HOST_3:2379 etcdctl --endpoints=$ENDPOINTS member list etcdctl --write-out=table --endpoints=$ENDPOINTS endpoint status etcdctl --endpoints=$ENDPOINTS endpoint health
备份 1、查看配置
1 kubectl describe pod etcd-master -n kube-system | grep Command -i -A 20
看到Command字段为:
1 2 3 4 5 6 7 8 9 10 11 12 13 14 15 16 17 18 19 Command: etcd --advertise-client-urls=https://172.17.0.10:2379 --cert-file=/etc/kubernetes/pki/etcd/server.crt --client-cert-auth=true --data-dir=/var/lib/etcd --initial-advertise-peer-urls=https://172.17.0.10:2380 --initial-cluster=master=https://172.17.0.10:2380 --key-file=/etc/kubernetes/pki/etcd/server.key --listen-client-urls=https://127.0.0.1:2379,https://172.17.0.10:2379 --listen-metrics-urls=http://127.0.0.1:2381 --listen-peer-urls=https://172.17.0.10:2380 --name=master --peer-cert-file=/etc/kubernetes/pki/etcd/peer.crt --peer-client-cert-auth=true --peer-key-file=/etc/kubernetes/pki/etcd/peer.key --peer-trusted-ca-file=/etc/kubernetes/pki/etcd/ca.crt --snapshot-count=10000 --trusted-ca-file=/etc/kubernetes/pki/etcd/ca.crt
或者查看/etc/kubernetes/manifests/etcd.yaml。
2、执行备份
1 2 3 4 5 6 ETCDCTL_API=3 etcdctl \ --endpoints=https://[127.0.0.1]:2379 \ --cacert=/etc/kubernetes/pki/etcd/ca.crt \ --cert=/etc/kubernetes/pki/etcd/server.crt \ --key=/etc/kubernetes/pki/etcd/server.key \ snapshot save /tmp/snapshot-pre-boot.db
3、查看备份
1 2 3 4 5 6 ETCDCTL_API=3 etcdctl \ --endpoints=https://[127.0.0.1]:2379 \ --cacert=/etc/kubernetes/pki/etcd/ca.crt \ --cert=/etc/kubernetes/pki/etcd/server.crt \ --key=/etc/kubernetes/pki/etcd/server.key \ snapshot status /tmp/snapshot-pre-boot.db -w table
恢复 1、恢复etcd数据
1 2 3 4 5 6 7 8 9 10 11 ETCDCTL_API=3 etcdctl \ --endpoints=https://[127.0.0.1]:2379 \ --cacert=/etc/kubernetes/pki/etcd/ca.crt \ --cert=/etc/kubernetes/pki/etcd/server.crt \ --key=/etc/kubernetes/pki/etcd/server.key \ --initial-cluster=master=https://127.0.0.1:2380 \ --initial-cluster-token etcd-cluster-1 \ --initial-advertise-peer-urls=https://127.0.0.1:2380 \ --name=master \ --data-dir /var/lib/etcd-from-backup \ snapshot restore /tmp/snapshot-pre-boot.db
2、修改etcd.yamlvim /etc/kubernetes/manifests/etcd.yaml,如下修改:
1 2 3 4 5 6 7 8 9 10 11 12 13 14 15 16 17 18 19 20 21 22 23 --data-dir=/var/lib/etcd-from-backup --initial-cluster-token=etcd-cluster-1 volumeMounts: - mountPath: /var/lib/etcd-from-backup name: etcd-data - mountPath: /etc/kubernetes/pki/etcd name: etcd-certs hostNetwork: true priorityClassName: system-cluster-critical volumes: - hostPath: path: /var/lib/etcd-from-backup type: DirectoryOrCreate name: etcd-data - hostPath: path: /etc/kubernetes/pki/etcd type: DirectoryOrCreate name: etcd-certs
参考文档:https://www.cnblogs.com/dukuan/p/14124600.html
http://www.xiaoheidiannao.com/87635.html
https://max.book118.com/html/2021/0317/5341143323003144.shtm