https://refactoringguru.cn/design-patterns/prototype

创建型模式-原型模式

亦称: 克隆、Clone、Prototype

意图

原型模式是一种创建型设计模式, 使你能够复制已有对象, 而又无需使代码依赖它们所属的类。

问题

如果你有一个对象, 并希望生成与其完全相同的一个复制品, 你该如何实现呢? 首先, 你必须新建一个属于相同类的对象。 然后, 你必须遍历原始对象的所有成员变量, 并将成员变量值复制到新对象中。

不错! 但有个小问题。 并非所有对象都能通过这种方式进行复制, 因为有些对象可能拥有私有成员变量, 它们在对象本身以外是不可见的。

“从外部”复制对象并非总是可行。

直接复制还有另外一个问题。 因为你必须知道对象所属的类才能创建复制品, 所以代码必须依赖该类。 即使你可以接受额外的依赖性, 那还有另外一个问题: 有时你只知道对象所实现的接口, 而不知道其所属的具体类, 比如可向方法的某个参数传入实现了某个接口的任何对象。

解决方案

原型模式将克隆过程委派给被克隆的实际对象。 模式为所有支持克隆的对象声明了一个通用接口, 该接口让你能够克隆对象, 同时又无需将代码和对象所属类耦合。 通常情况下, 这样的接口中仅包含一个 克隆方法。

所有的类对 克隆方法的实现都非常相似。 该方法会创建一个当前类的对象, 然后将原始对象所有的成员变量值复制到新建的类中。 你甚至可以复制私有成员变量, 因为绝大部分编程语言都允许对象访问其同类对象的私有成员变量。

支持克隆的对象即为原型。 当你的对象有几十个成员变量和几百种类型时, 对其进行克隆甚至可以代替子类的构造。

预生成原型可以代替子类的构造

其运作方式如下: 创建一系列不同类型的对象并不同的方式对其进行配置。 如果所需对象与预先配置的对象相同, 那么你只需克隆原型即可, 无需新建一个对象。

真实世界类比

现实生活中, 产品在得到大规模生产前会使用原型进行各种测试。 但在这种情况下, 原型只是一种被动的工具, 不参与任何真正的生产活动。

一个细胞的分裂

由于工业原型并不是真正意义上的自我复制, 因此细胞有丝分裂 (还记得生物学知识吗?) 或许是更恰当的类比。 有丝分裂会产生一对完全相同的细胞。 原始细胞就是一个原型, 它在复制体的生成过程中起到了推动作用。

原型模式结构

基本实现

  1. 原型 (Prototype) 接口将对克隆方法进行声明。 在绝大多数情况下, 其中只会有一个名为 clone克隆的方法。
  2. 具体原型 (Concrete Prototype) 类将实现克隆方法。 除了将原始对象的数据复制到克隆体中之外, 该方法有时还需处理克隆过程中的极端情况, 例如克隆关联对象和梳理递归依赖等等。
  3. 客户端 (Client) 可以复制实现了原型接口的任何对象。

原型注册表实现

  1. 原型注册表 (Prototype Registry) 提供了一种访问常用原型的简单方法, 其中存储了一系列可供随时复制的预生成对象。 最简单的注册表原型是一个 名称 → 原型的哈希表。 但如果需要使用名称以外的条件进行搜索, 你可以创建更加完善的注册表版本。

伪代码

在本例中, 原型模式能让你生成完全相同的几何对象副本, 同时无需代码与对象所属类耦合。

克隆一系列位于同一类层次结构中的对象

所有形状类都遵循同一个提供克隆方法的接口。 在复制自身成员变量值到结果对象前, 子类可调用其父类的克隆方法。

1
2
3
4
5
6
7
8
9
10
11
12
13
14
15
16
17
18
19
20
21
22
23
24
25
26
27
28
29
30
31
32
33
34
35
36
37
38
39
40
41
42
43
44
45
46
47
48
49
50
51
52
53
54
55
56
57
58
59
60
61
62
63
64
65
66
67
68
69
70
71
72
73
74
75
76
77
78
79
80
81
82
83
84
// 基础原型。
abstract class Shape is
field X: int
field Y: int
field color: string

// 常规构造函数。
constructor Shape() is
// ...

// 原型构造函数。使用已有对象的数值来初始化一个新对象。
constructor Shape(source: Shape) is
this()
this.X = source.X
this.Y = source.Y
this.color = source.color

// clone(克隆)操作会返回一个形状子类。
abstract method clone():Shape


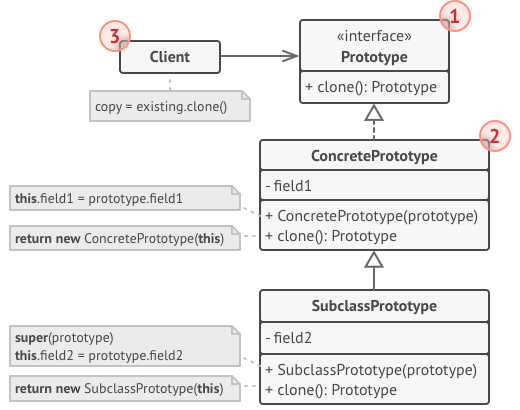
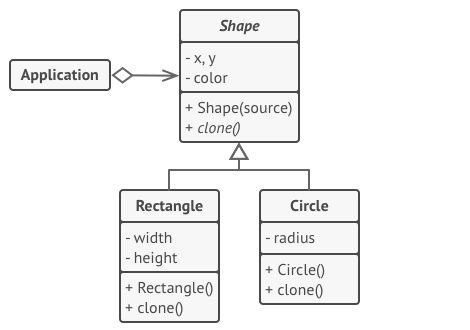
// 具体原型。克隆方法会创建一个新对象并将其传递给构造函数。直到构造函数运
// 行完成前,它都拥有指向新克隆对象的引用。因此,任何人都无法访问未完全生
// 成的克隆对象。这可以保持克隆结果的一致。
class Rectangle extends Shape is
field width: int
field height: int

constructor Rectangle(source: Rectangle) is
// 需要调用父构造函数来复制父类中定义的私有成员变量。
super(source)
this.width = source.width
this.height = source.height

method clone():Shape is
return new Rectangle(this)


class Circle extends Shape is
field radius: int

constructor Circle(source: Circle) is
super(source)
this.radius = source.radius

method clone():Shape is
return new Circle(this)


// 客户端代码中的某个位置。
class Application is
field shapes: array of Shape

constructor Application() is
Circle circle = new Circle()
circle.X = 10
circle.Y = 10
circle.radius = 20
shapes.add(circle)

Circle anotherCircle = circle.clone()
shapes.add(anotherCircle)
// 变量 `anotherCircle(另一个圆)`与 `circle(圆)`对象的内
// 容完全一样。

Rectangle rectangle = new Rectangle()
rectangle.width = 10
rectangle.height = 20
shapes.add(rectangle)

method businessLogic() is
// 原型是很强大的东西,因为它能在不知晓对象类型的情况下生成一个与
// 其完全相同的复制品。
Array shapesCopy = new Array of Shapes.

// 例如,我们不知晓形状数组中元素的具体类型,只知道它们都是形状。
// 但在多态机制的帮助下,当我们在某个形状上调用 `clone(克隆)`
// 方法时,程序会检查其所属的类并调用其中所定义的克隆方法。这样,
// 我们将获得一个正确的复制品,而不是一组简单的形状对象。
foreach (s in shapes) do
shapesCopy.add(s.clone())

// `shapesCopy(形状副本)`数组中包含 `shape(形状)`数组所有
// 子元素的复制品。

原型模式适合应用场景

如果你需要复制一些对象,同时又希望代码独立于这些对象所属的具体类,可以使用原型模式。

这一点考量通常出现在代码需要处理第三方代码通过接口传递过来的对象时。 即使不考虑代码耦合的情况, 你的代码也不能依赖这些对象所属的具体类, 因为你不知道它们的具体信息。

原型模式为客户端代码提供一个通用接口, 客户端代码可通过这一接口与所有实现了克隆的对象进行交互, 它也使得客户端代码与其所克隆的对象具体类独立开来。

如果子类的区别仅在于其对象的初始化方式,那么你可以使用该模式来减少子类的数量。别人创建这些子类的目的可能是为了创建特定类型的对象。

在原型模式中, 你可以使用一系列预生成的、 各种类型的对象作为原型。

客户端不必根据需求对子类进行实例化, 只需找到合适的原型并对其进行克隆即可。

实现方式

  1. 创建原型接口, 并在其中声明 克隆方法。 如果你已有类层次结构, 则只需在其所有类中添加该方法即可。

  2. 原型类必须另行定义一个以该类对象为参数的构造函数。 构造函数必须复制参数对象中的所有成员变量值到新建实体中。 如果你需要修改子类, 则必须调用父类构造函数, 让父类复制其私有成员变量值。

    如果编程语言不支持方法重载, 那么你可能需要定义一个特殊方法来复制对象数据。 在构造函数中进行此类处理比较方便, 因为它在调用 new运算符后会马上返回结果对象。

  3. 克隆方法通常只有一行代码: 使用 new运算符调用原型版本的构造函数。 注意, 每个类都必须显式重写克隆方法并使用自身类名调用 new运算符。 否则, 克隆方法可能会生成父类的对象。

  4. 你还可以创建一个中心化原型注册表, 用于存储常用原型。

    你可以新建一个工厂类来实现注册表, 或者在原型基类中添加一个获取原型的静态方法。 该方法必须能够根据客户端代码设定的条件进行搜索。 搜索条件可以是简单的字符串, 或者是一组复杂的搜索参数。 找到合适的原型后, 注册表应对原型进行克隆, 并将复制生成的对象返回给客户端。

    最后还要将对子类构造函数的直接调用替换为对原型注册表工厂方法的调用。

原型模式优缺点

优点

  • 你可以克隆对象, 而无需与它们所属的具体类相耦合。
  • 你可以克隆预生成原型, 避免反复运行初始化代码。
  • 你可以更方便地生成复杂对象。
  • 你可以用继承以外的方式来处理复杂对象的不同配置。

缺点

  • 克隆包含循环引用的复杂对象可能会非常麻烦。

与其他模式的关系

代码示例

原型是一种创建型设计模式, 使你能够复制对象, 甚至是复杂对象, 而又无需使代码依赖它们所属的类。

所有的原型类都必须有一个通用的接口, 使得即使在对象所属的具体类未知的情况下也能复制对象。 原型对象可以生成自身的完整副本, 因为相同类的对象可以相互访问对方的私有成员变量。

在 C# 中使用模式

复杂度: ★☆☆

流行度: ★★☆

使用示例: C# 的 Cloneable (克隆) 接口就是立即可用的原型模式。

识别方法: 原型可以简单地通过 clonecopy等方法来识别。

概念示例

本例说明了原型设计模式的结构并重点回答了下面的问题:

  • 它由哪些类组成?
  • 这些类扮演了哪些角色?
  • 模式中的各个元素会以何种方式相互关联?

Program.cs: 概念示例

1
2
3
4
5
6
7
8
9
10
11
12
13
14
15
16
17
18
19
20
21
22
23
24
25
26
27
28
29
30
31
32
33
34
35
36
37
38
39
40
41
42
43
44
45
46
47
48
49
50
51
52
53
54
55
56
57
58
59
60
61
62
63
64
65
66
67
68
69
70
71
72
73
74
75
76
77
78
79
80
81
82
using System;

namespace RefactoringGuru.DesignPatterns.Prototype.Conceptual
{
public class Person
{
public int Age;
public DateTime BirthDate;
public string Name;
public IdInfo IdInfo;

public Person ShallowCopy()
{
return (Person) this.MemberwiseClone();
}

public Person DeepCopy()
{
Person clone = (Person) this.MemberwiseClone();
clone.IdInfo = new IdInfo(IdInfo.IdNumber);
clone.Name = String.Copy(Name);
return clone;
}
}

public class IdInfo
{
public int IdNumber;

public IdInfo(int idNumber)
{
this.IdNumber = idNumber;
}
}

class Program
{
static void Main(string[] args)
{
Person p1 = new Person();
p1.Age = 42;
p1.BirthDate = Convert.ToDateTime("1977-01-01");
p1.Name = "Jack Daniels";
p1.IdInfo = new IdInfo(666);

// Perform a shallow copy of p1 and assign it to p2.
Person p2 = p1.ShallowCopy();
// Make a deep copy of p1 and assign it to p3.
Person p3 = p1.DeepCopy();

// Display values of p1, p2 and p3.
Console.WriteLine("Original values of p1, p2, p3:");
Console.WriteLine(" p1 instance values: ");
DisplayValues(p1);
Console.WriteLine(" p2 instance values:");
DisplayValues(p2);
Console.WriteLine(" p3 instance values:");
DisplayValues(p3);

// Change the value of p1 properties and display the values of p1,
// p2 and p3.
p1.Age = 32;
p1.BirthDate = Convert.ToDateTime("1900-01-01");
p1.Name = "Frank";
p1.IdInfo.IdNumber = 7878;
Console.WriteLine("\nValues of p1, p2 and p3 after changes to p1:");
Console.WriteLine(" p1 instance values: ");
DisplayValues(p1);
Console.WriteLine(" p2 instance values (reference values have changed):");
DisplayValues(p2);
Console.WriteLine(" p3 instance values (everything was kept the same):");
DisplayValues(p3);
}

public static void DisplayValues(Person p)
{
Console.WriteLine(" Name: {0:s}, Age: {1:d}, BirthDate: {2:MM/dd/yy}",
p.Name, p.Age, p.BirthDate);
Console.WriteLine(" ID#: {0:d}", p.IdInfo.IdNumber);
}
}
}

Output.txt: 执行结果

1
2
3
4
5
6
7
8
9
10
11
12
13
14
15
16
17
18
19
20
21
Original values of p1, p2, p3:
p1 instance values:
Name: Jack Daniels, Age: 42, BirthDate: 01/01/77
ID#: 666
p2 instance values:
Name: Jack Daniels, Age: 42, BirthDate: 01/01/77
ID#: 666
p3 instance values:
Name: Jack Daniels, Age: 42, BirthDate: 01/01/77
ID#: 666

Values of p1, p2 and p3 after changes to p1:
p1 instance values:
Name: Frank, Age: 32, BirthDate: 01/01/00
ID#: 7878
p2 instance values (reference values have changed):
Name: Jack Daniels, Age: 42, BirthDate: 01/01/77
ID#: 7878
p3 instance values (everything was kept the same):
Name: Jack Daniels, Age: 42, BirthDate: 01/01/77
ID#: 666

在 C++ 中使用模式

复杂度: ★☆☆

流行度: ★★☆

使用示例: C++ 的 Cloneable (克隆) 接口就是立即可用的原型模式。

识别方法: 原型可以简单地通过 clonecopy等方法来识别。

概念示例

本例说明了原型设计模式的结构并重点回答了下面的问题:

  • 它由哪些类组成?
  • 这些类扮演了哪些角色?
  • 模式中的各个元素会以何种方式相互关联?

main.cc: 概念示例

1
2
3
4
5
6
7
8
9
10
11
12
13
14
15
16
17
18
19
20
21
22
23
24
25
26
27
28
29
30
31
32
33
34
35
36
37
38
39
40
41
42
43
44
45
46
47
48
49
50
51
52
53
54
55
56
57
58
59
60
61
62
63
64
65
66
67
68
69
70
71
72
73
74
75
76
77
78
79
80
81
82
83
84
85
86
87
88
89
90
91
92
93
94
95
96
97
98
99
100
101
102
103
104
105
106
107
108
109
110
111
112
113
114
115
116
117
118
119
120
121
122
123
124
125
126
127
128
129
130
131
132
133
134
135
using std::string;

// Prototype Design Pattern
//
// Intent: Lets you copy existing objects without making your code dependent on
// their classes.

enum Type {
PROTOTYPE_1 = 0,
PROTOTYPE_2
};

/**
* The example class that has cloning ability. We'll see how the values of field
* with different types will be cloned.
*/

class Prototype {
protected:
string prototype_name_;
float prototype_field_;

public:
Prototype() {}
Prototype(string prototype_name)
: prototype_name_(prototype_name) {
}
virtual ~Prototype() {}
virtual Prototype *Clone() const = 0;
virtual void Method(float prototype_field) {
this->prototype_field_ = prototype_field;
std::cout << "Call Method from " << prototype_name_ << " with field : " << prototype_field << std::endl;
}
};

/**
* ConcretePrototype1 is a Sub-Class of Prototype and implement the Clone Method
* In this example all data members of Prototype Class are in the Stack. If you
* have pointers in your properties for ex: String* name_ ,you will need to
* implement the Copy-Constructor to make sure you have a deep copy from the
* clone method
*/

class ConcretePrototype1 : public Prototype {
private:
float concrete_prototype_field1_;

public:
ConcretePrototype1(string prototype_name, float concrete_prototype_field)
: Prototype(prototype_name), concrete_prototype_field1_(concrete_prototype_field) {
}

/**
* Notice that Clone method return a Pointer to a new ConcretePrototype1
* replica. so, the client (who call the clone method) has the responsability
* to free that memory. I you have smart pointer knowledge you may prefer to
* use unique_pointer here.
*/
Prototype *Clone() const override {
return new ConcretePrototype1(*this);
}
};

class ConcretePrototype2 : public Prototype {
private:
float concrete_prototype_field2_;

public:
ConcretePrototype2(string prototype_name, float concrete_prototype_field)
: Prototype(prototype_name), concrete_prototype_field2_(concrete_prototype_field) {
}
Prototype *Clone() const override {
return new ConcretePrototype2(*this);
}
};

/**
* In PrototypeFactory you have two concrete prototypes, one for each concrete
* prototype class, so each time you want to create a bullet , you can use the
* existing ones and clone those.
*/

class PrototypeFactory {
private:
std::unordered_map<Type, Prototype *, std::hash<int>> prototypes_;

public:
PrototypeFactory() {
prototypes_[Type::PROTOTYPE_1] = new ConcretePrototype1("PROTOTYPE_1 ", 50.f);
prototypes_[Type::PROTOTYPE_2] = new ConcretePrototype2("PROTOTYPE_2 ", 60.f);
}

/**
* Be carefull of free all memory allocated. Again, if you have smart pointers
* knowelege will be better to use it here.
*/

~PrototypeFactory() {
delete prototypes_[Type::PROTOTYPE_1];
delete prototypes_[Type::PROTOTYPE_2];
}

/**
* Notice here that you just need to specify the type of the prototype you
* want and the method will create from the object with this type.
*/
Prototype *CreatePrototype(Type type) {
return prototypes_[type]->Clone();
}
};

void Client(PrototypeFactory &prototype_factory) {
std::cout << "Let's create a Prototype 1\n";

Prototype *prototype = prototype_factory.CreatePrototype(Type::PROTOTYPE_1);
prototype->Method(90);
delete prototype;

std::cout << "\n";

std::cout << "Let's create a Prototype 2 \n";

prototype = prototype_factory.CreatePrototype(Type::PROTOTYPE_2);
prototype->Method(10);

delete prototype;
}

int main() {
PrototypeFactory *prototype_factory = new PrototypeFactory();
Client(*prototype_factory);
delete prototype_factory;

return 0;
}

Output.txt: 执行结果

1
2
3
4
5
Let's create a Prototype 1
Call Method from PROTOTYPE_1 with field : 90

Let's create a Prototype 2
Call Method from PROTOTYPE_2 with field : 10

在 Java 中使用模式

复杂度: ★☆☆

流行度: ★★☆

使用示例: Java 的 Cloneable (可克隆) 接口就是立即可用的原型模式。

任何类都可通过实现该接口来实现可被克隆的性质。

java.lang.Object#clone() (类必须实现 java.lang.Cloneable 接口)

识别方法: 原型可以简单地通过 clonecopy等方法来识别。

复制图形

让我们来看看在不使用标准 Cloneable接口的情况下如何实现原型模式。

shapes: 形状列表

shapes/Shape.java: 通用形状接口

1
2
3
4
5
6
7
8
9
10
11
12
13
14
15
16
17
18
19
20
21
22
23
24
25
26
27
28
29
package refactoring_guru.prototype.example.shapes;

import java.util.Objects;

public abstract class Shape {
public int x;
public int y;
public String color;

public Shape() {
}

public Shape(Shape target) {
if (target != null) {
this.x = target.x;
this.y = target.y;
this.color = target.color;
}
}

public abstract Shape clone();

@Override
public boolean equals(Object object2) {
if (!(object2 instanceof Shape)) return false;
Shape shape2 = (Shape) object2;
return shape2.x == x && shape2.y == y && Objects.equals(shape2.color, color);
}
}

shapes/Circle.java: 简单形状

1
2
3
4
5
6
7
8
9
10
11
12
13
14
15
16
17
18
19
20
21
22
23
24
25
26
27
package refactoring_guru.prototype.example.shapes;

public class Circle extends Shape {
public int radius;

public Circle() {
}

public Circle(Circle target) {
super(target);
if (target != null) {
this.radius = target.radius;
}
}

@Override
public Shape clone() {
return new Circle(this);
}

@Override
public boolean equals(Object object2) {
if (!(object2 instanceof Circle) || !super.equals(object2)) return false;
Circle shape2 = (Circle) object2;
return shape2.radius == radius;
}
}

shapes/Rectangle.java: 另一个形状

1
2
3
4
5
6
7
8
9
10
11
12
13
14
15
16
17
18
19
20
21
22
23
24
25
26
27
28
29
package refactoring_guru.prototype.example.shapes;

public class Rectangle extends Shape {
public int width;
public int height;

public Rectangle() {
}

public Rectangle(Rectangle target) {
super(target);
if (target != null) {
this.width = target.width;
this.height = target.height;
}
}

@Override
public Shape clone() {
return new Rectangle(this);
}

@Override
public boolean equals(Object object2) {
if (!(object2 instanceof Rectangle) || !super.equals(object2)) return false;
Rectangle shape2 = (Rectangle) object2;
return shape2.width == width && shape2.height == height;
}
}

Demo.java: 克隆示例

1
2
3
4
5
6
7
8
9
10
11
12
13
14
15
16
17
18
19
20
21
22
23
24
25
26
27
28
29
30
31
32
33
34
35
36
37
38
39
40
41
42
43
44
45
46
47
48
49
50
51
52
package refactoring_guru.prototype.example;

import refactoring_guru.prototype.example.shapes.Circle;
import refactoring_guru.prototype.example.shapes.Rectangle;
import refactoring_guru.prototype.example.shapes.Shape;

import java.util.ArrayList;
import java.util.List;

public class Demo {
public static void main(String[] args) {
List<Shape> shapes = new ArrayList<>();
List<Shape> shapesCopy = new ArrayList<>();

Circle circle = new Circle();
circle.x = 10;
circle.y = 20;
circle.radius = 15;
circle.color = "red";
shapes.add(circle);

Circle anotherCircle = (Circle) circle.clone();
shapes.add(anotherCircle);

Rectangle rectangle = new Rectangle();
rectangle.width = 10;
rectangle.height = 20;
rectangle.color = "blue";
shapes.add(rectangle);

cloneAndCompare(shapes, shapesCopy);
}

private static void cloneAndCompare(List<Shape> shapes, List<Shape> shapesCopy) {
for (Shape shape : shapes) {
shapesCopy.add(shape.clone());
}

for (int i = 0; i < shapes.size(); i++) {
if (shapes.get(i) != shapesCopy.get(i)) {
System.out.println(i + ": Shapes are different objects (yay!)");
if (shapes.get(i).equals(shapesCopy.get(i))) {
System.out.println(i + ": And they are identical (yay!)");
} else {
System.out.println(i + ": But they are not identical (booo!)");
}
} else {
System.out.println(i + ": Shape objects are the same (booo!)");
}
}
}
}

OutputDemo.txt: 执行结果

1
2
3
4
5
6
0: Shapes are different objects (yay!)
0: And they are identical (yay!)
1: Shapes are different objects (yay!)
1: And they are identical (yay!)
2: Shapes are different objects (yay!)
2: And they are identical (yay!)

原型注册站

你可以实现中心化的原型注册站 (或工厂), 其中包含一系列预定义的原型对象。 这样一来, 你就可以通过传递对象名称或其他参数的方式从工厂处获得新的对象。 工厂将搜索合适的原型, 然后对其进行克隆复制, 最后将副本返回给你。

cache

cache/BundledShapeCache.java: 原型工厂

1
2
3
4
5
6
7
8
9
10
11
12
13
14
15
16
17
18
19
20
21
22
23
24
25
26
27
28
29
30
31
32
33
34
35
36
37
38
39
package refactoring_guru.prototype.caching.cache;

import refactoring_guru.prototype.example.shapes.Circle;
import refactoring_guru.prototype.example.shapes.Rectangle;
import refactoring_guru.prototype.example.shapes.Shape;

import java.util.HashMap;
import java.util.Map;

public class BundledShapeCache {
private Map<String, Shape> cache = new HashMap<>();

public BundledShapeCache() {
Circle circle = new Circle();
circle.x = 5;
circle.y = 7;
circle.radius = 45;
circle.color = "Green";

Rectangle rectangle = new Rectangle();
rectangle.x = 6;
rectangle.y = 9;
rectangle.width = 8;
rectangle.height = 10;
rectangle.color = "Blue";

cache.put("Big green circle", circle);
cache.put("Medium blue rectangle", rectangle);
}

public Shape put(String key, Shape shape) {
cache.put(key, shape);
return shape;
}

public Shape get(String key) {
return cache.get(key).clone();
}
}

Demo.java: 克隆示例

1
2
3
4
5
6
7
8
9
10
11
12
13
14
15
16
17
18
19
20
21
22
23
24
25
26
27
28
29
30
31
package refactoring_guru.prototype.caching;

import refactoring_guru.prototype.caching.cache.BundledShapeCache;
import refactoring_guru.prototype.example.shapes.Shape;

public class Demo {
public static void main(String[] args) {
BundledShapeCache cache = new BundledShapeCache();

Shape shape1 = cache.get("Big green circle");
Shape shape2 = cache.get("Medium blue rectangle");
Shape shape3 = cache.get("Medium blue rectangle");

if (shape1 != shape2 && !shape1.equals(shape2)) {
System.out.println("Big green circle != Medium blue rectangle (yay!)");
} else {
System.out.println("Big green circle == Medium blue rectangle (booo!)");
}

if (shape2 != shape3) {
System.out.println("Medium blue rectangles are two different objects (yay!)");
if (shape2.equals(shape3)) {
System.out.println("And they are identical (yay!)");
} else {
System.out.println("But they are not identical (booo!)");
}
} else {
System.out.println("Rectangle objects are the same (booo!)");
}
}
}

OutputDemo.txt: 执行结果

1
2
3
Big green circle != Medium blue rectangle (yay!)
Medium blue rectangles are two different objects (yay!)
And they are identical (yay!)

在 PHP 中使用模式

复杂度: ★☆☆

流行度: ★★☆

使用示例: PHP 中提供立即可用的原型模式。 你可以使用 clone关键字创建一个对象的完整副本。 如果想要某个类支持克隆功能, 你需要实现 __clone方法。

识别方法: 原型可以简单地通过 clonecopy等方法来识别。

概念示例

本例说明了原型设计模式的结构并重点回答了下面的问题:

  • 它由哪些类组成?
  • 这些类扮演了哪些角色?
  • 模式中的各个元素会以何种方式相互关联?

了解该模式的结构后, 你可以更容易地理解下面基于真实世界的 PHP 应用案例。

index.php: 概念示例

1
2
3
4
5
6
7
8
9
10
11
12
13
14
15
16
17
18
19
20
21
22
23
24
25
26
27
28
29
30
31
32
33
34
35
36
37
38
39
40
41
42
43
44
45
46
47
48
49
50
51
52
53
54
55
56
57
58
59
60
61
62
63
64
65
66
67
68
69
70
71
72
73
74
75
76
77
78
79
80
81
82
83
84
85
<?php

namespace RefactoringGuru\Prototype\Conceptual;

/**
* The example class that has cloning ability. We'll see how the values of field
* with different types will be cloned.
*/
class Prototype
{
public $primitive;
public $component;
public $circularReference;

/**
* PHP has built-in cloning support. You can `clone` an object without
* defining any special methods as long as it has fields of primitive types.
* Fields containing objects retain their references in a cloned object.
* Therefore, in some cases, you might want to clone those referenced
* objects as well. You can do this in a special `__clone()` method.
*/
public function __clone()
{
$this->component = clone $this->component;

// Cloning an object that has a nested object with backreference
// requires special treatment. After the cloning is completed, the
// nested object should point to the cloned object, instead of the
// original object.
$this->circularReference = clone $this->circularReference;
$this->circularReference->prototype = $this;
}
}

class ComponentWithBackReference
{
public $prototype;

/**
* Note that the constructor won't be executed during cloning. If you have
* complex logic inside the constructor, you may need to execute it in the
* `__clone` method as well.
*/
public function __construct(Prototype $prototype)
{
$this->prototype = $prototype;
}
}

/**
* The client code.
*/
function clientCode()
{
$p1 = new Prototype();
$p1->primitive = 245;
$p1->component = new \DateTime();
$p1->circularReference = new ComponentWithBackReference($p1);

$p2 = clone $p1;
if ($p1->primitive === $p2->primitive) {
echo "Primitive field values have been carried over to a clone. Yay!\n";
} else {
echo "Primitive field values have not been copied. Booo!\n";
}
if ($p1->component === $p2->component) {
echo "Simple component has not been cloned. Booo!\n";
} else {
echo "Simple component has been cloned. Yay!\n";
}

if ($p1->circularReference === $p2->circularReference) {
echo "Component with back reference has not been cloned. Booo!\n";
} else {
echo "Component with back reference has been cloned. Yay!\n";
}

if ($p1->circularReference->prototype === $p2->circularReference->prototype) {
echo "Component with back reference is linked to original object. Booo!\n";
} else {
echo "Component with back reference is linked to the clone. Yay!\n";
}
}

clientCode();

Output.txt: 执行结果

1
2
3
4
Primitive field values have been carried over to a clone. Yay!
Simple component has been cloned. Yay!
Component with back reference has been cloned. Yay!
Component with back reference is linked to the clone. Yay!

真实世界示例

原型模式提供了一种复制已有对象的简便方式, 可代替直接复制对象的所有成员变量来对对象进行重构的方法。 直接复制的方式不仅让你与被克隆类所属的对象相耦合, 还不允许你复制私有成员变量的内容。 原型模式让你能够在被克隆类的内部进行克隆工作, 因此可以不受限制地访问类的私有成员变量。

本例说明了如何使用原型模式克隆复杂的页面对象。 页面类拥有许多私有成员变量, 但它们都通过原型模式被复制到了克隆对象中。

index.php: 真实世界示例

1
2
3
4
5
6
7
8
9
10
11
12
13
14
15
16
17
18
19
20
21
22
23
24
25
26
27
28
29
30
31
32
33
34
35
36
37
38
39
40
41
42
43
44
45
46
47
48
49
50
51
52
53
54
55
56
57
58
59
60
61
62
63
64
65
66
67
68
69
70
71
72
73
74
75
76
77
78
79
80
81
82
83
84
85
86
87
88
89
90
91
92
93
94
95
96
97
98
99
100
101
<?php

namespace RefactoringGuru\Prototype\RealWorld;

/**
* Prototype.
*/
class Page
{
private $title;

private $body;

/**
* @var Author
*/
private $author;

private $comments = [];

/**
* @var \DateTime
*/
private $date;

// +100 private fields.

public function __construct(string $title, string $body, Author $author)
{
$this->title = $title;
$this->body = $body;
$this->author = $author;
$this->author->addToPage($this);
$this->date = new \DateTime();
}

public function addComment(string $comment): void
{
$this->comments[] = $comment;
}

/**
* You can control what data you want to carry over to the cloned object.
*
* For instance, when a page is cloned:
* - It gets a new "Copy of ..." title.
* - The author of the page remains the same. Therefore we leave the
* reference to the existing object while adding the cloned page to the list
* of the author's pages.
* - We don't carry over the comments from the old page.
* - We also attach a new date object to the page.
*/
public function __clone()
{
$this->title = "Copy of " . $this->title;
$this->author->addToPage($this);
$this->comments = [];
$this->date = new \DateTime();
}
}

class Author
{
private $name;

/**
* @var Page[]
*/
private $pages = [];

public function __construct(string $name)
{
$this->name = $name;
}

public function addToPage(Page $page): void
{
$this->pages[] = $page;
}
}

/**
* The client code.
*/
function clientCode()
{
$author = new Author("John Smith");
$page = new Page("Tip of the day", "Keep calm and carry on.", $author);

// ...

$page->addComment("Nice tip, thanks!");

// ...

$draft = clone $page;
echo "Dump of the clone. Note that the author is now referencing two objects.\n\n";
print_r($draft);
}

clientCode();

Output.txt: 执行结果

1
2
3
4
5
6
7
8
9
10
11
12
13
14
15
16
17
18
19
20
21
22
23
24
25
26
27
28
29
30
31
32
33
34
35
36
37
38
39
40
41
42
43
44
45
46
47
48
49
Dump of the clone. Note that the author is now referencing two objects.

RefactoringGuru\Prototype\RealWorld\Page Object
(
[title:RefactoringGuru\Prototype\RealWorld\Page:private] => Copy of Tip of the day
[body:RefactoringGuru\Prototype\RealWorld\Page:private] => Keep calm and carry on.
[author:RefactoringGuru\Prototype\RealWorld\Page:private] => RefactoringGuru\Prototype\RealWorld\Author Object
(
[name:RefactoringGuru\Prototype\RealWorld\Author:private] => John Smith
[pages:RefactoringGuru\Prototype\RealWorld\Author:private] => Array
(
[0] => RefactoringGuru\Prototype\RealWorld\Page Object
(
[title:RefactoringGuru\Prototype\RealWorld\Page:private] => Tip of the day
[body:RefactoringGuru\Prototype\RealWorld\Page:private] => Keep calm and carry on.
[author:RefactoringGuru\Prototype\RealWorld\Page:private] => RefactoringGuru\Prototype\RealWorld\Author Object
*RECURSION*
[comments:RefactoringGuru\Prototype\RealWorld\Page:private] => Array
(
[0] => Nice tip, thanks!
)

[date:RefactoringGuru\Prototype\RealWorld\Page:private] => DateTime Object
(
[date] => 2018-06-04 14:50:39.306237
[timezone_type] => 3
[timezone] => UTC
)

)

[1] => RefactoringGuru\Prototype\RealWorld\Page Object
*RECURSION*
)

)

[comments:RefactoringGuru\Prototype\RealWorld\Page:private] => Array
(
)

[date:RefactoringGuru\Prototype\RealWorld\Page:private] => DateTime Object
(
[date] => 2018-06-04 14:50:39.306272
[timezone_type] => 3
[timezone] => UTC
)

)

在 Python 中使用模式

复杂度: ★☆☆

流行度: ★★☆

使用示例: Python 的 Cloneable (克隆) 接口就是立即可用的原型模式。

识别方法: 原型可以简单地通过 clonecopy等方法来识别。

概念示例

本例说明了原型设计模式的结构并重点回答了下面的问题:

  • 它由哪些类组成?
  • 这些类扮演了哪些角色?
  • 模式中的各个元素会以何种方式相互关联?

main.py: 概念示例

1
2
3
4
5
6
7
8
9
10
11
12
13
14
15
16
17
18
19
20
21
22
23
24
25
26
27
28
29
30
31
32
33
34
35
36
37
38
39
40
41
42
43
44
45
46
47
48
49
50
51
52
53
54
55
56
57
58
59
60
61
62
63
64
65
66
67
68
69
70
71
72
73
74
75
76
77
78
79
80
81
82
83
84
85
86
87
88
89
90
91
92
93
94
95
96
97
98
99
100
101
102
103
104
105
106
107
108
109
110
111
112
113
114
115
116
117
118
119
120
121
122
123
124
125
126
127
128
129
130
131
132
133
134
135
136
137
138
139
140
141
142
143
144
145
146
147
148
149
150
151
152
153
154
155
156
import copy


class SelfReferencingEntity:
def __init__(self):
self.parent = None

def set_parent(self, parent):
self.parent = parent


class SomeComponent:
"""
Python provides its own interface of Prototype via `copy.copy` and
`copy.deepcopy` functions. And any class that wants to implement custom
implementations have to override `__copy__` and `__deepcopy__` member
functions.
"""

def __init__(self, some_int, some_list_of_objects, some_circular_ref):
self.some_int = some_int
self.some_list_of_objects = some_list_of_objects
self.some_circular_ref = some_circular_ref

def __copy__(self):
"""
Create a shallow copy. This method will be called whenever someone calls
`copy.copy` with this object and the returned value is returned as the
new shallow copy.
"""

# First, let's create copies of the nested objects.
some_list_of_objects = copy.copy(self.some_list_of_objects)
some_circular_ref = copy.copy(self.some_circular_ref)

# Then, let's clone the object itself, using the prepared clones of the
# nested objects.
new = self.__class__(
self.some_int, some_list_of_objects, some_circular_ref
)
new.__dict__.update(self.__dict__)

return new

def __deepcopy__(self, memo={}):
"""
Create a deep copy. This method will be called whenever someone calls
`copy.deepcopy` with this object and the returned value is returned as
the new deep copy.

What is the use of the argument `memo`? Memo is the dictionary that is
used by the `deepcopy` library to prevent infinite recursive copies in
instances of circular references. Pass it to all the `deepcopy` calls
you make in the `__deepcopy__` implementation to prevent infinite
recursions.
"""

# First, let's create copies of the nested objects.
some_list_of_objects = copy.deepcopy(self.some_list_of_objects, memo)
some_circular_ref = copy.deepcopy(self.some_circular_ref, memo)

# Then, let's clone the object itself, using the prepared clones of the
# nested objects.
new = self.__class__(
self.some_int, some_list_of_objects, some_circular_ref
)
new.__dict__ = copy.deepcopy(self.__dict__, memo)

return new


if __name__ == "__main__":

list_of_objects = [1, {1, 2, 3}, [1, 2, 3]]
circular_ref = SelfReferencingEntity()
component = SomeComponent(23, list_of_objects, circular_ref)
circular_ref.set_parent(component)

shallow_copied_component = copy.copy(component)

# Let's change the list in shallow_copied_component and see if it changes in
# component.
shallow_copied_component.some_list_of_objects.append("another object")
if component.some_list_of_objects[-1] == "another object":
print(
"Adding elements to `shallow_copied_component`'s "
"some_list_of_objects adds it to `component`'s "
"some_list_of_objects."
)
else:
print(
"Adding elements to `shallow_copied_component`'s "
"some_list_of_objects doesn't add it to `component`'s "
"some_list_of_objects."
)

# Let's change the set in the list of objects.
component.some_list_of_objects[1].add(4)
if 4 in shallow_copied_component.some_list_of_objects[1]:
print(
"Changing objects in the `component`'s some_list_of_objects "
"changes that object in `shallow_copied_component`'s "
"some_list_of_objects."
)
else:
print(
"Changing objects in the `component`'s some_list_of_objects "
"doesn't change that object in `shallow_copied_component`'s "
"some_list_of_objects."
)

deep_copied_component = copy.deepcopy(component)

# Let's change the list in deep_copied_component and see if it changes in
# component.
deep_copied_component.some_list_of_objects.append("one more object")
if component.some_list_of_objects[-1] == "one more object":
print(
"Adding elements to `deep_copied_component`'s "
"some_list_of_objects adds it to `component`'s "
"some_list_of_objects."
)
else:
print(
"Adding elements to `deep_copied_component`'s "
"some_list_of_objects doesn't add it to `component`'s "
"some_list_of_objects."
)

# Let's change the set in the list of objects.
component.some_list_of_objects[1].add(10)
if 10 in deep_copied_component.some_list_of_objects[1]:
print(
"Changing objects in the `component`'s some_list_of_objects "
"changes that object in `deep_copied_component`'s "
"some_list_of_objects."
)
else:
print(
"Changing objects in the `component`'s some_list_of_objects "
"doesn't change that object in `deep_copied_component`'s "
"some_list_of_objects."
)

print(
f"id(deep_copied_component.some_circular_ref.parent): "
f"{id(deep_copied_component.some_circular_ref.parent)}"
)
print(
f"id(deep_copied_component.some_circular_ref.parent.some_circular_ref.parent): "
f"{id(deep_copied_component.some_circular_ref.parent.some_circular_ref.parent)}"
)
print(
"^^ This shows that deepcopied objects contain same reference, they "
"are not cloned repeatedly."
)

Output.txt: 执行结果

1
2
3
4
5
6
7
Adding elements to `shallow_copied_component`'s some_list_of_objects adds it to `component`'s some_list_of_objects.
Changing objects in the `component`'s some_list_of_objects changes that object in `shallow_copied_component`'s some_list_of_objects.
Adding elements to `deep_copied_component`'s some_list_of_objects doesn't add it to `component`'s some_list_of_objects.
Changing objects in the `component`'s some_list_of_objects doesn't change that object in `deep_copied_component`'s some_list_of_objects.
id(deep_copied_component.some_circular_ref.parent): 4429472784
id(deep_copied_component.some_circular_ref.parent.some_circular_ref.parent): 4429472784
^^ This shows that deepcopied objects contain same reference, they are not cloned repeatedly.

在 Ruby 中使用模式

复杂度: ★☆☆

流行度: ★★☆

使用示例: Ruby 的 Cloneable (克隆) 接口就是立即可用的原型模式。

识别方法: 原型可以简单地通过 clonecopy等方法来识别。。

概念示例

本例说明了原型设计模式的结构并重点回答了下面的问题:

  • 它由哪些类组成?
  • 这些类扮演了哪些角色?
  • 模式中的各个元素会以何种方式相互关联?

main.rb: 概念示例

1
2
3
4
5
6
7
8
9
10
11
12
13
14
15
16
17
18
19
20
21
22
23
24
25
26
27
28
29
30
31
32
33
34
35
36
37
38
39
40
41
42
43
44
45
46
47
48
49
50
51
52
53
54
55
56
57
58
59
60
61
62
63
64
65
66
67
68
69
70
# The example class that has cloning ability. We'll see how the values of field
# with different types will be cloned.
class Prototype
attr_accessor :primitive, :component, :circular_reference

def initialize
@primitive = nil
@component = nil
@circular_reference = nil
end

# @return [Prototype]
def clone
@component = deep_copy(@component)

# Cloning an object that has a nested object with backreference requires
# special treatment. After the cloning is completed, the nested object
# should point to the cloned object, instead of the original object.
@circular_reference = deep_copy(@circular_reference)
@circular_reference.prototype = self
deep_copy(self)
end

# deep_copy is the usual Marshalling hack to make a deep copy. But it's rather
# slow and inefficient, therefore, in real applications, use a special gem
private def deep_copy(object)
Marshal.load(Marshal.dump(object))
end
end

class ComponentWithBackReference
attr_accessor :prototype

# @param [Prototype] prototype
def initialize(prototype)
@prototype = prototype
end
end

# The client code.
p1 = Prototype.new
p1.primitive = 245
p1.component = Time.now
p1.circular_reference = ComponentWithBackReference.new(p1)

p2 = p1.clone

if p1.primitive == p2.primitive
puts 'Primitive field values have been carried over to a clone. Yay!'
else
puts 'Primitive field values have not been copied. Booo!'
end

if p1.component.equal?(p2.component)
puts 'Simple component has not been cloned. Booo!'
else
puts 'Simple component has been cloned. Yay!'
end

if p1.circular_reference.equal?(p2.circular_reference)
puts 'Component with back reference has not been cloned. Booo!'
else
puts 'Component with back reference has been cloned. Yay!'
end

if p1.circular_reference.prototype.equal?(p2.circular_reference.prototype)
print 'Component with back reference is linked to original object. Booo!'
else
print 'Component with back reference is linked to the clone. Yay!'
end

output.txt: 执行结果

1
2
3
4
Primitive field values have been carried over to a clone. Yay!
Simple component has been cloned. Yay!
Component with back reference has been cloned. Yay!
Component with back reference is linked to the clone. Yay!

在 Swift 中使用模式

复杂度: ★☆☆

流行度: ★★☆

使用示例: Swift 的 Cloneable (克隆) 接口就是立即可用的原型模式。

识别方法: 原型可以简单地通过 clonecopy等方法来识别。

概念示例

本例说明了原型设计模式的结构并重点回答了下面的问题:

  • 它由哪些类组成?
  • 这些类扮演了哪些角色?
  • 模式中的各个元素会以何种方式相互关联?

了解该模式的结构后, 你可以更容易地理解下面基于真实世界的 Swift 应用案例。

Example.swift: 概念示例

1
2
3
4
5
6
7
8
9
10
11
12
13
14
15
16
17
18
19
20
21
22
23
24
25
26
27
28
29
30
31
32
33
34
35
36
37
38
39
40
41
42
43
44
45
46
47
48
49
50
51
52
53
54
55
56
57
58
59
60
61
62
63
64
65
66
67
68
69
70
71
72
73
74
75
76
77
import XCTest

/// Swift has built-in cloning support. To add cloning support to your class,
/// you need to implement the NSCopying protocol in that class and provide the
/// implementation for the `copy` method.
class BaseClass: NSCopying, Equatable {

private var intValue = 1
private var stringValue = "Value"

required init(intValue: Int = 1, stringValue: String = "Value") {

self.intValue = intValue
self.stringValue = stringValue
}

/// MARK: - NSCopying
func copy(with zone: NSZone? = nil) -> Any {
let prototype = type(of: self).init()
prototype.intValue = intValue
prototype.stringValue = stringValue
print("Values defined in BaseClass have been cloned!")
return prototype
}

/// MARK: - Equatable
static func == (lhs: BaseClass, rhs: BaseClass) -> Bool {
return lhs.intValue == rhs.intValue && lhs.stringValue == rhs.stringValue
}
}

/// Subclasses can override the base `copy` method to copy their own data into
/// the resulting object. But you should always call the base method first.
class SubClass: BaseClass {

private var boolValue = true

func copy() -> Any {
return copy(with: nil)
}

override func copy(with zone: NSZone?) -> Any {
guard let prototype = super.copy(with: zone) as? SubClass else {
return SubClass() // oops
}
prototype.boolValue = boolValue
print("Values defined in SubClass have been cloned!")
return prototype
}
}

/// The client code.
class Client {
// ...
static func someClientCode() {
let original = SubClass(intValue: 2, stringValue: "Value2")

guard let copy = original.copy() as? SubClass else {
XCTAssert(false)
return
}

/// See implementation of `Equatable` protocol for more details.
XCTAssert(copy == original)

print("The original object is equal to the copied object!")
}
// ...
}

/// Let's see how it all works together.
class PrototypeConceptual: XCTestCase {

func testPrototype_NSCopying() {
Client.someClientCode()
}
}

Output.txt: 执行结果

1
2
3
Values defined in BaseClass have been cloned!
Values defined in SubClass have been cloned!
The original object is equal to the copied object!

真实世界示例

Example.swift: 真实世界示例

1
2
3
4
5
6
7
8
9
10
11
12
13
14
15
16
17
18
19
20
21
22
23
24
25
26
27
28
29
30
31
32
33
34
35
36
37
38
39
40
41
42
43
44
45
46
47
48
49
50
51
52
53
54
55
56
57
58
59
60
61
62
63
64
65
66
67
68
69
70
71
72
73
74
75
76
77
78
79
import XCTest

class PrototypeRealWorld: XCTestCase {

func testPrototypeRealWorld() {

let author = Author(id: 10, username: "Ivan_83")
let page = Page(title: "My First Page", contents: "Hello world!", author: author)

page.add(comment: Comment(message: "Keep it up!"))

/// Since NSCopying returns Any, the copied object should be unwrapped.
guard let anotherPage = page.copy() as? Page else {
XCTFail("Page was not copied")
return
}

/// Comments should be empty as it is a new page.
XCTAssert(anotherPage.comments.isEmpty)

/// Note that the author is now referencing two objects.
XCTAssert(author.pagesCount == 2)

print("Original title: " + page.title)
print("Copied title: " + anotherPage.title)
print("Count of pages: " + String(author.pagesCount))
}
}

private class Author {

private var id: Int
private var username: String
private var pages = [Page]()

init(id: Int, username: String) {
self.id = id
self.username = username
}

func add(page: Page) {
pages.append(page)
}

var pagesCount: Int {
return pages.count
}
}

private class Page: NSCopying {

private(set) var title: String
private(set) var contents: String
private weak var author: Author?
private(set) var comments = [Comment]()

init(title: String, contents: String, author: Author?) {
self.title = title
self.contents = contents
self.author = author
author?.add(page: self)
}

func add(comment: Comment) {
comments.append(comment)
}

/// MARK: - NSCopying

func copy(with zone: NSZone? = nil) -> Any {
return Page(title: "Copy of '" + title + "'", contents: contents, author: author)
}
}

private struct Comment {

let date = Date()
let message: String
}

Output.txt: 执行结果

1
2
3
Original title: My First Page
Copied title: Copy of 'My First Page'
Count of pages: 2

在 TypeScript 中使用模式

复杂度: ★☆☆

流行度: ★★☆

使用示例: TypeScript 的 Cloneable (克隆) 接口就是立即可用的原型模式。

识别方法: 原型可以简单地通过 clonecopy等方法来识别。

概念示例

本例说明了原型设计模式的结构并重点回答了下面的问题:

  • 它由哪些类组成?
  • 这些类扮演了哪些角色?
  • 模式中的各个元素会以何种方式相互关联?

index.ts: 概念示例

1
2
3
4
5
6
7
8
9
10
11
12
13
14
15
16
17
18
19
20
21
22
23
24
25
26
27
28
29
30
31
32
33
34
35
36
37
38
39
40
41
42
43
44
45
46
47
48
49
50
51
52
53
54
55
56
57
58
59
60
61
62
63
64
65
66
67
68
69
70
/**
* The example class that has cloning ability. We'll see how the values of field
* with different types will be cloned.
*/
class Prototype {
public primitive: any;
public component: object;
public circularReference: ComponentWithBackReference;

public clone(): this {
const clone = Object.create(this);

clone.component = Object.create(this.component);

// Cloning an object that has a nested object with backreference
// requires special treatment. After the cloning is completed, the
// nested object should point to the cloned object, instead of the
// original object. Spread operator can be handy for this case.
clone.circularReference = {
...this.circularReference,
prototype: { ...this },
};

return clone;
}
}

class ComponentWithBackReference {
public prototype;

constructor(prototype: Prototype) {
this.prototype = prototype;
}
}

/**
* The client code.
*/
function clientCode() {
const p1 = new Prototype();
p1.primitive = 245;
p1.component = new Date();
p1.circularReference = new ComponentWithBackReference(p1);

const p2 = p1.clone();
if (p1.primitive === p2.primitive) {
console.log('Primitive field values have been carried over to a clone. Yay!');
} else {
console.log('Primitive field values have not been copied. Booo!');
}
if (p1.component === p2.component) {
console.log('Simple component has not been cloned. Booo!');
} else {
console.log('Simple component has been cloned. Yay!');
}

if (p1.circularReference === p2.circularReference) {
console.log('Component with back reference has not been cloned. Booo!');
} else {
console.log('Component with back reference has been cloned. Yay!');
}

if (p1.circularReference.prototype === p2.circularReference.prototype) {
console.log('Component with back reference is linked to original object. Booo!');
} else {
console.log('Component with back reference is linked to the clone. Yay!');
}
}

clientCode();

Output.txt: 执行结果

1
2
3
4
Primitive field values have been carried over to a clone. Yay!
Simple component has been cloned. Yay!
Component with back reference has been cloned. Yay!
Component with back reference is linked to the clone. Yay!

概念示例

让我们尝试通过基于操作系统文件系统的示例来理解原型模式。 操作系统的文件系统是递归的: 文件夹中包含文件和文件夹, 其中又包含文件和文件夹, 以此类推。

每个文件和文件夹都可用一个 inode接口来表示。 inode接口中同样也有 clone克隆功能。

file文件和 folder文件夹结构体都实现了 print打印和 clone方法, 因为它们都是 inode类型。 同时, 注意 filefolder中的 clone方法。 这两者的 clone方法都会返回相应文件或文件夹的副本。 同时在克隆过程中, 我们会在其名称后面添加 “_clone” 字样。

inode.go: 原型接口

1
2
3
4
5
6
package main

type inode interface {
print(string)
clone() inode
}

file.go: 具体原型

1
2
3
4
5
6
7
8
9
10
11
12
13
14
15
package main

import "fmt"

type file struct {
name string
}

func (f *file) print(indentation string) {
fmt.Println(indentation + f.name)
}

func (f *file) clone() inode {
return &file{name: f.name + "_clone"}
}

folder.go: 具体原型

1
2
3
4
5
6
7
8
9
10
11
12
13
14
15
16
17
18
19
20
21
22
23
24
25
26
package main

import "fmt"

type folder struct {
children []inode
name string
}

func (f *folder) print(indentation string) {
fmt.Println(indentation + f.name)
for _, i := range f.children {
i.print(indentation + indentation)
}
}

func (f *folder) clone() inode {
cloneFolder := &folder{name: f.name + "_clone"}
var tempChildren []inode
for _, i := range f.children {
copy := i.clone()
tempChildren = append(tempChildren, copy)
}
cloneFolder.children = tempChildren
return cloneFolder
}

main.go: 客户端代码

1
2
3
4
5
6
7
8
9
10
11
12
13
14
15
16
17
18
19
20
21
22
23
24
25
package main

import "fmt"

func main() {
file1 := &file{name: "File1"}
file2 := &file{name: "File2"}
file3 := &file{name: "File3"}

folder1 := &folder{
children: []inode{file1},
name: "Folder1",
}

folder2 := &folder{
children: []inode{folder1, file2, file3},
name: "Folder2",
}
fmt.Println("\nPrinting hierarchy for Folder2")
folder2.print(" ")

cloneFolder := folder2.clone()
fmt.Println("\nPrinting hierarchy for clone Folder")
cloneFolder.print(" ")
}

output.txt: 执行结果

1
2
3
4
5
6
7
8
9
10
11
12
13
Printing hierarchy for Folder2
Folder2
Folder1
File1
File2
File3

Printing hierarchy for clone Folder
Folder2_clone
Folder1_clone
File1_clone
File2_clone
File3_clone

根据: Golang By Example