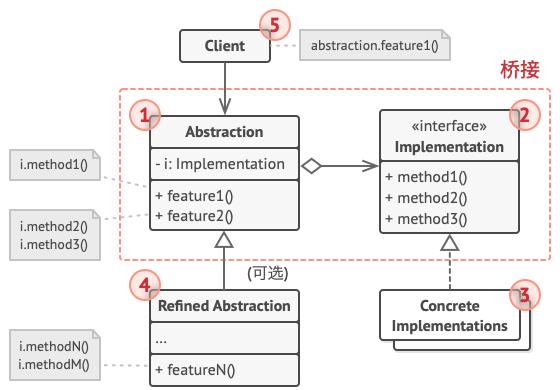
namespaceRefactoringGuru.DesignPatterns.Bridge.Conceptual { // The Abstraction defines the interface for the "control" part of the two // class hierarchies. It maintains a reference to an object of the // Implementation hierarchy and delegates all of the real work to this // object. classAbstraction { protected IImplementation _implementation; publicAbstraction(IImplementation implementation) { this._implementation = implementation; } publicvirtualstringOperation() { return"Abstract: Base operation with:\n" + _implementation.OperationImplementation(); } }
// You can extend the Abstraction without changing the Implementation // classes. classExtendedAbstraction : Abstraction { publicExtendedAbstraction(IImplementation implementation) : base(implementation) { } publicoverridestringOperation() { return"ExtendedAbstraction: Extended operation with:\n" + base._implementation.OperationImplementation(); } }
// The Implementation defines the interface for all implementation classes. // It doesn't have to match the Abstraction's interface. In fact, the two // interfaces can be entirely different. Typically the Implementation // interface provides only primitive operations, while the Abstraction // defines higher- level operations based on those primitives. publicinterfaceIImplementation { stringOperationImplementation(); }
// Each Concrete Implementation corresponds to a specific platform and // implements the Implementation interface using that platform's API. classConcreteImplementationA : IImplementation { publicstringOperationImplementation() { return"ConcreteImplementationA: The result in platform A.\n"; } }
classConcreteImplementationB : IImplementation { publicstringOperationImplementation() { return"ConcreteImplementationA: The result in platform B.\n"; } }
classClient { // Except for the initialization phase, where an Abstraction object gets // linked with a specific Implementation object, the client code should // only depend on the Abstraction class. This way the client code can // support any abstraction-implementation combination. publicvoidClientCode(Abstraction abstraction) { Console.Write(abstraction.Operation()); } } classProgram { staticvoidMain(string[] args) { Client client = new Client();
Abstraction abstraction; // The client code should be able to work with any pre-configured // abstraction-implementation combination. abstraction = new Abstraction(new ConcreteImplementationA()); client.ClientCode(abstraction); Console.WriteLine(); abstraction = new ExtendedAbstraction(new ConcreteImplementationB()); client.ClientCode(abstraction); } } }
Output.txt: 执行结果
1
2
3
4
5
Abstract: Base operation with:
ConcreteImplementationA: The result in platform A.

ExtendedAbstraction: Extended operation with:
ConcreteImplementationA: The result in platform B.
在 C++ 中使用模式
复杂度: ★★★
流行度: ★☆☆
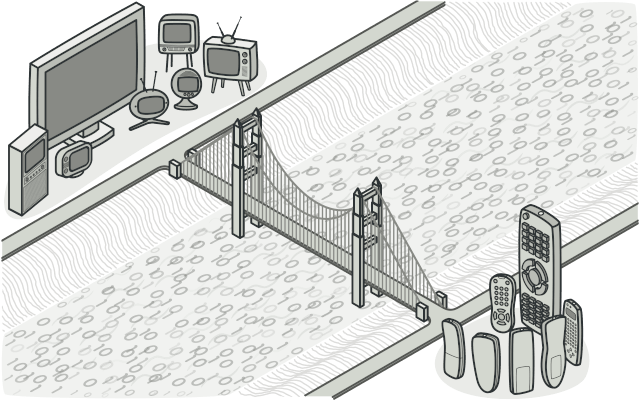
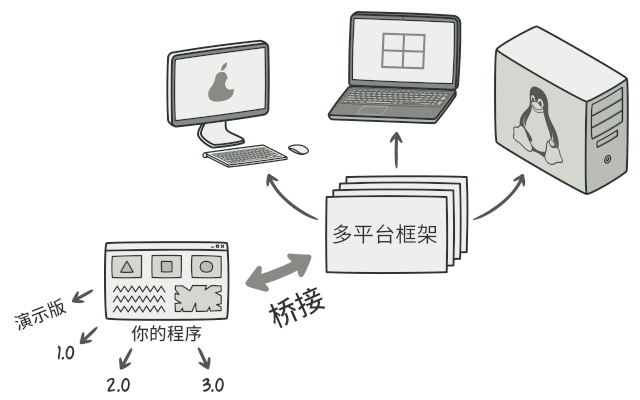
使用示例: 桥接模式在处理跨平台应用、 支持多种类型的数据库服务器或与多个特定种类 (例如云平台和社交网络等) 的 API 供应商协作时会特别有用。
/** * The Implementation defines the interface for all implementation classes. It * doesn't have to match the Abstraction's interface. In fact, the two * interfaces can be entirely different. Typically the Implementation interface * provides only primitive operations, while the Abstraction defines higher- * level operations based on those primitives. */
/** * Each Concrete Implementation corresponds to a specific platform and * implements the Implementation interface using that platform's API. */ classConcreteImplementationA : public Implementation { public: std::string OperationImplementation()constoverride{ return"ConcreteImplementationA: Here's the result on the platform A.\n"; } }; classConcreteImplementationB : public Implementation { public: std::string OperationImplementation()constoverride{ return"ConcreteImplementationB: Here's the result on the platform B.\n"; } };
/** * The Abstraction defines the interface for the "control" part of the two class * hierarchies. It maintains a reference to an object of the Implementation * hierarchy and delegates all of the real work to this object. */
virtual std::string Operation()const{ return"Abstraction: Base operation with:\n" + this->implementation_->OperationImplementation(); } }; /** * You can extend the Abstraction without changing the Implementation classes. */ classExtendedAbstraction : public Abstraction { public: ExtendedAbstraction(Implementation* implementation) : Abstraction(implementation) { } std::string Operation()constoverride{ return"ExtendedAbstraction: Extended operation with:\n" + this->implementation_->OperationImplementation(); } };
/** * Except for the initialization phase, where an Abstraction object gets linked * with a specific Implementation object, the client code should only depend on * the Abstraction class. This way the client code can support any abstraction- * implementation combination. */ voidClientCode(const Abstraction& abstraction){ // ... std::cout << abstraction.Operation(); // ... } /** * The client code should be able to work with any pre-configured abstraction- * implementation combination. */
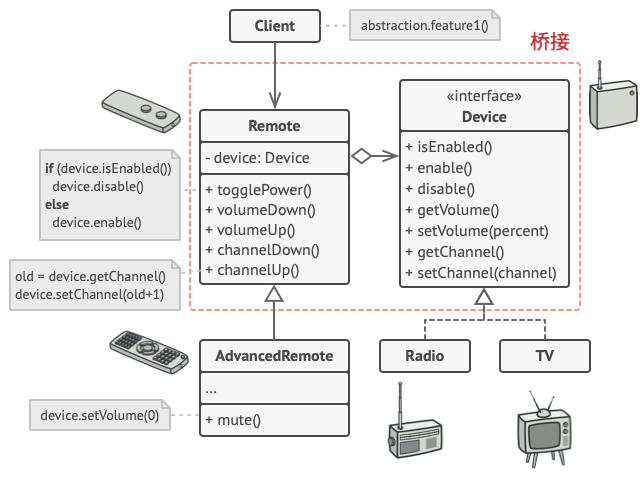
Tests with basic remote. Remote: power toggle ------------------------------------ | I'm TV set. | I'm enabled | Current volume is 30% | Current channel is 1 ------------------------------------
Tests with advanced remote. Remote: power toggle Remote: mute ------------------------------------ | I'm TV set. | I'm disabled | Current volume is 0% | Current channel is 1 ------------------------------------
Tests with basic remote. Remote: power toggle ------------------------------------ | I'm radio. | I'm enabled | Current volume is 30% | Current channel is 1 ------------------------------------
Tests with advanced remote. Remote: power toggle Remote: mute ------------------------------------ | I'm radio. | I'm disabled | Current volume is 0% | Current channel is 1 ------------------------------------
在 PHP 中使用模式
复杂度: ★★★
流行度: ★☆☆
使用示例: 桥接模式在支持多种类型的数据库服务器或与多个特定种类 (例如云平台和社交网络等) 的 API 供应商协作时会特别有用。
/** * The Abstraction defines the interface for the "control" part of the two class * hierarchies. It maintains a reference to an object of the Implementation * hierarchy and delegates all of the real work to this object. */ classAbstraction { /** * @var Implementation */ protected$implementation;
/** * You can extend the Abstraction without changing the Implementation classes. */ classExtendedAbstractionextendsAbstraction { publicfunctionoperation(): string { return"ExtendedAbstraction: Extended operation with:\n" . $this->implementation->operationImplementation(); } }
/** * The Implementation defines the interface for all implementation classes. It * doesn't have to match the Abstraction's interface. In fact, the two * interfaces can be entirely different. Typically the Implementation interface * provides only primitive operations, while the Abstraction defines higher- * level operations based on those primitives. */ interfaceImplementation { publicfunctionoperationImplementation(): string; }
/** * Each Concrete Implementation corresponds to a specific platform and * implements the Implementation interface using that platform's API. */ classConcreteImplementationAimplementsImplementation { publicfunctionoperationImplementation(): string { return"ConcreteImplementationA: Here's the result on the platform A.\n"; } }
classConcreteImplementationBimplementsImplementation { publicfunctionoperationImplementation(): string { return"ConcreteImplementationB: Here's the result on the platform B.\n"; } }
/** * Except for the initialization phase, where an Abstraction object gets linked * with a specific Implementation object, the client code should only depend on * the Abstraction class. This way the client code can support any abstraction- * implementation combination. */ functionclientCode(Abstraction $abstraction) { // ...
echo$abstraction->operation();
// ... }
/** * The client code should be able to work with any pre-configured abstraction- * implementation combination. */ $implementation = newConcreteImplementationA(); $abstraction = newAbstraction($implementation); clientCode($abstraction);
/** * The Abstraction is usually initialized with one of the Implementation * objects. */ publicfunction__construct(Renderer $renderer) { $this->renderer = $renderer; }
/** * The Implementation declares a set of "real", "under-the-hood", "platform" * methods. * * In this case, the Implementation lists rendering methods that can be used to * compose any web page. Different Abstractions may use different methods of the * Implementation. */ interfaceRenderer { publicfunctionrenderTitle(string$title): string;
/** * This Concrete Implementation renders a web page as HTML. */ classHTMLRendererimplementsRenderer { publicfunctionrenderTitle(string$title): string { return"<h1>$title</h1>"; }
/** * The client code usually deals only with the Abstraction objects. */ functionclientCode(Page $page) { // ...
echo$page->view();
// ... }
/** * The client code can be executed with any pre-configured combination of the * Abstraction+Implementation. */ $HTMLRenderer = newHTMLRenderer(); $JSONRenderer = newJsonRenderer();
$page = newSimplePage($HTMLRenderer, "Home", "Welcome to our website!"); echo"HTML view of a simple content page:\n"; clientCode($page); echo"\n\n";
/** * The Abstraction can change the linked Implementation at runtime if needed. */ $page->changeRenderer($JSONRenderer); echo"JSON view of a simple content page, rendered with the same client code:\n"; clientCode($page); echo"\n\n";
$product = newProduct("123", "Star Wars, episode1", "A long time ago in a galaxy far, far away...", "/images/star-wars.jpeg", 39.95);
$page = newProductPage($HTMLRenderer, $product); echo"HTML view of a product page, same client code:\n"; clientCode($page); echo"\n\n";
$page->changeRenderer($JSONRenderer); echo"JSON view of a simple content page, with the same client code:\n"; clientCode($page);
HTML view of a simple content page: <html><body> <h1>Home</h1> <div class='text'>Welcome to our website!</div> </body></html>
JSON view of a simple content page, rendered with the same client code: { "title": "Home", "text": "Welcome to our website!" }
HTML view of a product page, same client code: <html><body> <h1>Star Wars, episode1</h1> <div class='text'>A long time ago in a galaxy far, far away...</div> <img src='/images/star-wars.jpeg'> <a href='/cart/add/123'>Add to cart</a> </body></html>
JSON view of a simple content page, with the same client code: { "title": "Star Wars, episode1", "text": "A long time ago in a galaxy far, far away...", "img": "/images/star-wars.jpeg", "link": {"href": "/cart/add/123", "title": "Add to cart"} }
在 Python 中使用模式
复杂度: ★★★
流行度: ★☆☆
使用示例: 桥接模式在处理跨平台应用、 支持多种类型的数据库服务器或与多个特定种类 (例如云平台和社交网络等) 的 API 供应商协作时会特别有用。
from __future__ import annotations from abc import ABC, abstractmethod
classAbstraction: """ The Abstraction defines the interface for the "control" part of the two class hierarchies. It maintains a reference to an object of the Implementation hierarchy and delegates all of the real work to this object. """
classImplementation(ABC): """ The Implementation defines the interface for all implementation classes. It doesn't have to match the Abstraction's interface. In fact, the two interfaces can be entirely different. Typically the Implementation interface provides only primitive operations, while the Abstraction defines higher- level operations based on those primitives. """
""" Each Concrete Implementation corresponds to a specific platform and implements the Implementation interface using that platform's API. """
classConcreteImplementationA(Implementation): defoperation_implementation(self) -> str: return"ConcreteImplementationA: Here's the result on the platform A."
classConcreteImplementationB(Implementation): defoperation_implementation(self) -> str: return"ConcreteImplementationB: Here's the result on the platform B."
defclient_code(abstraction: Abstraction) -> None: """ Except for the initialization phase, where an Abstraction object gets linked with a specific Implementation object, the client code should only depend on the Abstraction class. This way the client code can support any abstraction- implementation combination. """
# ...
print(abstraction.operation(), end="")
# ...
if __name__ == "__main__": """ The client code should be able to work with any pre-configured abstraction- implementation combination. """
# The Abstraction defines the interface for the "control" part of the two class # hierarchies. It maintains a reference to an object of the Implementation # hierarchy and delegates all of the real work to this object. classAbstraction # @param [Implementation] implementation definitialize(implementation) @implementation = implementation end
# @return [String] defoperation "Abstraction: Base operation with:\n"\ "#{@implementation.operation_implementation}" end end
# You can extend the Abstraction without changing the Implementation classes. classExtendedAbstraction < Abstraction # @return [String] defoperation "ExtendedAbstraction: Extended operation with:\n"\ "#{@implementation.operation_implementation}" end end
# The Implementation defines the interface for all implementation classes. It # doesn't have to match the Abstraction's interface. In fact, the two interfaces # can be entirely different. Typically the Implementation interface provides # only primitive operations, while the Abstraction defines higher-level # operations based on those primitives. classImplementation # @abstract # # @return [String] defoperation_implementation raiseNotImplementedError, "#{self.class} has not implemented method '#{__method__}'" end end
# Each Concrete Implementation corresponds to a specific platform and implements # the Implementation interface using that platform's API. classConcreteImplementationA < Implementation # @return [String] defoperation_implementation 'ConcreteImplementationA: Here\'s the result on the platform A.' end end
classConcreteImplementationB < Implementation # @return [String] defoperation_implementation 'ConcreteImplementationB: Here\'s the result on the platform B.' end end
# Except for the initialization phase, where an Abstraction object gets linked # with a specific Implementation object, the client code should only depend on # the Abstraction class. This way the client code can support any abstraction- # implementation combination. defclient_code(abstraction) # ...
print abstraction.operation
# ... end
# The client code should be able to work with any pre-configured abstraction- # implementation combination.
/// The Abstraction defines the interface for the "control" part of the two /// class hierarchies. It maintains a reference to an object of the /// Implementation hierarchy and delegates all of the real work to this object. classAbstraction {
/// The Implementation defines the interface for all implementation classes. It /// doesn't have to match the Abstraction's interface. In fact, the two /// interfaces can be entirely different. Typically the Implementation interface /// provides only primitive operations, while the Abstraction defines higher- /// level operations based on those primitives. protocolImplementation {
funcoperationImplementation() -> String }
/// Each Concrete Implementation corresponds to a specific platform and /// implements the Implementation interface using that platform's API. classConcreteImplementationA: Implementation {
funcoperationImplementation() -> String { return"ConcreteImplementationA: Here's the result on the platform A.\n" } }
classConcreteImplementationB: Implementation {
funcoperationImplementation() -> String { return"ConcreteImplementationB: Here's the result on the platform B\n" } }
/// Except for the initialization phase, where an Abstraction object gets linked /// with a specific Implementation object, the client code should only depend on /// the Abstraction class. This way the client code can support any abstraction- /// implementation combination. classClient { // ... staticfuncsomeClientCode(abstraction: Abstraction) { print(abstraction.operation()) } // ... }
/// Let's see how it all works together. classBridgeConceptual: XCTestCase {
functestBridgeConceptual() { // The client code should be able to work with any pre-configured // abstraction-implementation combination. let implementation =ConcreteImplementationA() Client.someClientCode(abstraction: Abstraction(implementation))
let concreteImplementation =ConcreteImplementationB() Client.someClientCode(abstraction: ExtendedAbstraction(concreteImplementation)) } }
Output.txt: 执行结果
1
2
3
4
5
Abstraction: Base operation with:
ConcreteImplementationA: Here's the result on the platform A

ExtendedAbstraction: Extended operation with:
ConcreteImplementationB: Here's the result on the platform B
funcupdate(content: Content) { /// ...updating UI and showing a content... /// ... /// ... then, a user will choose a content and trigger an event print("\(description): User selected a \(content) to share") /// ... shareService?.share(content: content) }
funcaccept(service: SharingService) { shareService = service } }
/** * The Abstraction defines the interface for the "control" part of the two class * hierarchies. It maintains a reference to an object of the Implementation * hierarchy and delegates all of the real work to this object. */ classAbstraction { protectedimplementation: Implementation;
publicoperation(): string { const result = this.implementation.operationImplementation(); return`Abstraction: Base operation with:\n${result}`; } }
/** * You can extend the Abstraction without changing the Implementation classes. */ classExtendedAbstractionextendsAbstraction { publicoperation(): string { const result = this.implementation.operationImplementation(); return`ExtendedAbstraction: Extended operation with:\n${result}`; } }
/** * The Implementation defines the interface for all implementation classes. It * doesn't have to match the Abstraction's interface. In fact, the two * interfaces can be entirely different. Typically the Implementation interface * provides only primitive operations, while the Abstraction defines higher- * level operations based on those primitives. */ interfaceImplementation { operationImplementation(): string; }
/** * Each Concrete Implementation corresponds to a specific platform and * implements the Implementation interface using that platform's API. */ classConcreteImplementationAimplementsImplementation { publicoperationImplementation(): string { return'ConcreteImplementationA: Here\'s the result on the platform A.'; } }
classConcreteImplementationBimplementsImplementation { publicoperationImplementation(): string { return'ConcreteImplementationB: Here\'s the result on the platform B.'; } }
/** * Except for the initialization phase, where an Abstraction object gets linked * with a specific Implementation object, the client code should only depend on * the Abstraction class. This way the client code can support any abstraction- * implementation combination. */ functionclientCode(abstraction: Abstraction) { // ..
console.log(abstraction.operation());
// .. }
/** * The client code should be able to work with any pre-configured abstraction- * implementation combination. */ let implementation = newConcreteImplementationA(); let abstraction = newAbstraction(implementation); clientCode(abstraction);
console.log('');
implementation = newConcreteImplementationB(); abstraction = newExtendedAbstraction(implementation); clientCode(abstraction);/** * The Abstraction defines the interface for the "control" part of the two class * hierarchies. It maintains a reference to an object of the Implementation * hierarchy and delegates all of the real work to this object. */ classAbstraction { protectedimplementation: Implementation;
publicoperation(): string { const result = this.implementation.operationImplementation(); return`Abstraction: Base operation with:\n${result}`; } }
/** * You can extend the Abstraction without changing the Implementation classes. */ classExtendedAbstractionextendsAbstraction { publicoperation(): string { const result = this.implementation.operationImplementation(); return`ExtendedAbstraction: Extended operation with:\n${result}`; } }
/** * The Implementation defines the interface for all implementation classes. It * doesn't have to match the Abstraction's interface. In fact, the two * interfaces can be entirely different. Typically the Implementation interface * provides only primitive operations, while the Abstraction defines higher- * level operations based on those primitives. */ interfaceImplementation { operationImplementation(): string; }
/** * Each Concrete Implementation corresponds to a specific platform and * implements the Implementation interface using that platform's API. */ classConcreteImplementationAimplementsImplementation { publicoperationImplementation(): string { return'ConcreteImplementationA: Here\'s the result on the platform A.'; } }
classConcreteImplementationBimplementsImplementation { publicoperationImplementation(): string { return'ConcreteImplementationB: Here\'s the result on the platform B.'; } }
/** * Except for the initialization phase, where an Abstraction object gets linked * with a specific Implementation object, the client code should only depend on * the Abstraction class. This way the client code can support any abstraction- * implementation combination. */ functionclientCode(abstraction: Abstraction) { // ..
console.log(abstraction.operation());
// .. }
/** * The client code should be able to work with any pre-configured abstraction- * implementation combination. */ let implementation = newConcreteImplementationA(); let abstraction = newAbstraction(implementation); clientCode(abstraction);