namespaceRefactoringGuru.DesignPatterns.Adapter.Conceptual { // The Target defines the domain-specific interface used by the client code. publicinterfaceITarget { stringGetRequest(); }
// The Adaptee contains some useful behavior, but its interface is // incompatible with the existing client code. The Adaptee needs some // adaptation before the client code can use it. classAdaptee { publicstringGetSpecificRequest() { return"Specific request."; } }
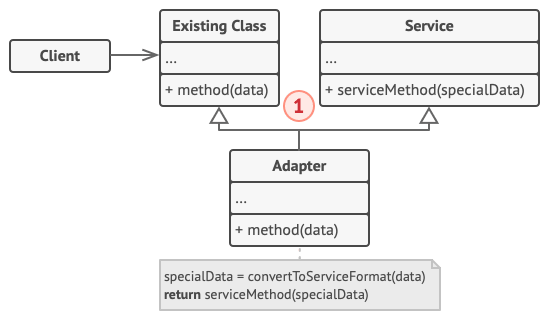
// The Adapter makes the Adaptee's interface compatible with the Target's // interface. classAdapter : ITarget { privatereadonly Adaptee _adaptee;
/** * The Target defines the domain-specific interface used by the client code. */ classTarget { public: virtual ~Target() = default;
virtual std::string Request()const{ return"Target: The default target's behavior."; } };
/** * The Adaptee contains some useful behavior, but its interface is incompatible * with the existing client code. The Adaptee needs some adaptation before the * client code can use it. */ classAdaptee { public: std::string SpecificRequest()const{ return".eetpadA eht fo roivaheb laicepS"; } };
/** * The Adapter makes the Adaptee's interface compatible with the Target's * interface. */ classAdapter : public Target { private: Adaptee *adaptee_;
/** * The client code supports all classes that follow the Target interface. */ voidClientCode(const Target *target){ std::cout << target->Request(); }
intmain(){ std::cout << "Client: I can work just fine with the Target objects:\n"; Target *target = new Target; ClientCode(target); std::cout << "\n\n"; Adaptee *adaptee = new Adaptee; std::cout << "Client: The Adaptee class has a weird interface. See, I don't understand it:\n"; std::cout << "Adaptee: " << adaptee->SpecificRequest(); std::cout << "\n\n"; std::cout << "Client: But I can work with it via the Adapter:\n"; Adapter *adapter = newAdapter(adaptee); ClientCode(adapter); std::cout << "\n";
delete target; delete adaptee; delete adapter;
return0; }
Output.txt: 执行结果
1 2 3 4 5 6 7 8
Client: I can work just fine with the Target objects: Target: The default target's behavior.
Client: The Adaptee class has a weird interface. See, I don't understand it: Adaptee: .eetpadA eht fo roivaheb laicepS
Client: But I can work with it via the Adapter: Adapter: (TRANSLATED) Special behavior of the Adaptee.
/** * The Target defines the domain-specific interface used by the client code. */ classTarget { public: virtual ~Target() = default; virtual std::string Request()const{ return"Target: The default target's behavior."; } };
/** * The Adaptee contains some useful behavior, but its interface is incompatible * with the existing client code. The Adaptee needs some adaptation before the * client code can use it. */ classAdaptee { public: std::string SpecificRequest()const{ return".eetpadA eht fo roivaheb laicepS"; } };
/** * The Adapter makes the Adaptee's interface compatible with the Target's * interface using multiple inheritance. */ classAdapter : public Target, public Adaptee { public: Adapter() {} std::string Request()constoverride{ std::string to_reverse = SpecificRequest(); std::reverse(to_reverse.begin(), to_reverse.end()); return"Adapter: (TRANSLATED) " + to_reverse; } };
/** * The client code supports all classes that follow the Target interface. */ voidClientCode(const Target *target){ std::cout << target->Request(); }
intmain(){ std::cout << "Client: I can work just fine with the Target objects:\n"; Target *target = new Target; ClientCode(target); std::cout << "\n\n"; Adaptee *adaptee = new Adaptee; std::cout << "Client: The Adaptee class has a weird interface. See, I don't understand it:\n"; std::cout << "Adaptee: " << adaptee->SpecificRequest(); std::cout << "\n\n"; std::cout << "Client: But I can work with it via the Adapter:\n"; Adapter *adapter = new Adapter; ClientCode(adapter); std::cout << "\n";
delete target; delete adaptee; delete adapter;
return0; }
Output.txt: 执行结果
1
2
3
4
5
6
7
8
Client: I can work just fine with the Target objects:
Target: The default target's behavior.

Client: The Adaptee class has a weird interface. See, I don't understand it:
Adaptee: .eetpadA eht fo roivaheb laicepS

Client: But I can work with it via the Adapter:
Adapter: (TRANSLATED) Special behavior of the Adaptee.
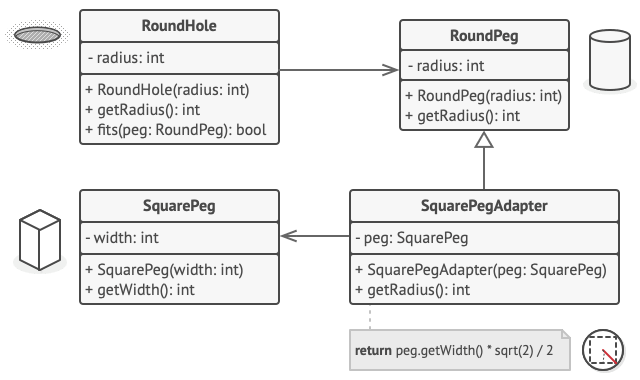
/** * SquarePegs are not compatible with RoundHoles (they were implemented by * previous development team). But we have to integrate them into our program. */ publicclassSquarePeg { privatedouble width;
@Override publicdoublegetRadius() { double result; // Calculate a minimum circle radius, which can fit this peg. result = (Math.sqrt(Math.pow((peg.getWidth() / 2), 2) * 2)); return result; } }
// Adapter solves the problem. SquarePegAdaptersmallSqPegAdapter=newSquarePegAdapter(smallSqPeg); SquarePegAdapterlargeSqPegAdapter=newSquarePegAdapter(largeSqPeg); if (hole.fits(smallSqPegAdapter)) { System.out.println("Square peg w2 fits round hole r5."); } if (!hole.fits(largeSqPegAdapter)) { System.out.println("Square peg w20 does not fit into round hole r5."); } } }
OutputDemo.txt: 执行结果
1 2 3
Round peg r5 fits round hole r5. Square peg w2 fits round hole r5. Square peg w20 does not fit into round hole r5.
/** * The Target defines the domain-specific interface used by the client code. */ classTarget { publicfunctionrequest(): string { return"Target: The default target's behavior."; } }
/** * The Adaptee contains some useful behavior, but its interface is incompatible * with the existing client code. The Adaptee needs some adaptation before the * client code can use it. */ classAdaptee { publicfunctionspecificRequest(): string { return".eetpadA eht fo roivaheb laicepS"; } }
/** * The Adapter makes the Adaptee's interface compatible with the Target's * interface. */ classAdapterextendsTarget { private$adaptee;
/** * The client code supports all classes that follow the Target interface. */ functionclientCode(Target $target) { echo$target->request(); }
echo"Client: I can work just fine with the Target objects:\n"; $target = newTarget(); clientCode($target); echo"\n\n";
$adaptee = newAdaptee(); echo"Client: The Adaptee class has a weird interface. See, I don't understand it:\n"; echo"Adaptee: " . $adaptee->specificRequest(); echo"\n\n";
echo"Client: But I can work with it via the Adapter:\n"; $adapter = newAdapter($adaptee); clientCode($adapter);
Output.txt: 执行结果
1
2
3
4
5
6
7
8
Client: I can work just fine with the Target objects:
Target: The default target's behavior.

Client: The Adaptee class has a weird interface. See, I don't understand it:
Adaptee: .eetpadA eht fo roivaheb laicepS

Client: But I can work with it via the Adapter:
Adapter: (TRANSLATED) Special behavior of the Adaptee.
/** * The Target interface represents the interface that your application's classes * already follow. */ interfaceNotification { publicfunctionsend(string$title, string$message); }
/** * Here's an example of the existing class that follows the Target interface. * * The truth is that many real apps may not have this interface clearly defined. * If you're in that boat, your best bet would be to extend the Adapter from one * of your application's existing classes. If that's awkward (for instance, * SlackNotification doesn't feel like a subclass of EmailNotification), then * extracting an interface should be your first step. */ classEmailNotificationimplementsNotification { private$adminEmail;
publicfunctionsend(string$title, string$message): void { mail($this->adminEmail, $title, $message); echo"Sent email with title '$title' to '{$this->adminEmail}' that says '$message'."; } }
/** * The Adaptee is some useful class, incompatible with the Target interface. You * can't just go in and change the code of the class to follow the Target * interface, since the code might be provided by a 3rd-party library. */ classSlackApi { private$login; private$apiKey;
publicfunctionlogIn(): void { // Send authentication request to Slack web service. echo"Logged in to a slack account '{$this->login}'.\n"; }
publicfunctionsendMessage(string$chatId, string$message): void { // Send message post request to Slack web service. echo"Posted following message into the '$chatId' chat: '$message'.\n"; } }
/** * The Adapter is a class that links the Target interface and the Adaptee class. * In this case, it allows the application to send notifications using Slack * API. */ classSlackNotificationimplementsNotification { private$slack; private$chatId;
/** * An Adapter is not only capable of adapting interfaces, but it can also * convert incoming data to the format required by the Adaptee. */ publicfunctionsend(string$title, string$message): void { $slackMessage = "#" . $title . "# " . strip_tags($message); $this->slack->logIn(); $this->slack->sendMessage($this->chatId, $slackMessage); } }
/** * The client code can work with any class that follows the Target interface. */ functionclientCode(Notification $notification) { // ...
echo$notification->send("Website is down!", "<strong style='color:red;font-size: 50px;'>Alert!</strong> " . "Our website is not responding. Call admins and bring it up!");
// ... }
echo"Client code is designed correctly and works with email notifications:\n"; $notification = newEmailNotification("developers@example.com"); clientCode($notification); echo"\n\n";
echo"The same client code can work with other classes via adapter:\n"; $slackApi = newSlackApi("example.com", "XXXXXXXX"); $notification = newSlackNotification($slackApi, "Example.com Developers"); clientCode($notification);
Output.txt: 执行结果
1 2 3 4 5 6
Client code is designed correctly and works with email notifications: Sent email with title 'Website is down!' to 'developers@example.com' that says '<strong style='color:red;font-size: 50px;'>Alert!</strong> Our website is not responding. Call admins and bring it up!'.
The same client code can work with other classes via adapter: Logged in to a slack account 'example.com'. Posted following message into the 'Example.com Developers' chat: '#Website is down!# Alert! Our website is not responding. Call admins and bring it up!'.
classTarget: """ The Target defines the domain-specific interface used by the client code. """
defrequest(self) -> str: return"Target: The default target's behavior."
classAdaptee: """ The Adaptee contains some useful behavior, but its interface is incompatible with the existing client code. The Adaptee needs some adaptation before the client code can use it. """
defclient_code(target: "Target") -> None: """ The client code supports all classes that follow the Target interface. """
print(target.request(), end="")
if __name__ == "__main__": print("Client: I can work just fine with the Target objects:") target = Target() client_code(target) print("\n")
adaptee = Adaptee() print("Client: The Adaptee class has a weird interface. " "See, I don't understand it:") print(f"Adaptee: {adaptee.specific_request()}", end="\n\n")
print("Client: But I can work with it via the Adapter:") adapter = Adapter() client_code(adapter)
Output.txt: 执行结果
1
2
3
4
5
6
7
8
Client: I can work just fine with the Target objects:
Target: The default target's behavior.

Client: The Adaptee class has a weird interface. See, I don't understand it:
Adaptee: .eetpadA eht fo roivaheb laicepS

Client: But I can work with it via the Adapter:
Adapter: (TRANSLATED) Special behavior of the Adaptee.
# The Target defines the domain-specific interface used by the client code. classTarget # @return [String] defrequest 'Target: The default target\'s behavior.' end end
# The Adaptee contains some useful behavior, but its interface is incompatible # with the existing client code. The Adaptee needs some adaptation before the # client code can use it. classAdaptee # @return [String] defspecific_request '.eetpadA eht fo roivaheb laicepS' end end
# The Adapter makes the Adaptee's interface compatible with the Target's # interface. classAdapter < Target # @param [Adaptee] adaptee definitialize(adaptee) @adaptee = adaptee end
defrequest "Adapter: (TRANSLATED) #{@adaptee.specific_request.reverse!}" end end
# The client code supports all classes that follow the Target interface. defclient_code(target) print target.request end
puts 'Client: I can work just fine with the Target objects:' target = Target.new client_code(target) puts "\n\n"
adaptee = Adaptee.new puts 'Client: The Adaptee class has a weird interface. See, I don\'t understand it:' puts "Adaptee: #{adaptee.specific_request}" puts "\n"
puts 'Client: But I can work with it via the Adapter:' adapter = Adapter.new(adaptee) client_code(adapter)
output.txt: 执行结果
1 2 3 4 5 6 7 8
Client: I can work just fine with the Target objects: Target: The default target's behavior.
Client: The Adaptee class has a weird interface. See, I don't understand it: Adaptee: .eetpadA eht fo roivaheb laicepS
Client: But I can work with it via the Adapter: Adapter: (TRANSLATED) Special behavior of the Adaptee.
在 Swift 中使用模式
复杂度: ★☆☆
流行度: ★★★
使用示例: 适配器模式在 Swift 代码中很常见。 基于一些遗留代码的系统常常会使用该模式。 在这种情况下, 适配器让遗留代码与现代的类得以相互合作。
/// The Adaptee contains some useful behavior, but its interface is incompatible /// with the existing client code. The Adaptee needs some adaptation before the /// client code can use it. classAdaptee {
/// The client code supports all classes that follow the Target interface. classClient { // ... staticfuncsomeClientCode(target: Target) { print(target.request()) } // ... }
/// Let's see how it all works together. classAdapterConceptual: XCTestCase {
functestAdapterConceptual() { print("Client: I can work just fine with the Target objects:") Client.someClientCode(target: Target())
let adaptee =Adaptee() print("Client: The Adaptee class has a weird interface. See, I don't understand it:") print("Adaptee: "+ adaptee.specificRequest())
print("Client: But I can work with it via the Adapter:") Client.someClientCode(target: Adapter(adaptee)) } }
Output.txt: 执行结果
1 2 3 4 5 6
Client: I can work just fine with the Target objects: Target: The default target's behavior. Client: The Adaptee class has a weird interface. See, I don't understand it: Adaptee: .eetpadA eht fo roivaheb laicepS Client: But I can work with it via the Adapter: Adapter: (TRANSLATED) Special behavior of the Adaptee.
/// Adapter Design Pattern /// /// Intent: Convert the interface of a class into the interface clients expect. /// Adapter lets classes work together that couldn't work otherwise because of /// incompatible interfaces.
classAdapterRealWorld: XCTestCase {
/// Example. Let's assume that our app perfectly works with Facebook /// authorization. However, users ask you to add sign in via Twitter. /// /// Unfortunately, Twitter SDK has a different authorization method. /// /// Firstly, you have to create the new protocol 'AuthService' and insert /// the authorization method of Facebook SDK. /// /// Secondly, write an extension for Twitter SDK and implement methods of /// AuthService protocol, just a simple redirect. /// /// Thirdly, write an extension for Facebook SDK. You should not write any /// code at this point as methods already implemented by Facebook SDK. /// /// It just tells a compiler that both SDKs have the same interface.
functestAdapterRealWorld() {
print("Starting an authorization via Facebook") startAuthorization(with: FacebookAuthSDK())
print("Starting an authorization via Twitter.") startAuthorization(with: TwitterAuthSDK()) }
funcpresentAuthFlow(fromviewController: UIViewController) { /// Call SDK methods and pass a view controller print("Facebook WebView has been shown.") } }
classTwitterAuthSDK {
funcstartAuthorization(withviewController: UIViewController) { /// Call SDK methods and pass a view controller print("Twitter WebView has been shown. Users will be happy :)") } }
extensionTwitterAuthSDK: AuthService {
/// This is an adapter /// /// Yeah, we are able to not create another class and just extend an /// existing one
funcpresentAuthFlow(fromviewController: UIViewController) { print("The Adapter is called! Redirecting to the original method...") self.startAuthorization(with: viewController) } }
extensionFacebookAuthSDK: AuthService { /// This extension just tells a compiler that both SDKs have the same /// interface. }
Output.txt: 执行结果
1 2 3 4 5 6
Starting an authorization via Facebook Facebook WebView has been shown /// Starting an authorization via Twitter The Adapter is called! Redirecting to the original method... Twitter WebView has been shown. Users will be happy :)
/** * The Target defines the domain-specific interface used by the client code. */ classTarget { publicrequest(): string { return'Target: The default target\'s behavior.'; } }
/** * The Adaptee contains some useful behavior, but its interface is incompatible * with the existing client code. The Adaptee needs some adaptation before the * client code can use it. */ classAdaptee { publicspecificRequest(): string { return'.eetpadA eht fo roivaheb laicepS'; } }
/** * The Adapter makes the Adaptee's interface compatible with the Target's * interface. */ classAdapterextendsTarget { privateadaptee: Adaptee;
/** * The client code supports all classes that follow the Target interface. */ functionclientCode(target: Target) { console.log(target.request()); }
console.log('Client: I can work just fine with the Target objects:'); const target = newTarget(); clientCode(target);
console.log('');
const adaptee = newAdaptee(); console.log('Client: The Adaptee class has a weird interface. See, I don\'t understand it:'); console.log(`Adaptee: ${adaptee.specificRequest()}`);
console.log('');
console.log('Client: But I can work with it via the Adapter:'); const adapter = newAdapter(adaptee); clientCode(adapter);
Output.txt: 执行结果
1
2
3
4
5
6
7
8
Client: I can work just fine with the Target objects:
Target: The default target's behavior.

Client: The Adaptee class has a weird interface. See, I don't understand it:
Adaptee: .eetpadA eht fo roivaheb laicepS

Client: But I can work with it via the Adapter:
Adapter: (TRANSLATED) Special behavior of the Adaptee.
Client inserts Lightning connector into computer.
Lightning connector is plugged into mac machine.
Client inserts Lightning connector into computer.
Adapter converts Lightning signal to USB.
USB connector is plugged into windows machine.