ArgoCD持续部署
Argo CD是用于Kubernetes的声明性GitOps连续交付工具。
Argo CD实现为kubernetes控制器,它持续监视运行中的应用程序,并将当前的活动状态与期望的目标状态进行比较(如Git repo中指定的那样)。如果已部署的应用程序的活动状态偏离了目标状态,则认为是OutOfSync。Argo CD报告和可视化这些差异,同时提供了方法,可以自动或手动将活动状态同步回所需的目标状态。在Git repo中对所需目标状态所做的任何修改都可以自动应用并反映到指定的目标环境中。
安装ArgoCD
1
2
3
4
5
6
7
8
9
10
11
12
13
14
15
16
17
18
19
20
21
22
23
24
| kubectl create namespace argocd
kubectl delete namespace argocd
wget https://raw.githubusercontent.com/argoproj/argo-cd/stable/manifests/install.yaml -O argocd.yaml
# 修改dev-server镜像
containers:
- command:
- /shared/argocd-dex
- rundex
image: ghcr.io/dexidp/dex:latest #修改
kubectl apply -n argocd -f argocd.yaml
#查看argocd
kubectl get all -n argocd
kubectl get po -n argocd
# 查看端口
kubectl get svc -n argocd
# 获取默认登录用户admin密码
kubectl get pods -n argocd -l app.kubernetes.io/name=argocd-server -o name | cut -d'/' -f 2
# 修改密码 password
kubectl -n argocd patch secret argocd-secret -p '{"stringData": {"admin.password": "$2a$10$rRyBsGSHK6.uc8fntPwVIuLVHgsAhAX7TcdrqW/RADU0uh7CaChLa","admin.passwordMtime": "'$(date +%FT%T%Z)'"}}'
|
访问web
默认情况下,Argo CD API服务器未使用外部IP公开。要访问API服务器,请选择以下技术之一以公开Argo CD API服务器
端口转发
1
2
3
4
| kubectl port-forward svc/argocd-server -n argocd --address 0.0.0.0 8080:443
# 节点地址访问 192.168.1.106:8080 admin password
# 虚拟地址访问 192.168.1.200:8080 admin password
|
修改service端口
1
2
3
4
5
6
7
8
9
10
11
12
13
14
| # 将service的type类型改为NodePort
kubectl edit -n argocd svc argocd-server
# 改完后通过以下命令查看端口
kubectl get svc -n argocd
root@k8s-master-01:~# kubectl get svc -n argocd
NAME TYPE CLUSTER-IP EXTERNAL-IP PORT(S) AGE
argocd-dex-server ClusterIP 10.103.253.111 <none> 5556/TCP,5557/TCP,5558/TCP 18m
argocd-metrics ClusterIP 10.110.29.42 <none> 8082/TCP 18m
argocd-redis ClusterIP 10.98.93.98 <none> 6379/TCP 18m
argocd-repo-server ClusterIP 10.110.254.252 <none> 8081/TCP,8084/TCP 18m
argocd-server NodePort 10.97.97.200 <none> 80:31281/TCP,443:30211/TCP 18m
argocd-server-metrics ClusterIP 10.108.77.47 <none> 8083/TCP 18m
# 访问 192.168.1.106:31281 admin password
|
安装argo客户端
mac
1
2
| brew tap argoproj/tap
brew install argoproj/tap/argocd
|
linux
1
2
3
4
| VERSION=$(curl --silent "https://api.github.com/repos/argoproj/argo-cd/releases/latest" | grep '"tag_name"' | sed -E 's/.*"([^"]+)".*/\1/')
curl -sSL -o /usr/local/bin/argocd https://github.com/argoproj/argo-cd/releases/download/$VERSION/argocd-linux-amd64
chmod +x /usr/local/bin/argocd
|
登录argo
1
2
3
| argocd login 192.168.1.106:32178
admin
password
|
修改密码
1
2
3
4
5
6
7
8
| argocd account update-password
argocd account update-password \
--account admin \
--current-password password \
--new-password 123456
Password updated
Context '172.17.100.50:32109' updated
|
注册集群
此步骤将群集的凭据注册到Argo CD,仅在部署到外部群集时才需要。在内部进行部署(到与Argo CD运行所在的同一集群)时,应将https://kubernetes.default.svc 用作应用程序的K8s API服务器地址。
首先列出当前kubconfig中的所有集群上下文:
1
2
3
4
| root@k8s-master-01:~# kubectl config get-contexts
CURRENT NAME CLUSTER AUTHINFO NAMESPACE
* kubernetes-admin@kubernetes kubernetes kubernetes-admin
root@k8s-master-01:~# argocd cluster add Kubernetes-admin@kubernetes
|
上面的命令将ServiceAccount(argocd-manager)安装到该kubectl上下文的kube-system命名空间中,并将服务帐户绑定到管理员级别的ClusterRole。Argo CD使用此服务帐户令牌执行其管理任务(即部署/监视)。
可以修改argocd-manager-role角色的规则,使其仅具有对一组有限的名称空间,组和种类的创建,更新,修补,删除特权。但是,在群集作用域中,获取,列出,监视特权是Argo CD起作用所必需的。
创建应用
先要搭建ci环境
1
2
3
4
5
| docker pull alpine:3.12
docker login -u admin 192.168.1.109:8800 -p Harbor12345
docker tag alpine:3.12 192.168.1.109:8800/library/alpine:3.12
docker push 192.168.1.109:8800/library/alpine:3.12
docker logout
|
新建一个仓库test
test.go
1
2
3
4
5
6
7
8
9
10
11
12
13
| package main
import (
"net/http"
)
func main() {
http.HandleFunc("/hello", func(w http.ResponseWriter, r *http.Request) {
w.Write([]byte("hello world!"))
})
http.ListenAndServe(":8080", nil)
}
|
go.mod
1
2
3
4
5
6
| module test
go 1.15
require ()
|
Dockerfile
1
2
3
4
5
6
| FROM 192.168.1.109:8800/library/alpine:3.12
WORKDIR /
COPY test .
#COPY conf conf
ENTRYPOINT ["/test"]
|
Makefile
1
2
3
4
5
6
7
8
9
10
11
12
13
14
15
16
17
18
19
20
21
22
23
24
25
26
27
28
29
| include platform.mk
NAME=test
IMAGE_NAME=didong/$(NAME)
GIT_COMMIT=$(shell git rev-parse --short HEAD)
GIT_TAG=$(shell git describe --abbrev=0 --tags --always --match "v*")
GIT_IMPORT=luobo/lbck/cmd
BUILD_DATE=$(shell date +%s)
LDFLAGS=-X $(GIT_IMPORT).BuildDate=$(BUILD_DATE) -X $(GIT_IMPORT).GitCommit=$(GIT_COMMIT) -X $(GIT_IMPORT).GitTag=$(GIT_TAG)
IMAGE_TAG=$(GIT_TAG)-$(GIT_COMMIT)
.PHONY: build clean vet test docker
build:
CGO_ENABLED=$(CGO_ENABLED) GOOS=$(GOOS) go build -a -installsuffix cgo -ldflags "-s -w ${LDFLAGS}"
docker:
docker build -t $(IMAGE_NAME):$(IMAGE_TAG) .
docker tag $(IMAGE_NAME):$(IMAGE_TAG) $(IMAGE_NAME):latest
vet:
go vet ./...
test: vet
go test -v ./...
clean:
rm -rf ./test
|
platform.mk
1
2
3
4
5
6
7
8
9
10
11
12
| PLATS = linux windows
.PHONY : none $(PLATS)
CGO_ENABLED := 1
GOOS := windows
GOARCH := amd64
linux : CGO_ENABLED := 0
linux : GOOS := linux
windows linux :
$(MAKE) build CGO_ENABLED="$(CGO_ENABLED)" GOOS="$(GOOS)"
|
.drone.yaml
1
2
3
4
5
6
7
8
9
10
11
12
13
14
15
16
17
18
19
20
21
22
23
24
25
26
27
28
29
30
31
32
33
34
35
36
37
38
39
40
41
42
43
| kind: pipeline
name: test
steps:
- name: build test
image: golang:1.15
volumes:
- name: cache
path: /go
- name: gocache
path: /root/.cache/go-build
environment:
CGO_ENABLED: 0
GO111MODULE: on
GOPROXY: https://mirrors.aliyun.com/goproxy,direct
commands:
- echo $DRONE_BUILD_CREATED
- go version
- go env
- cd ./
- pwd
- make linux
- name: publish test
image: plugins/docker
settings:
username: admin
password: Harbor12345
context: ./
dockerfile: ./Dockerfile
repo: 192.168.1.109:8800/library/test
registry: 192.168.1.109:8800
tags:
- ${DRONE_TAG=dev}-${DRONE_COMMIT:0:8}
- latest
insecure: true
volumes:
- name: cache
host:
path: /tmp/drone-cache/go
- name: gocache
host:
path: /tmp/drone-cache/go_build
|
argo/test-svr.yaml
1
2
3
4
5
6
7
8
9
10
11
12
13
14
15
16
17
18
19
20
21
22
23
24
25
26
27
28
29
30
31
32
33
34
35
36
37
| apiVersion: apps/v1
kind: Deployment
metadata:
name: test
namespace: test
spec:
selector:
matchLabels:
app: test
replicas: 1
template:
metadata:
labels:
app: test
spec:
containers:
- name: test
image: 192.168.1.109:8800/library/test:latest
args:
- server
---
apiVersion: v1
kind: Service
metadata:
name: test
namespace: test
labels:
svc: test
spec:
selector:
app: test
ports:
- name: http
port: 8080
targetPort: 8080
nodePort: 30001
type: NodePort
|
创建命名空间
1
2
| # test-svr.yml中定义的
kubectl create namespace test
|
添加仓库地址,Settings → Repositories,点击 Connect Repo using HTTPS

创建app,点击NEW APP
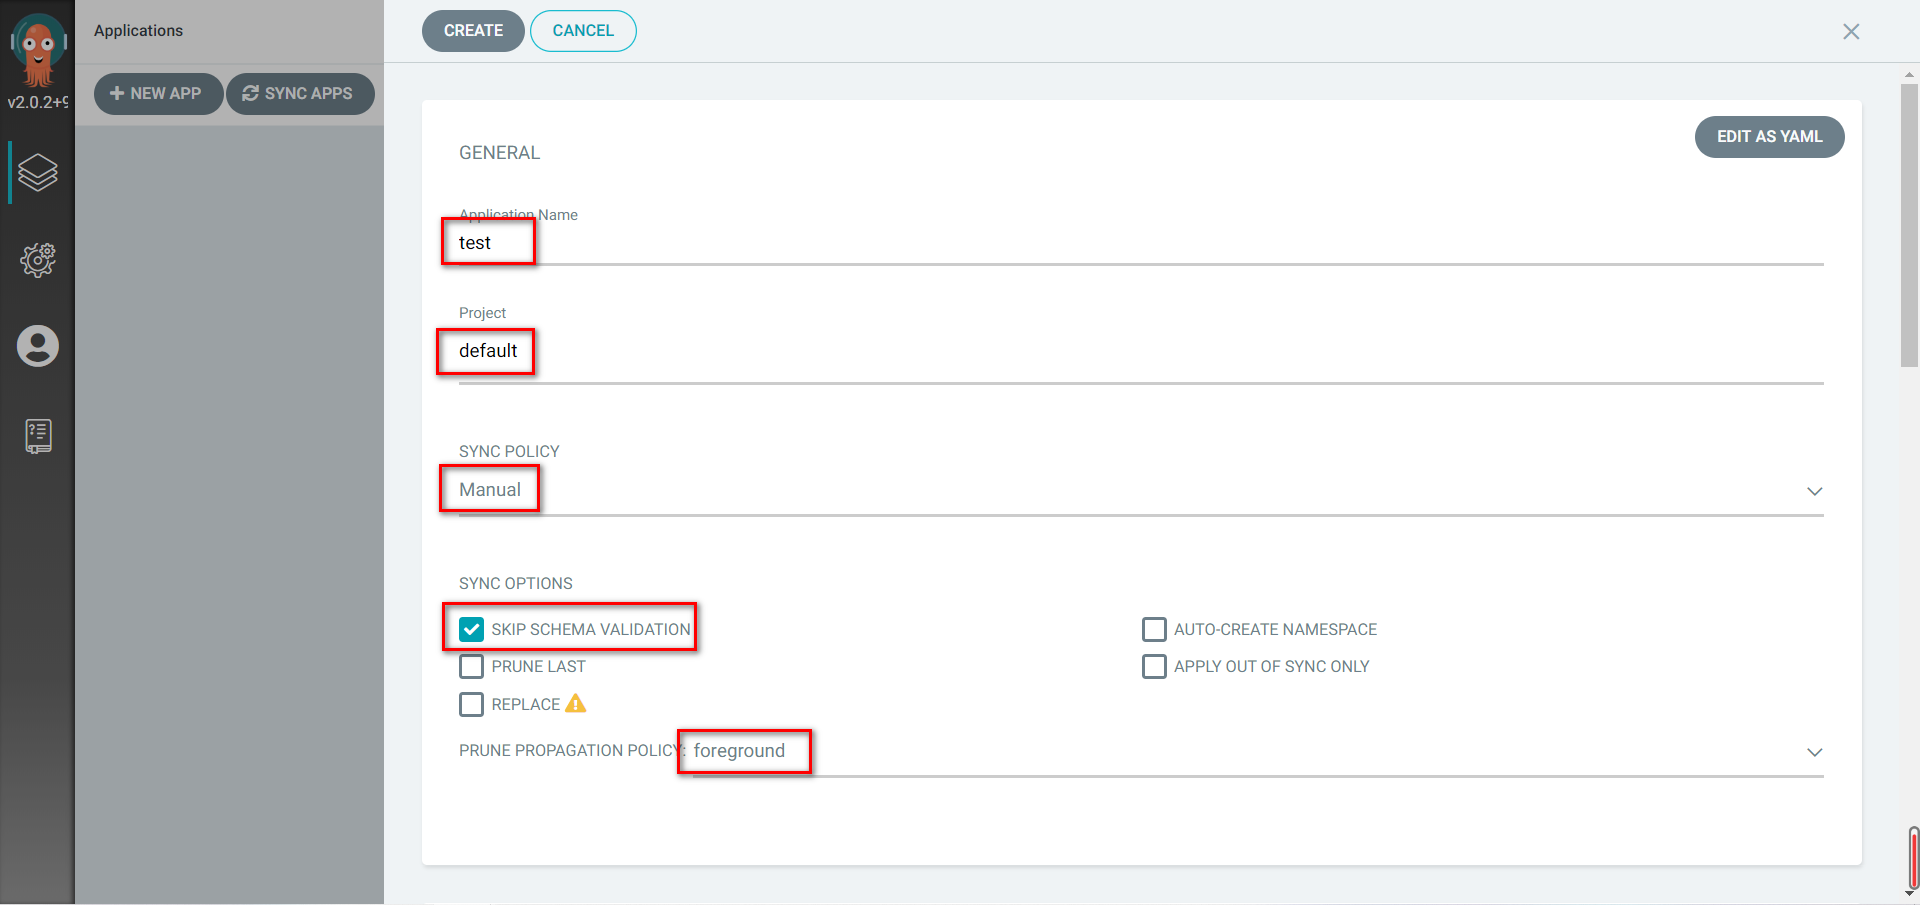

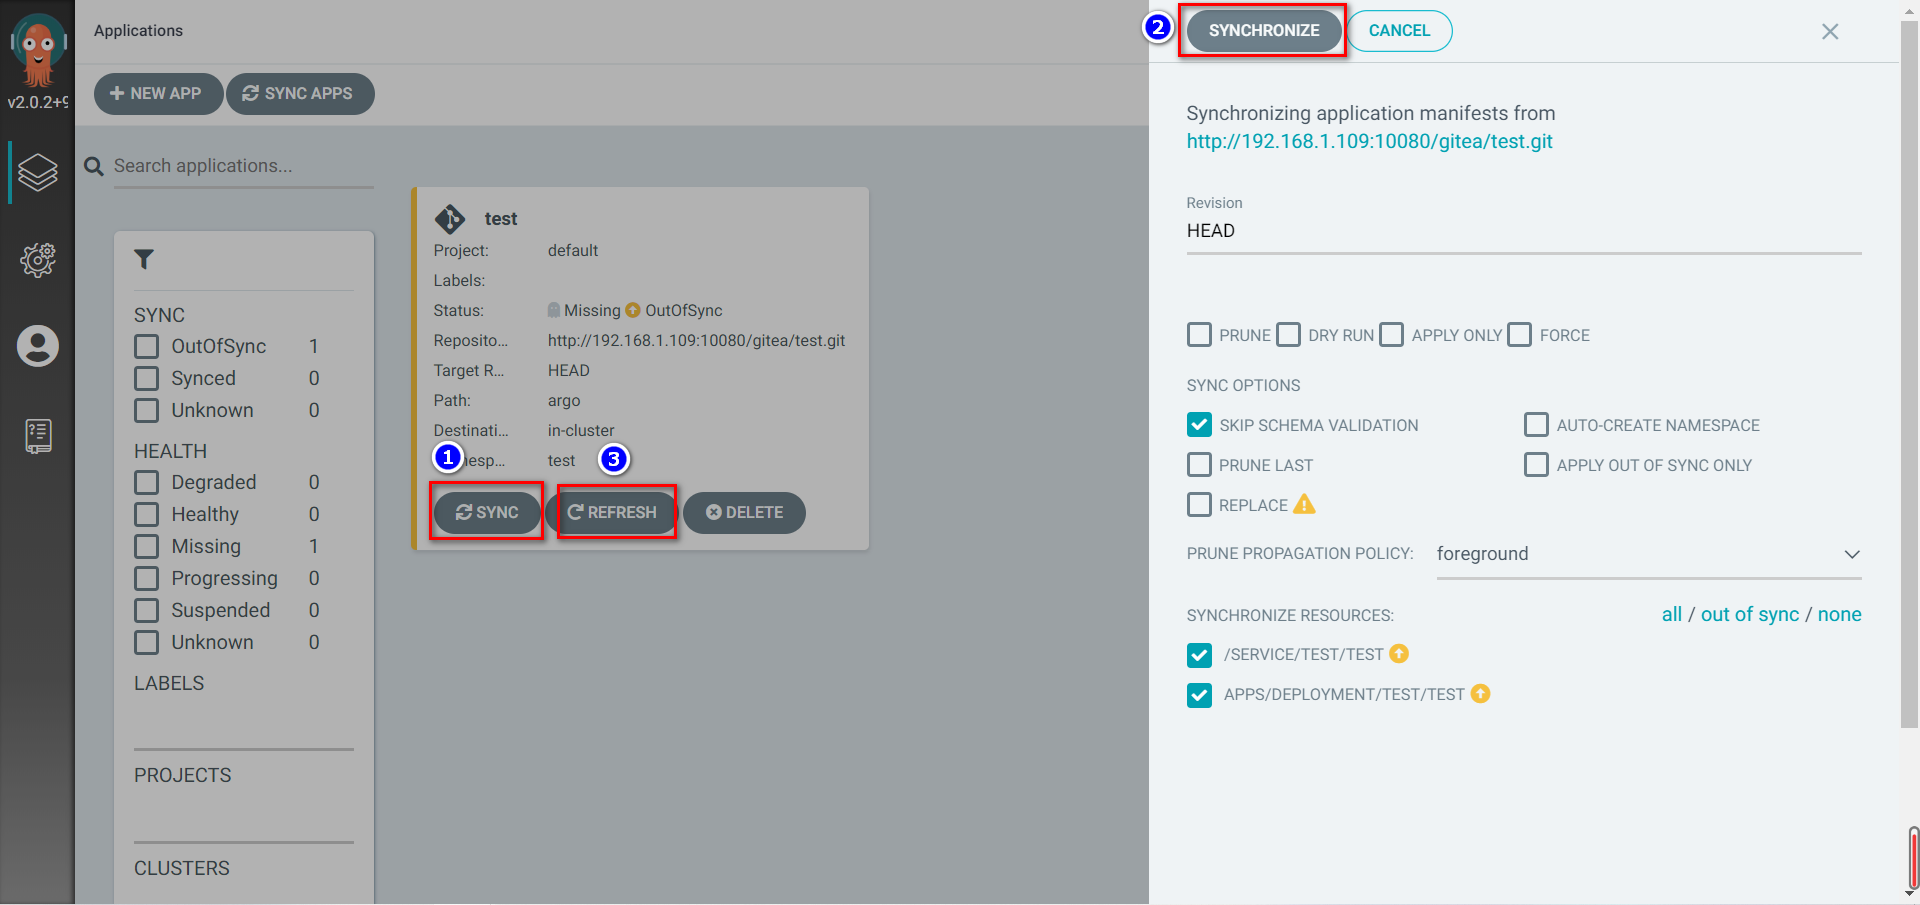
Kubernetes 中有两种级联删除的模式:background 模式和 foreground 模式。
Background 级联删除,在 background 级联删除 模式下,Kubernetes 会立即删除 Owner 对象,然后垃圾收集器会在后台删除这些 Dependent。
Foreground 级联删除m在 foreground 级联删除 模式下,根对象首先进入 “删除中” 状态。该对象会设置deletionTimestamp 字段对象的 metadata.finalizers 字段包含了值 “foregroundDeletion”,对象仍然可以通过 REST API 可见,一旦被设置为 “删除中” 状态,垃圾收集器会删除对象的所有 Dependent。垃圾收集器删除了所有 “Blocking” 的 Dependent(对象的 ownerReference.blockOwnerDeletion=true)之后,它会删除 Owner 对象。
如果一个对象的ownerReferences 字段被一个 Controller(例如 Deployment 或 ReplicaSet)设置,blockOwnerDeletion 会被自动设置,没必要手动修改这个字段。
如果删除对象时,不自动删除它的 Dependent,这些 Dependent 被称作是原对象的 孤儿(Orphan),可以使用以下命令实现
1
| kubectl delete statefulset -n de2ca8d1-94b4-4faa-8077-e9374ca9db4e 5bagk2rivkjno --cascade=false
|
kubernetes apps删除流程