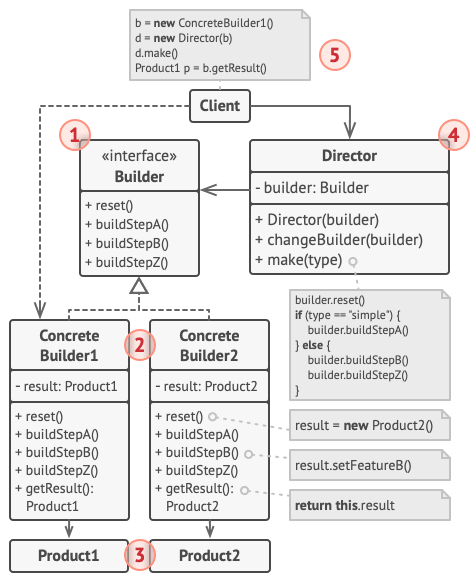
https://refactoringguru.cn/design-patterns/builder

创建型模式-生成器模式

亦称: 建造者模式、Builder

意图

生成器模式是一种创建型设计模式, 使你能够分步骤创建复杂对象。 该模式允许你使用相同的创建代码生成不同类型和形式的对象。

问题

假设有这样一个复杂对象, 在对其进行构造时需要对诸多成员变量和嵌套对象进行繁复的初始化工作。 这些初始化代码通常深藏于一个包含众多参数且让人基本看不懂的构造函数中; 甚至还有更糟糕的情况, 那就是这些代码散落在客户端代码的多个位置。

如果为每种可能的对象都创建一个子类, 这可能会导致程序变得过于复杂

例如, 我们来思考如何创建一个 房屋House对象。 建造一栋简单的房屋, 首先你需要建造四面墙和地板, 安装房门和一套窗户, 然后再建造一个屋顶。 但是如果你想要一栋更宽敞更明亮的房屋, 还要有院子和其他设施 (例如暖气、 排水和供电设备), 那又该怎么办呢?

最简单的方法是扩展 房屋基类, 然后创建一系列涵盖所有参数组合的子类。 但最终你将面对相当数量的子类。 任何新增的参数 (例如门廊类型) 都会让这个层次结构更加复杂。

另一种方法则无需生成子类。 你可以在 房屋基类中创建一个包括所有可能参数的超级构造函数, 并用它来控制房屋对象。 这种方法确实可以避免生成子类, 但它却会造成另外一个问题。

拥有大量输入参数的构造函数也有缺陷: 这些参数也不是每次都要全部用上的

通常情况下, 绝大部分的参数都没有使用, 这使得对于构造函数的调用十分不简洁。 例如, 只有很少的房子有游泳池, 因此与游泳池相关的参数十之八九是毫无用处的。

解决方案

生成器模式建议将对象构造代码从产品类中抽取出来, 并将其放在一个名为生成器的独立对象中。

生成器模式让你能够分步骤创建复杂对象。 生成器不允许其他对象访问正在创建中的产品

该模式会将对象构造过程划分为一组步骤, 比如 build­Walls创建墙壁和 build­Door创建房门创建房门等。 每次创建对象时, 你都需要通过生成器对象执行一系列步骤。 重点在于你无需调用所有步骤, 而只需调用创建特定对象配置所需的那些步骤即可。

当你需要创建不同形式的产品时, 其中的一些构造步骤可能需要不同的实现。 例如, 木屋的房门可能需要使用木头制造, 而城堡的房门则必须使用石头制造。

在这种情况下, 你可以创建多个不同的生成器, 用不同方式实现一组相同的创建步骤。 然后你就可以在创建过程中使用这些生成器 (例如按顺序调用多个构造步骤) 来生成不同类型的对象。

不同生成器以不同方式执行相同的任务。

例如, 假设第一个建造者使用木头和玻璃制造房屋, 第二个建造者使用石头和钢铁, 而第三个建造者使用黄金和钻石。 在调用同一组步骤后, 第一个建造者会给你一栋普通房屋, 第二个会给你一座小城堡, 而第三个则会给你一座宫殿。 但是, 只有在调用构造步骤的客户端代码可以通过通用接口与建造者进行交互时, 这样的调用才能返回需要的房屋。

主管

你可以进一步将用于创建产品的一系列生成器步骤调用抽取成为单独的主管类。 主管类可定义创建步骤的执行顺序, 而生成器则提供这些步骤的实现。

主管知道需要哪些创建步骤才能获得可正常使用的产品。

严格来说, 你的程序中并不一定需要主管类。 客户端代码可直接以特定顺序调用创建步骤。 不过, 主管类中非常适合放入各种例行构造流程, 以便在程序中反复使用。

此外, 对于客户端代码来说, 主管类完全隐藏了产品构造细节。 客户端只需要将一个生成器与主管类关联, 然后使用主管类来构造产品, 就能从生成器处获得构造结果了。

生成器模式结构

  1. 生成器 (Builder) 接口声明在所有类型生成器中通用的产品构造步骤。
  2. 具体生成器 (Concrete Builders) 提供构造过程的不同实现。 具体生成器也可以构造不遵循通用接口的产品。
  3. 产品 (Products) 是最终生成的对象。 由不同生成器构造的产品无需属于同一类层次结构或接口。
  4. 主管 (Director) 类定义调用构造步骤的顺序, 这样你就可以创建和复用特定的产品配置。
  5. 客户端 (Client) 必须将某个生成器对象与主管类关联。 一般情况下, 你只需通过主管类构造函数的参数进行一次性关联即可。 此后主管类就能使用生成器对象完成后续所有的构造任务。 但在客户端将生成器对象传递给主管类制造方法时还有另一种方式。 在这种情况下, 你在使用主管类生产产品时每次都可以使用不同的生成器。

伪代码

下面关于生成器模式的例子演示了你可以如何复用相同的对象构造代码来生成不同类型的产品——例如汽车 (Car)——及其相应的使用手册 (Manual)。

分步骤制造汽车并制作对应型号用户使用手册的示例

汽车是一个复杂对象, 有数百种不同的制造方法。 我们没有在 汽车类中塞入一个巨型构造函数, 而是将汽车组装代码抽取到单独的汽车生成器类中。 该类中有一组方法可用来配置汽车的各种部件。

如果客户端代码需要组装一辆与众不同、 精心调教的汽车, 它可以直接调用生成器。 或者, 客户端可以将组装工作委托给主管类, 因为主管类知道如何使用生成器制造最受欢迎的几种型号汽车。

你或许会感到吃惊, 但确实每辆汽车都需要一本使用手册 (说真的, 谁会去读它们呢?)。 使用手册会介绍汽车的每一项功能, 因此不同型号的汽车, 其使用手册内容也不一样。 因此, 你可以复用现有流程来制造实际的汽车及其对应的手册。 当然, 编写手册和制造汽车不是一回事, 所以我们需要另外一个生成器对象来专门编写使用手册。 该类与其制造汽车的兄弟类都实现了相同的制造方法, 但是其功能不是制造汽车部件, 而是描述每个部件。 将这些生成器传递给相同的主管对象, 我们就能够生成一辆汽车或是一本使用手册了。

最后一个部分是获取结果对象。 尽管金属汽车和纸质手册存在关联, 但它们却是完全不同的东西。 我们无法在主管类和具体产品类不发生耦合的情况下, 在主管类中提供获取结果对象的方法。 因此, 我们只能通过负责制造过程的生成器来获取结果对象。

1
2
3
4
5
6
7
8
9
10
11
12
13
14
15
16
17
18
19
20
21
22
23
24
25
26
27
28
29
30
31
32
33
34
35
36
37
38
39
40
41
42
43
44
45
46
47
48
49
50
51
52
53
54
55
56
57
58
59
60
61
62
63
64
65
66
67
68
69
70
71
72
73
74
75
76
77
78
79
80
81
82
83
84
85
86
87
88
89
90
91
92
93
94
95
96
97
98
99
100
101
102
103
104
105
106
107
108
109
110
111
112
113
114
115
116
117
118
119
120
121
122
123
// 只有当产品较为复杂且需要详细配置时,使用生成器模式才有意义。下面的两个
// 产品尽管没有同样的接口,但却相互关联。
class Car is
// 一辆汽车可能配备有 GPS 设备、行车电脑和几个座位。不同型号的汽车(
// 运动型轿车、SUV 和敞篷车)可能会安装或启用不同的功能。

class Manual is
// 用户使用手册应该根据汽车配置进行编制,并介绍汽车的所有功能。


// 生成器接口声明了创建产品对象不同部件的方法。
interface Builder is
method reset()
method setSeats(...)
method setEngine(...)
method setTripComputer(...)
method setGPS(...)

// 具体生成器类将遵循生成器接口并提供生成步骤的具体实现。你的程序中可能会
// 有多个以不同方式实现的生成器变体。
class CarBuilder implements Builder is
private field car:Car

// 一个新的生成器实例必须包含一个在后续组装过程中使用的空产品对象。
constructor CarBuilder() is
this.reset()

// reset(重置)方法可清除正在生成的对象。
method reset() is
this.car = new Car()

// 所有生成步骤都会与同一个产品实例进行交互。
method setSeats(...) is
// 设置汽车座位的数量。

method setEngine(...) is
// 安装指定的引擎。

method setTripComputer(...) is
// 安装行车电脑。

method setGPS(...) is
// 安装全球定位系统。

// 具体生成器需要自行提供获取结果的方法。这是因为不同类型的生成器可能
// 会创建不遵循相同接口的、完全不同的产品。所以也就无法在生成器接口中
// 声明这些方法(至少在静态类型的编程语言中是这样的)。
//
// 通常在生成器实例将结果返回给客户端后,它们应该做好生成另一个产品的
// 准备。因此生成器实例通常会在 `getProduct(获取产品)`方法主体末尾
// 调用重置方法。但是该行为并不是必需的,你也可让生成器等待客户端明确
// 调用重置方法后再去处理之前的结果。
method getProduct():Car is
product = this.car
this.reset()
return product

// 生成器与其他创建型模式的不同之处在于:它让你能创建不遵循相同接口的产品。
class CarManualBuilder implements Builder is
private field manual:Manual

constructor CarManualBuilder() is
this.reset()

method reset() is
this.manual = new Manual()

method setSeats(...) is
// 添加关于汽车座椅功能的文档。

method setEngine(...) is
// 添加关于引擎的介绍。

method setTripComputer(...) is
// 添加关于行车电脑的介绍。

method setGPS(...) is
// 添加关于 GPS 的介绍。

method getProduct():Manual is
// 返回使用手册并重置生成器。


// 主管只负责按照特定顺序执行生成步骤。其在根据特定步骤或配置来生成产品时
// 会很有帮助。由于客户端可以直接控制生成器,所以严格意义上来说,主管类并
// 不是必需的。
class Director is
private field builder:Builder

// 主管可同由客户端代码传递给自身的任何生成器实例进行交互。客户端可通
// 过这种方式改变最新组装完毕的产品的最终类型。
method setBuilder(builder:Builder)
this.builder = builder

// 主管可使用同样的生成步骤创建多个产品变体。
method constructSportsCar(builder: Builder) is
builder.reset()
builder.setSeats(2)
builder.setEngine(new SportEngine())
builder.setTripComputer(true)
builder.setGPS(true)

method constructSUV(builder: Builder) is
// ...


// 客户端代码会创建生成器对象并将其传递给主管,然后执行构造过程。最终结果
// 将需要从生成器对象中获取。
class Application is

method makeCar() is
director = new Director()

CarBuilder builder = new CarBuilder()
director.constructSportsCar(builder)
Car car = builder.getProduct()

CarManualBuilder builder = new CarManualBuilder()
director.constructSportsCar(builder)

// 最终产品通常需要从生成器对象中获取,因为主管不知晓具体生成器和
// 产品的存在,也不会对其产生依赖。
Manual manual = builder.getProduct()

生成器模式适合应用场景

使用生成器模式可避免“重叠构造函数 (telescopic constructor)”的出现。

假设你的构造函数中有十个可选参数, 那么调用该函数会非常不方便; 因此, 你需要重载这个构造函数, 新建几个只有较少参数的简化版。 但这些构造函数仍需调用主构造函数, 传递一些默认数值来替代省略掉的参数。

1
2
3
4
5
class Pizza {
Pizza(int size) { ... }
Pizza(int size, boolean cheese) { ... }
Pizza(int size, boolean cheese, boolean pepperoni) { ... }
// ...

只有在 C# 或 Java 等支持方法重载的编程语言中才能写出如此复杂的构造函数。

生成器模式让你可以分步骤生成对象, 而且允许你仅使用必须的步骤。 应用该模式后, 你再也不需要将几十个参数塞进构造函数里了。

当你希望使用代码创建不同形式的产品(例如石头或木头房屋)时,可使用生成器模式。

如果你需要创建的各种形式的产品, 它们的制造过程相似且仅有细节上的差异, 此时可使用生成器模式。

基本生成器接口中定义了所有可能的制造步骤, 具体生成器将实现这些步骤来制造特定形式的产品。 同时, 主管类将负责管理制造步骤的顺序。

使用生成器构造组合树或其他复杂对象。

生成器模式让你能分步骤构造产品。 你可以延迟执行某些步骤而不会影响最终产品。 你甚至可以递归调用这些步骤, 这在创建对象树时非常方便。

生成器在执行制造步骤时, 不能对外发布未完成的产品。 这可以避免客户端代码获取到不完整结果对象的情况。

实现方式

  1. 清晰地定义通用步骤, 确保它们可以制造所有形式的产品。 否则你将无法进一步实施该模式。

  2. 在基本生成器接口中声明这些步骤。

  3. 为每个形式的产品创建具体生成器类, 并实现其构造步骤。

    不要忘记实现获取构造结果对象的方法。 你不能在生成器接口中声明该方法, 因为不同生成器构造的产品可能没有公共接口, 因此你就不知道该方法返回的对象类型。 但是, 如果所有产品都位于单一类层次中, 你就可以安全地在基本接口中添加获取生成对象的方法。

  4. 考虑创建主管类。 它可以使用同一生成器对象来封装多种构造产品的方式。

  5. 客户端代码会同时创建生成器和主管对象。 构造开始前, 客户端必须将生成器对象传递给主管对象。 通常情况下, 客户端只需调用主管类构造函数一次即可。 主管类使用生成器对象完成后续所有制造任务。 还有另一种方式, 那就是客户端可以将生成器对象直接传递给主管类的制造方法。

  6. 只有在所有产品都遵循相同接口的情况下, 构造结果可以直接通过主管类获取。 否则, 客户端应当通过生成器获取构造结果。

生成器模式优缺点

优点

  • 你可以分步创建对象, 暂缓创建步骤或递归运行创建步骤。
  • 生成不同形式的产品时, 你可以复用相同的制造代码。
  • 单一职责原则。 你可以将复杂构造代码从产品的业务逻辑中分离出来。

缺点

  • 由于该模式需要新增多个类, 因此代码整体复杂程度会有所增加。

与其他模式的关系

代码示例

生成器是一种创建型设计模式, 使你能够分步骤创建复杂对象。

与其他创建型模式不同, 生成器不要求产品拥有通用接口。 这使得用相同的创建过程生成不同的产品成为可能。

在 C# 中使用模式

复杂度: ★★☆

流行度: ★★★

使用示例: 生成器模式是 C# 世界中的一个著名模式。 当你需要创建一个可能有许多配置选项的对象时, 该模式会特别有用。

识别方法: 生成器模式可以通过类来识别, 它拥有一个构建方法和多个配置结果对象的方法。 生成器方法通常支持方法链 (例如 someBuilder->setValueA(1)->setValueB(2)->create() )。

概念示例

本例说明了生成器设计模式的结构并重点回答了下面的问题:

  • 它由哪些类组成?
  • 这些类扮演了哪些角色?
  • 模式中的各个元素会以何种方式相互关联?

Program.cs: 概念示例

1
2
3
4
5
6
7
8
9
10
11
12
13
14
15
16
17
18
19
20
21
22
23
24
25
26
27
28
29
30
31
32
33
34
35
36
37
38
39
40
41
42
43
44
45
46
47
48
49
50
51
52
53
54
55
56
57
58
59
60
61
62
63
64
65
66
67
68
69
70
71
72
73
74
75
76
77
78
79
80
81
82
83
84
85
86
87
88
89
90
91
92
93
94
95
96
97
98
99
100
101
102
103
104
105
106
107
108
109
110
111
112
113
114
115
116
117
118
119
120
121
122
123
124
125
126
127
128
129
130
131
132
133
134
135
136
137
138
139
140
141
142
143
144
145
146
147
148
149
150
151
152
153
154
155
156
157
158
159
160
using System;
using System.Collections.Generic;

namespace RefactoringGuru.DesignPatterns.Builder.Conceptual
{
// The Builder interface specifies methods for creating the different parts
// of the Product objects.
public interface IBuilder
{
void BuildPartA();

void BuildPartB();

void BuildPartC();
}

// The Concrete Builder classes follow the Builder interface and provide
// specific implementations of the building steps. Your program may have
// several variations of Builders, implemented differently.
public class ConcreteBuilder : IBuilder
{
private Product _product = new Product();

// A fresh builder instance should contain a blank product object, which
// is used in further assembly.
public ConcreteBuilder()
{
this.Reset();
}

public void Reset()
{
this._product = new Product();
}

// All production steps work with the same product instance.
public void BuildPartA()
{
this._product.Add("PartA1");
}

public void BuildPartB()
{
this._product.Add("PartB1");
}

public void BuildPartC()
{
this._product.Add("PartC1");
}

// Concrete Builders are supposed to provide their own methods for
// retrieving results. That's because various types of builders may
// create entirely different products that don't follow the same
// interface. Therefore, such methods cannot be declared in the base
// Builder interface (at least in a statically typed programming
// language).
//
// Usually, after returning the end result to the client, a builder
// instance is expected to be ready to start producing another product.
// That's why it's a usual practice to call the reset method at the end
// of the `GetProduct` method body. However, this behavior is not
// mandatory, and you can make your builders wait for an explicit reset
// call from the client code before disposing of the previous result.
public Product GetProduct()
{
Product result = this._product;

this.Reset();

return result;
}
}

// It makes sense to use the Builder pattern only when your products are
// quite complex and require extensive configuration.
//
// Unlike in other creational patterns, different concrete builders can
// produce unrelated products. In other words, results of various builders
// may not always follow the same interface.
public class Product
{
private List<object> _parts = new List<object>();

public void Add(string part)
{
this._parts.Add(part);
}

public string ListParts()
{
string str = string.Empty;

for (int i = 0; i < this._parts.Count; i++)
{
str += this._parts[i] + ", ";
}

str = str.Remove(str.Length - 2); // removing last ",c"

return "Product parts: " + str + "\n";
}
}

// The Director is only responsible for executing the building steps in a
// particular sequence. It is helpful when producing products according to a
// specific order or configuration. Strictly speaking, the Director class is
// optional, since the client can control builders directly.
public class Director
{
private IBuilder _builder;

public IBuilder Builder
{
set { _builder = value; }
}

// The Director can construct several product variations using the same
// building steps.
public void BuildMinimalViableProduct()
{
this._builder.BuildPartA();
}

public void BuildFullFeaturedProduct()
{
this._builder.BuildPartA();
this._builder.BuildPartB();
this._builder.BuildPartC();
}
}

class Program
{
static void Main(string[] args)
{
// The client code creates a builder object, passes it to the
// director and then initiates the construction process. The end
// result is retrieved from the builder object.
var director = new Director();
var builder = new ConcreteBuilder();
director.Builder = builder;

Console.WriteLine("Standard basic product:");
director.BuildMinimalViableProduct();
Console.WriteLine(builder.GetProduct().ListParts());

Console.WriteLine("Standard full featured product:");
director.BuildFullFeaturedProduct();
Console.WriteLine(builder.GetProduct().ListParts());

// Remember, the Builder pattern can be used without a Director
// class.
Console.WriteLine("Custom product:");
builder.BuildPartA();
builder.BuildPartC();
Console.Write(builder.GetProduct().ListParts());
}
}
}

Output.txt: 执行结果

1
2
3
4
5
6
7
8
Standard basic product:
Product parts: PartA1

Standard full featured product:
Product parts: PartA1, PartB1, PartC1

Custom product:
Product parts: PartA1, PartC1

在 C++ 中使用模式

复杂度: ★★☆

流行度: ★★★

使用示例: 生成器模式是 C++ 世界中的一个著名模式。 当你需要创建一个可能有许多配置选项的对象时, 该模式会特别有用。

识别方法: 生成器模式可以通过类来识别, 它拥有一个构建方法和多个配置结果对象的方法。 生成器方法通常支持方法链 (例如 someBuilder->setValueA(1)->setValueB(2)->create() )。

概念示例

本例说明了生成器设计模式的结构并重点回答了下面的问题:

  • 它由哪些类组成?
  • 这些类扮演了哪些角色?
  • 模式中的各个元素会以何种方式相互关联?

main.cc: 概念示例

1
2
3
4
5
6
7
8
9
10
11
12
13
14
15
16
17
18
19
20
21
22
23
24
25
26
27
28
29
30
31
32
33
34
35
36
37
38
39
40
41
42
43
44
45
46
47
48
49
50
51
52
53
54
55
56
57
58
59
60
61
62
63
64
65
66
67
68
69
70
71
72
73
74
75
76
77
78
79
80
81
82
83
84
85
86
87
88
89
90
91
92
93
94
95
96
97
98
99
100
101
102
103
104
105
106
107
108
109
110
111
112
113
114
115
116
117
118
119
120
121
122
123
124
125
126
127
128
129
130
131
132
133
134
135
136
137
138
139
140
141
142
143
144
145
146
147
148
149
150
151
152
153
154
155
156
157
158
159
160
161
162
163
164
165
166
167
168
169
170
171
172
173
174
175
176
177
178
179
180
181
182
183
184
185
186
187
188
189
190
191
192
193
194
/**
* It makes sense to use the Builder pattern only when your products are quite
* complex and require extensive configuration.
*
* Unlike in other creational patterns, different concrete builders can produce
* unrelated products. In other words, results of various builders may not
* always follow the same interface.
*/

class Product1{
public:
std::vector<std::string> parts_;
void ListParts()const{
std::cout << "Product parts: ";
for (size_t i=0;i<parts_.size();i++){
if(parts_[i]== parts_.back()){
std::cout << parts_[i];
}else{
std::cout << parts_[i] << ", ";
}
}
std::cout << "\n\n";
}
};


/**
* The Builder interface specifies methods for creating the different parts of
* the Product objects.
*/
class Builder{
public:
virtual ~Builder(){}
virtual void ProducePartA() const =0;
virtual void ProducePartB() const =0;
virtual void ProducePartC() const =0;
};
/**
* The Concrete Builder classes follow the Builder interface and provide
* specific implementations of the building steps. Your program may have several
* variations of Builders, implemented differently.
*/
class ConcreteBuilder1 : public Builder{
private:

Product1* product;

/**
* A fresh builder instance should contain a blank product object, which is
* used in further assembly.
*/
public:

ConcreteBuilder1(){
this->Reset();
}

~ConcreteBuilder1(){
delete product;
}

void Reset(){
this->product= new Product1();
}
/**
* All production steps work with the same product instance.
*/

void ProducePartA()const override{
this->product->parts_.push_back("PartA1");
}

void ProducePartB()const override{
this->product->parts_.push_back("PartB1");
}

void ProducePartC()const override{
this->product->parts_.push_back("PartC1");
}

/**
* Concrete Builders are supposed to provide their own methods for
* retrieving results. That's because various types of builders may create
* entirely different products that don't follow the same interface.
* Therefore, such methods cannot be declared in the base Builder interface
* (at least in a statically typed programming language). Note that PHP is a
* dynamically typed language and this method CAN be in the base interface.
* However, we won't declare it there for the sake of clarity.
*
* Usually, after returning the end result to the client, a builder instance
* is expected to be ready to start producing another product. That's why
* it's a usual practice to call the reset method at the end of the
* `getProduct` method body. However, this behavior is not mandatory, and
* you can make your builders wait for an explicit reset call from the
* client code before disposing of the previous result.
*/

/**
* Please be careful here with the memory ownership. Once you call
* GetProduct the user of this function is responsable to release this
* memory. Here could be a better option to use smart pointers to avoid
* memory leaks
*/

Product1* GetProduct() {
Product1* result= this->product;
this->Reset();
return result;
}
};

/**
* The Director is only responsible for executing the building steps in a
* particular sequence. It is helpful when producing products according to a
* specific order or configuration. Strictly speaking, the Director class is
* optional, since the client can control builders directly.
*/
class Director{
/**
* @var Builder
*/
private:
Builder* builder;
/**
* The Director works with any builder instance that the client code passes
* to it. This way, the client code may alter the final type of the newly
* assembled product.
*/

public:

void set_builder(Builder* builder){
this->builder=builder;
}

/**
* The Director can construct several product variations using the same
* building steps.
*/

void BuildMinimalViableProduct(){
this->builder->ProducePartA();
}

void BuildFullFeaturedProduct(){
this->builder->ProducePartA();
this->builder->ProducePartB();
this->builder->ProducePartC();
}
};
/**
* The client code creates a builder object, passes it to the director and then
* initiates the construction process. The end result is retrieved from the
* builder object.
*/
/**
* I used raw pointers for simplicity however you may prefer to use smart
* pointers here
*/
void ClientCode(Director& director)
{
ConcreteBuilder1* builder = new ConcreteBuilder1();
director.set_builder(builder);
std::cout << "Standard basic product:\n";
director.BuildMinimalViableProduct();

Product1* p= builder->GetProduct();
p->ListParts();
delete p;

std::cout << "Standard full featured product:\n";
director.BuildFullFeaturedProduct();

p= builder->GetProduct();
p->ListParts();
delete p;

// Remember, the Builder pattern can be used without a Director class.
std::cout << "Custom product:\n";
builder->ProducePartA();
builder->ProducePartC();
p=builder->GetProduct();
p->ListParts();
delete p;

delete builder;
}

int main(){
Director* director= new Director();
ClientCode(*director);
delete director;
return 0;
}

Output.txt: 执行结果

1
2
3
4
5
6
7
8
Standard basic product:
Product parts: PartA1

Standard full featured product:
Product parts: PartA1, PartB1, PartC1

Custom product:
Product parts: PartA1, PartC1

在 Java 中使用模式

复杂度: ★★☆

流行度: ★★★

使用示例: 生成器模式是 Java 世界中的一个著名模式。 当你需要创建一个可能有许多配置选项的对象时, 该模式会特别有用。

生成器在 Java 核心程序库中得到了广泛的应用:

识别方法: 生成器模式可以通过类来识别, 它拥有一个构建方法和多个配置结果对象的方法。 生成器方法通常支持方法链 (例如 someBuilder->setValueA(1)->setValueB(2)->create() )。

分步制造汽车

在本例中, 生成器模式允许你分步骤地制造不同型号的汽车。

示例还展示了生成器如何使用相同的生产过程制造不同类型的产品 (汽车手册)。

主管控制着构造顺序。 它知道制造各种汽车型号需要调用的生产步骤。 它仅与汽车的通用接口进行交互。 这样就能将不同类型的生成器传递给主管了。

最终结果将从生成器对象中获得, 因为主管不知道最终产品的类型。 只有生成器对象知道自己生成的产品是什么。

builders

builders/Builder.java: 通用生成器接口

1
2
3
4
5
6
7
8
9
10
11
12
13
14
15
16
17
18
19
package refactoring_guru.builder.example.builders;

import refactoring_guru.builder.example.cars.CarType;
import refactoring_guru.builder.example.components.Engine;
import refactoring_guru.builder.example.components.GPSNavigator;
import refactoring_guru.builder.example.components.Transmission;
import refactoring_guru.builder.example.components.TripComputer;

/**
* Builder interface defines all possible ways to configure a product.
*/
public interface Builder {
void setCarType(CarType type);
void setSeats(int seats);
void setEngine(Engine engine);
void setTransmission(Transmission transmission);
void setTripComputer(TripComputer tripComputer);
void setGPSNavigator(GPSNavigator gpsNavigator);
}

builders/CarBuilder.java: 汽车生成器

1
2
3
4
5
6
7
8
9
10
11
12
13
14
15
16
17
18
19
20
21
22
23
24
25
26
27
28
29
30
31
32
33
34
35
36
37
38
39
40
41
42
43
44
45
46
47
48
49
50
51
52
53
package refactoring_guru.builder.example.builders;

import refactoring_guru.builder.example.cars.Car;
import refactoring_guru.builder.example.cars.CarType;
import refactoring_guru.builder.example.components.Engine;
import refactoring_guru.builder.example.components.GPSNavigator;
import refactoring_guru.builder.example.components.Transmission;
import refactoring_guru.builder.example.components.TripComputer;

/**
* Concrete builders implement steps defined in the common interface.
*/
public class CarBuilder implements Builder {
private CarType type;
private int seats;
private Engine engine;
private Transmission transmission;
private TripComputer tripComputer;
private GPSNavigator gpsNavigator;

public void setCarType(CarType type) {
this.type = type;
}

@Override
public void setSeats(int seats) {
this.seats = seats;
}

@Override
public void setEngine(Engine engine) {
this.engine = engine;
}

@Override
public void setTransmission(Transmission transmission) {
this.transmission = transmission;
}

@Override
public void setTripComputer(TripComputer tripComputer) {
this.tripComputer = tripComputer;
}

@Override
public void setGPSNavigator(GPSNavigator gpsNavigator) {
this.gpsNavigator = gpsNavigator;
}

public Car getResult() {
return new Car(type, seats, engine, transmission, tripComputer, gpsNavigator);
}
}

builders/CarManualBuilder.java: 汽车手册生成器

1
2
3
4
5
6
7
8
9
10
11
12
13
14
15
16
17
18
19
20
21
22
23
24
25
26
27
28
29
30
31
32
33
34
35
36
37
38
39
40
41
42
43
44
45
46
47
48
49
50
51
52
53
54
55
56
57
58
59
package refactoring_guru.builder.example.builders;

import refactoring_guru.builder.example.cars.Manual;
import refactoring_guru.builder.example.cars.CarType;
import refactoring_guru.builder.example.components.Engine;
import refactoring_guru.builder.example.components.GPSNavigator;
import refactoring_guru.builder.example.components.Transmission;
import refactoring_guru.builder.example.components.TripComputer;

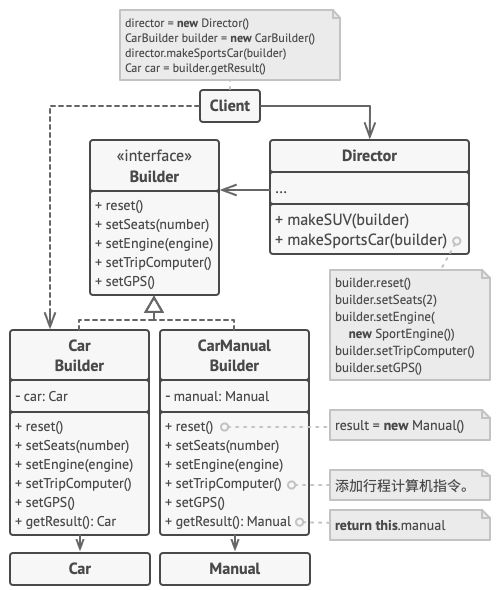
/**
* Unlike other creational patterns, Builder can construct unrelated products,
* which don't have the common interface.
*
* In this case we build a user manual for a car, using the same steps as we
* built a car. This allows to produce manuals for specific car models,
* configured with different features.
*/
public class CarManualBuilder implements Builder{
private CarType type;
private int seats;
private Engine engine;
private Transmission transmission;
private TripComputer tripComputer;
private GPSNavigator gpsNavigator;

@Override
public void setCarType(CarType type) {
this.type = type;
}

@Override
public void setSeats(int seats) {
this.seats = seats;
}

@Override
public void setEngine(Engine engine) {
this.engine = engine;
}

@Override
public void setTransmission(Transmission transmission) {
this.transmission = transmission;
}

@Override
public void setTripComputer(TripComputer tripComputer) {
this.tripComputer = tripComputer;
}

@Override
public void setGPSNavigator(GPSNavigator gpsNavigator) {
this.gpsNavigator = gpsNavigator;
}

public Manual getResult() {
return new Manual(type, seats, engine, transmission, tripComputer, gpsNavigator);
}
}

cars

cars/Car.java: 汽车产品

1
2
3
4
5
6
7
8
9
10
11
12
13
14
15
16
17
18
19
20
21
22
23
24
25
26
27
28
29
30
31
32
33
34
35
36
37
38
39
40
41
42
43
44
45
46
47
48
49
50
51
52
53
54
55
56
57
58
59
60
61
62
63
64
package refactoring_guru.builder.example.cars;

import refactoring_guru.builder.example.components.Engine;
import refactoring_guru.builder.example.components.GPSNavigator;
import refactoring_guru.builder.example.components.Transmission;
import refactoring_guru.builder.example.components.TripComputer;

/**
* Car is a product class.
*/
public class Car {
private final CarType carType;
private final int seats;
private final Engine engine;
private final Transmission transmission;
private final TripComputer tripComputer;
private final GPSNavigator gpsNavigator;
private double fuel = 0;

public Car(CarType carType, int seats, Engine engine, Transmission transmission,
TripComputer tripComputer, GPSNavigator gpsNavigator) {
this.carType = carType;
this.seats = seats;
this.engine = engine;
this.transmission = transmission;
this.tripComputer = tripComputer;
if (this.tripComputer != null) {
this.tripComputer.setCar(this);
}
this.gpsNavigator = gpsNavigator;
}

public CarType getCarType() {
return carType;
}

public double getFuel() {
return fuel;
}

public void setFuel(double fuel) {
this.fuel = fuel;
}

public int getSeats() {
return seats;
}

public Engine getEngine() {
return engine;
}

public Transmission getTransmission() {
return transmission;
}

public TripComputer getTripComputer() {
return tripComputer;
}

public GPSNavigator getGpsNavigator() {
return gpsNavigator;
}
}

cars/Manual.java: 手册产品

1
2
3
4
5
6
7
8
9
10
11
12
13
14
15
16
17
18
19
20
21
22
23
24
25
26
27
28
29
30
31
32
33
34
35
36
37
38
39
40
41
42
43
44
45
46
47
48
package refactoring_guru.builder.example.cars;

import refactoring_guru.builder.example.components.Engine;
import refactoring_guru.builder.example.components.GPSNavigator;
import refactoring_guru.builder.example.components.Transmission;
import refactoring_guru.builder.example.components.TripComputer;

/**
* Car manual is another product. Note that it does not have the same ancestor
* as a Car. They are not related.
*/
public class Manual {
private final CarType carType;
private final int seats;
private final Engine engine;
private final Transmission transmission;
private final TripComputer tripComputer;
private final GPSNavigator gpsNavigator;

public Manual(CarType carType, int seats, Engine engine, Transmission transmission,
TripComputer tripComputer, GPSNavigator gpsNavigator) {
this.carType = carType;
this.seats = seats;
this.engine = engine;
this.transmission = transmission;
this.tripComputer = tripComputer;
this.gpsNavigator = gpsNavigator;
}

public String print() {
String info = "";
info += "Type of car: " + carType + "\n";
info += "Count of seats: " + seats + "\n";
info += "Engine: volume - " + engine.getVolume() + "; mileage - " + engine.getMileage() + "\n";
info += "Transmission: " + transmission + "\n";
if (this.tripComputer != null) {
info += "Trip Computer: Functional" + "\n";
} else {
info += "Trip Computer: N/A" + "\n";
}
if (this.gpsNavigator != null) {
info += "GPS Navigator: Functional" + "\n";
} else {
info += "GPS Navigator: N/A" + "\n";
}
return info;
}
}

cars/CarType.java

1
2
3
4
5
package refactoring_guru.builder.example.cars;

public enum CarType {
CITY_CAR, SPORTS_CAR, SUV
}

components

components/Engine.java: 产品特征 1

1
2
3
4
5
6
7
8
9
10
11
12
13
14
15
16
17
18
19
20
21
22
23
24
25
26
27
28
29
30
31
32
33
34
35
36
37
38
39
40
41
42
43
package refactoring_guru.builder.example.components;

/**
* Just another feature of a car.
*/
public class Engine {
private final double volume;
private double mileage;
private boolean started;

public Engine(double volume, double mileage) {
this.volume = volume;
this.mileage = mileage;
}

public void on() {
started = true;
}

public void off() {
started = false;
}

public boolean isStarted() {
return started;
}

public void go(double mileage) {
if (started) {
this.mileage += mileage;
} else {
System.err.println("Cannot go(), you must start engine first!");
}
}

public double getVolume() {
return volume;
}

public double getMileage() {
return mileage;
}
}

components/GPSNavigator.java: 产品特征 2

1
2
3
4
5
6
7
8
9
10
11
12
13
14
15
16
17
18
19
20
package refactoring_guru.builder.example.components;

/**
* Just another feature of a car.
*/
public class GPSNavigator {
private String route;

public GPSNavigator() {
this.route = "221b, Baker Street, London to Scotland Yard, 8-10 Broadway, London";
}

public GPSNavigator(String manualRoute) {
this.route = manualRoute;
}

public String getRoute() {
return route;
}
}

components/Transmission.java: 产品特征 3

1
2
3
4
5
6
7
8
package refactoring_guru.builder.example.components;

/**
* Just another feature of a car.
*/
public enum Transmission {
SINGLE_SPEED, MANUAL, AUTOMATIC, SEMI_AUTOMATIC
}

components/TripComputer.java: 产品特征 4

1
2
3
4
5
6
7
8
9
10
11
12
13
14
15
16
17
18
19
20
21
22
23
24
25
26
27
package refactoring_guru.builder.example.components;

import refactoring_guru.builder.example.cars.Car;

/**
* Just another feature of a car.
*/
public class TripComputer {

private Car car;

public void setCar(Car car) {
this.car = car;
}

public void showFuelLevel() {
System.out.println("Fuel level: " + car.getFuel());
}

public void showStatus() {
if (this.car.getEngine().isStarted()) {
System.out.println("Car is started");
} else {
System.out.println("Car isn't started");
}
}
}

director

director/Director.java: 主管控制生成器

1
2
3
4
5
6
7
8
9
10
11
12
13
14
15
16
17
18
19
20
21
22
23
24
25
26
27
28
29
30
31
32
33
34
35
36
37
38
39
40
41
42
package refactoring_guru.builder.example.director;

import refactoring_guru.builder.example.builders.Builder;
import refactoring_guru.builder.example.cars.CarType;
import refactoring_guru.builder.example.components.Engine;
import refactoring_guru.builder.example.components.GPSNavigator;
import refactoring_guru.builder.example.components.Transmission;
import refactoring_guru.builder.example.components.TripComputer;

/**
* Director defines the order of building steps. It works with a builder object
* through common Builder interface. Therefore it may not know what product is
* being built.
*/
public class Director {

public void constructSportsCar(Builder builder) {
builder.setCarType(CarType.SPORTS_CAR);
builder.setSeats(2);
builder.setEngine(new Engine(3.0, 0));
builder.setTransmission(Transmission.SEMI_AUTOMATIC);
builder.setTripComputer(new TripComputer());
builder.setGPSNavigator(new GPSNavigator());
}

public void constructCityCar(Builder builder) {
builder.setCarType(CarType.CITY_CAR);
builder.setSeats(2);
builder.setEngine(new Engine(1.2, 0));
builder.setTransmission(Transmission.AUTOMATIC);
builder.setTripComputer(new TripComputer());
builder.setGPSNavigator(new GPSNavigator());
}

public void constructSUV(Builder builder) {
builder.setCarType(CarType.SUV);
builder.setSeats(4);
builder.setEngine(new Engine(2.5, 0));
builder.setTransmission(Transmission.MANUAL);
builder.setGPSNavigator(new GPSNavigator());
}
}

Demo.java: 客户端代码

1
2
3
4
5
6
7
8
9
10
11
12
13
14
15
16
17
18
19
20
21
22
23
24
25
26
27
28
29
30
31
32
33
34
35
36
37
38
package refactoring_guru.builder.example;

import refactoring_guru.builder.example.builders.CarBuilder;
import refactoring_guru.builder.example.builders.CarManualBuilder;
import refactoring_guru.builder.example.cars.Car;
import refactoring_guru.builder.example.cars.Manual;
import refactoring_guru.builder.example.director.Director;

/**
* Demo class. Everything comes together here.
*/
public class Demo {

public static void main(String[] args) {
Director director = new Director();

// Director gets the concrete builder object from the client
// (application code). That's because application knows better which
// builder to use to get a specific product.
CarBuilder builder = new CarBuilder();
director.constructSportsCar(builder);

// The final product is often retrieved from a builder object, since
// Director is not aware and not dependent on concrete builders and
// products.
Car car = builder.getResult();
System.out.println("Car built:\n" + car.getCarType());


CarManualBuilder manualBuilder = new CarManualBuilder();

// Director may know several building recipes.
director.constructSportsCar(manualBuilder);
Manual carManual = manualBuilder.getResult();
System.out.println("\nCar manual built:\n" + carManual.print());
}

}

OutputDemo.txt: 执行结果

1
2
3
4
5
6
7
8
9
10
Car built:
SPORTS_CAR

Car manual built:
Type of car: SPORTS_CAR
Count of seats: 2
Engine: volume - 3.0; mileage - 0.0
Transmission: SEMI_AUTOMATIC
Trip Computer: Functional
GPS Navigator: Functional

在 PHP 中使用模式

复杂度: ★★☆

流行度: ★★★

使用示例: 生成器模式是 PHP 世界中的一个著名模式。 当你需要创建一个可能有许多配置选项的对象时, 该模式会特别有用。

识别方法: 生成器模式可以通过类来识别, 它拥有一个构建方法和多个配置结果对象的方法。 生成器方法通常支持方法链 (例如 someBuilder->setValueA(1)->setValueB(2)->create() )。

概念示例

本例说明了生成器设计模式的结构并重点回答了下面的问题:

  • 它由哪些类组成?
  • 这些类扮演了哪些角色?
  • 模式中的各个元素会以何种方式相互关联?

了解该模式的结构后, 你可以更轻松地理解下面基于真实世界的 PHP 应用案例。

index.php: 概念示例

1
2
3
4
5
6
7
8
9
10
11
12
13
14
15
16
17
18
19
20
21
22
23
24
25
26
27
28
29
30
31
32
33
34
35
36
37
38
39
40
41
42
43
44
45
46
47
48
49
50
51
52
53
54
55
56
57
58
59
60
61
62
63
64
65
66
67
68
69
70
71
72
73
74
75
76
77
78
79
80
81
82
83
84
85
86
87
88
89
90
91
92
93
94
95
96
97
98
99
100
101
102
103
104
105
106
107
108
109
110
111
112
113
114
115
116
117
118
119
120
121
122
123
124
125
126
127
128
129
130
131
132
133
134
135
136
137
138
139
140
141
142
143
144
145
146
147
148
149
150
151
152
153
154
155
156
157
158
159
160
161
162
163
164
165
166
167
168
<?php

namespace RefactoringGuru\Builder\Conceptual;

/**
* The Builder interface specifies methods for creating the different parts of
* the Product objects.
*/
interface Builder
{
public function producePartA(): void;

public function producePartB(): void;

public function producePartC(): void;
}

/**
* The Concrete Builder classes follow the Builder interface and provide
* specific implementations of the building steps. Your program may have several
* variations of Builders, implemented differently.
*/
class ConcreteBuilder1 implements Builder
{
private $product;

/**
* A fresh builder instance should contain a blank product object, which is
* used in further assembly.
*/
public function __construct()
{
$this->reset();
}

public function reset(): void
{
$this->product = new Product1();
}

/**
* All production steps work with the same product instance.
*/
public function producePartA(): void
{
$this->product->parts[] = "PartA1";
}

public function producePartB(): void
{
$this->product->parts[] = "PartB1";
}

public function producePartC(): void
{
$this->product->parts[] = "PartC1";
}

/**
* Concrete Builders are supposed to provide their own methods for
* retrieving results. That's because various types of builders may create
* entirely different products that don't follow the same interface.
* Therefore, such methods cannot be declared in the base Builder interface
* (at least in a statically typed programming language). Note that PHP is a
* dynamically typed language and this method CAN be in the base interface.
* However, we won't declare it there for the sake of clarity.
*
* Usually, after returning the end result to the client, a builder instance
* is expected to be ready to start producing another product. That's why
* it's a usual practice to call the reset method at the end of the
* `getProduct` method body. However, this behavior is not mandatory, and
* you can make your builders wait for an explicit reset call from the
* client code before disposing of the previous result.
*/
public function getProduct(): Product1
{
$result = $this->product;
$this->reset();

return $result;
}
}

/**
* It makes sense to use the Builder pattern only when your products are quite
* complex and require extensive configuration.
*
* Unlike in other creational patterns, different concrete builders can produce
* unrelated products. In other words, results of various builders may not
* always follow the same interface.
*/
class Product1
{
public $parts = [];

public function listParts(): void
{
echo "Product parts: " . implode(', ', $this->parts) . "\n\n";
}
}

/**
* The Director is only responsible for executing the building steps in a
* particular sequence. It is helpful when producing products according to a
* specific order or configuration. Strictly speaking, the Director class is
* optional, since the client can control builders directly.
*/
class Director
{
/**
* @var Builder
*/
private $builder;

/**
* The Director works with any builder instance that the client code passes
* to it. This way, the client code may alter the final type of the newly
* assembled product.
*/
public function setBuilder(Builder $builder): void
{
$this->builder = $builder;
}

/**
* The Director can construct several product variations using the same
* building steps.
*/
public function buildMinimalViableProduct(): void
{
$this->builder->producePartA();
}

public function buildFullFeaturedProduct(): void
{
$this->builder->producePartA();
$this->builder->producePartB();
$this->builder->producePartC();
}
}

/**
* The client code creates a builder object, passes it to the director and then
* initiates the construction process. The end result is retrieved from the
* builder object.
*/
function clientCode(Director $director)
{
$builder = new ConcreteBuilder1();
$director->setBuilder($builder);

echo "Standard basic product:\n";
$director->buildMinimalViableProduct();
$builder->getProduct()->listParts();

echo "Standard full featured product:\n";
$director->buildFullFeaturedProduct();
$builder->getProduct()->listParts();

// Remember, the Builder pattern can be used without a Director class.
echo "Custom product:\n";
$builder->producePartA();
$builder->producePartC();
$builder->getProduct()->listParts();
}

$director = new Director();
clientCode($director);

Output.txt: 执行结果

1
2
3
4
5
6
7
8
Standard basic product:
Product parts: PartA1

Standard full featured product:
Product parts: PartA1, PartB1, PartC1

Custom product:
Product parts: PartA1, PartC1

真实世界示例

生成器模式最好的应用方式之一是 SQL 查询生成器。 生成器接口定义了生成一般 SQL 查询所需的通用步骤。 另一方面, 对应不同 SQL 语言的具体生成器会去实现这些步骤, 返回能在特定数据库引擎中执行的 SQL 查询语句。

index.php: 真实世界示例

1
2
3
4
5
6
7
8
9
10
11
12
13
14
15
16
17
18
19
20
21
22
23
24
25
26
27
28
29
30
31
32
33
34
35
36
37
38
39
40
41
42
43
44
45
46
47
48
49
50
51
52
53
54
55
56
57
58
59
60
61
62
63
64
65
66
67
68
69
70
71
72
73
74
75
76
77
78
79
80
81
82
83
84
85
86
87
88
89
90
91
92
93
94
95
96
97
98
99
100
101
102
103
104
105
106
107
108
109
110
111
112
113
114
115
116
117
118
119
120
121
122
123
124
125
126
127
128
129
130
131
132
133
134
135
136
137
138
139
140
141
142
143
144
145
146
147
148
149
150
151
152
153
154
155
156
157
158
159
160
161
162
163
164
165
<?php

namespace RefactoringGuru\Builder\RealWorld;

/**
* The Builder interface declares a set of methods to assemble an SQL query.
*
* All of the construction steps are returning the current builder object to
* allow chaining: $builder->select(...)->where(...)
*/
interface SQLQueryBuilder
{
public function select(string $table, array $fields): SQLQueryBuilder;

public function where(string $field, string $value, string $operator = '='): SQLQueryBuilder;

public function limit(int $start, int $offset): SQLQueryBuilder;

// +100 other SQL syntax methods...

public function getSQL(): string;
}

/**
* Each Concrete Builder corresponds to a specific SQL dialect and may implement
* the builder steps a little bit differently from the others.
*
* This Concrete Builder can build SQL queries compatible with MySQL.
*/
class MysqlQueryBuilder implements SQLQueryBuilder
{
protected $query;

protected function reset(): void
{
$this->query = new \stdClass();
}

/**
* Build a base SELECT query.
*/
public function select(string $table, array $fields): SQLQueryBuilder
{
$this->reset();
$this->query->base = "SELECT " . implode(", ", $fields) . " FROM " . $table;
$this->query->type = 'select';

return $this;
}

/**
* Add a WHERE condition.
*/
public function where(string $field, string $value, string $operator = '='): SQLQueryBuilder
{
if (!in_array($this->query->type, ['select', 'update', 'delete'])) {
throw new \Exception("WHERE can only be added to SELECT, UPDATE OR DELETE");
}
$this->query->where[] = "$field $operator '$value'";

return $this;
}

/**
* Add a LIMIT constraint.
*/
public function limit(int $start, int $offset): SQLQueryBuilder
{
if (!in_array($this->query->type, ['select'])) {
throw new \Exception("LIMIT can only be added to SELECT");
}
$this->query->limit = " LIMIT " . $start . ", " . $offset;

return $this;
}

/**
* Get the final query string.
*/
public function getSQL(): string
{
$query = $this->query;
$sql = $query->base;
if (!empty($query->where)) {
$sql .= " WHERE " . implode(' AND ', $query->where);
}
if (isset($query->limit)) {
$sql .= $query->limit;
}
$sql .= ";";
return $sql;
}
}

/**
* This Concrete Builder is compatible with PostgreSQL. While Postgres is very
* similar to Mysql, it still has several differences. To reuse the common code,
* we extend it from the MySQL builder, while overriding some of the building
* steps.
*/
class PostgresQueryBuilder extends MysqlQueryBuilder
{
/**
* Among other things, PostgreSQL has slightly different LIMIT syntax.
*/
public function limit(int $start, int $offset): SQLQueryBuilder
{
parent::limit($start, $offset);

$this->query->limit = " LIMIT " . $start . " OFFSET " . $offset;

return $this;
}

// + tons of other overrides...
}


/**
* Note that the client code uses the builder object directly. A designated
* Director class is not necessary in this case, because the client code needs
* different queries almost every time, so the sequence of the construction
* steps cannot be easily reused.
*
* Since all our query builders create products of the same type (which is a
* string), we can interact with all builders using their common interface.
* Later, if we implement a new Builder class, we will be able to pass its
* instance to the existing client code without breaking it thanks to the
* SQLQueryBuilder interface.
*/
function clientCode(SQLQueryBuilder $queryBuilder)
{
// ...

$query = $queryBuilder
->select("users", ["name", "email", "password"])
->where("age", 18, ">")
->where("age", 30, "<")
->limit(10, 20)
->getSQL();

echo $query;

// ...
}


/**
* The application selects the proper query builder type depending on a current
* configuration or the environment settings.
*/
// if ($_ENV['database_type'] == 'postgres') {
// $builder = new PostgresQueryBuilder(); } else {
// $builder = new MysqlQueryBuilder(); }
//
// clientCode($builder);


echo "Testing MySQL query builder:\n";
clientCode(new MysqlQueryBuilder());

echo "\n\n";

echo "Testing PostgresSQL query builder:\n";
clientCode(new PostgresQueryBuilder());

Output.txt: 执行结果

1
2
3
4
5
Testing MySQL query builder:
SELECT name, email, password FROM users WHERE age > '18' AND age < '30' LIMIT 10, 20;

Testing PostgresSQL query builder:
SELECT name, email, password FROM users WHERE age > '18' AND age < '30' LIMIT 10 OFFSET 20;

在 Python 中使用模式

复杂度: ★★☆

流行度: ★★★

使用示例: 生成器模式是 Python 世界中的一个著名模式。 当你需要创建一个可能有许多配置选项的对象时, 该模式会特别有用。

识别方法: 生成器模式可以通过类来识别, 它拥有一个构建方法和多个配置结果对象的方法。 生成器方法通常支持方法链 (例如 someBuilder.setValueA(1).setValueB(2).create() )。

概念示例

本例说明了生成器设计模式的结构并重点回答了下面的问题:

  • 它由哪些类组成?
  • 这些类扮演了哪些角色?
  • 模式中的各个元素会以何种方式相互关联?

main.py: 概念示例

1
2
3
4
5
6
7
8
9
10
11
12
13
14
15
16
17
18
19
20
21
22
23
24
25
26
27
28
29
30
31
32
33
34
35
36
37
38
39
40
41
42
43
44
45
46
47
48
49
50
51
52
53
54
55
56
57
58
59
60
61
62
63
64
65
66
67
68
69
70
71
72
73
74
75
76
77
78
79
80
81
82
83
84
85
86
87
88
89
90
91
92
93
94
95
96
97
98
99
100
101
102
103
104
105
106
107
108
109
110
111
112
113
114
115
116
117
118
119
120
121
122
123
124
125
126
127
128
129
130
131
132
133
134
135
136
137
138
139
140
141
142
143
144
145
146
147
148
149
150
151
152
153
154
155
156
157
158
159
160
161
from __future__ import annotations
from abc import ABC, abstractmethod, abstractproperty
from typing import Any


class Builder(ABC):
"""
The Builder interface specifies methods for creating the different parts of
the Product objects.
"""

@abstractproperty
def product(self) -> None:
pass

@abstractmethod
def produce_part_a(self) -> None:
pass

@abstractmethod
def produce_part_b(self) -> None:
pass

@abstractmethod
def produce_part_c(self) -> None:
pass


class ConcreteBuilder1(Builder):
"""
The Concrete Builder classes follow the Builder interface and provide
specific implementations of the building steps. Your program may have
several variations of Builders, implemented differently.
"""

def __init__(self) -> None:
"""
A fresh builder instance should contain a blank product object, which is
used in further assembly.
"""
self.reset()

def reset(self) -> None:
self._product = Product1()

@property
def product(self) -> Product1:
"""
Concrete Builders are supposed to provide their own methods for
retrieving results. That's because various types of builders may create
entirely different products that don't follow the same interface.
Therefore, such methods cannot be declared in the base Builder interface
(at least in a statically typed programming language).

Usually, after returning the end result to the client, a builder
instance is expected to be ready to start producing another product.
That's why it's a usual practice to call the reset method at the end of
the `getProduct` method body. However, this behavior is not mandatory,
and you can make your builders wait for an explicit reset call from the
client code before disposing of the previous result.
"""
product = self._product
self.reset()
return product

def produce_part_a(self) -> None:
self._product.add("PartA1")

def produce_part_b(self) -> None:
self._product.add("PartB1")

def produce_part_c(self) -> None:
self._product.add("PartC1")


class Product1():
"""
It makes sense to use the Builder pattern only when your products are quite
complex and require extensive configuration.

Unlike in other creational patterns, different concrete builders can produce
unrelated products. In other words, results of various builders may not
always follow the same interface.
"""

def __init__(self) -> None:
self.parts = []

def add(self, part: Any) -> None:
self.parts.append(part)

def list_parts(self) -> None:
print(f"Product parts: {', '.join(self.parts)}", end="")


class Director:
"""
The Director is only responsible for executing the building steps in a
particular sequence. It is helpful when producing products according to a
specific order or configuration. Strictly speaking, the Director class is
optional, since the client can control builders directly.
"""

def __init__(self) -> None:
self._builder = None

@property
def builder(self) -> Builder:
return self._builder

@builder.setter
def builder(self, builder: Builder) -> None:
"""
The Director works with any builder instance that the client code passes
to it. This way, the client code may alter the final type of the newly
assembled product.
"""
self._builder = builder

"""
The Director can construct several product variations using the same
building steps.
"""

def build_minimal_viable_product(self) -> None:
self.builder.produce_part_a()

def build_full_featured_product(self) -> None:
self.builder.produce_part_a()
self.builder.produce_part_b()
self.builder.produce_part_c()


if __name__ == "__main__":
"""
The client code creates a builder object, passes it to the director and then
initiates the construction process. The end result is retrieved from the
builder object.
"""

director = Director()
builder = ConcreteBuilder1()
director.builder = builder

print("Standard basic product: ")
director.build_minimal_viable_product()
builder.product.list_parts()

print("\n")

print("Standard full featured product: ")
director.build_full_featured_product()
builder.product.list_parts()

print("\n")

# Remember, the Builder pattern can be used without a Director class.
print("Custom product: ")
builder.produce_part_a()
builder.produce_part_b()
builder.product.list_parts()

Output.txt: 执行结果

1
2
3
4
5
6
7
8
Standard basic product: 
Product parts: PartA1

Standard full featured product:
Product parts: PartA1, PartB1, PartC1

Custom product:
Product parts: PartA1, PartB1

在 Ruby 中使用模式

复杂度: ★★☆

流行度: ★★★

使用示例: 生成器模式是 Ruby 世界中的一个著名模式。 当你需要创建一个可能有许多配置选项的对象时, 该模式会特别有用。

识别方法: 生成器模式可以通过类来识别, 它拥有一个构建方法和多个配置结果对象的方法。 生成器方法通常支持方法链 (例如 someBuilder.setValueA(1).setValueB(2).create() )。

概念示例

本例说明了生成器设计模式的结构并重点回答了下面的问题:

  • 它由哪些类组成?
  • 这些类扮演了哪些角色?
  • 模式中的各个元素会以何种方式相互关联?

main.rb: 概念示例

1
2
3
4
5
6
7
8
9
10
11
12
13
14
15
16
17
18
19
20
21
22
23
24
25
26
27
28
29
30
31
32
33
34
35
36
37
38
39
40
41
42
43
44
45
46
47
48
49
50
51
52
53
54
55
56
57
58
59
60
61
62
63
64
65
66
67
68
69
70
71
72
73
74
75
76
77
78
79
80
81
82
83
84
85
86
87
88
89
90
91
92
93
94
95
96
97
98
99
100
101
102
103
104
105
106
107
108
109
110
111
112
113
114
115
116
117
118
119
120
121
122
123
124
125
126
127
128
129
130
131
132
133
134
135
136
137
138
139
140
141
142
143
# The Builder interface specifies methods for creating the different parts of
# the Product objects.
class Builder
# @abstract
def produce_part_a
raise NotImplementedError, "#{self.class} has not implemented method '#{__method__}'"
end

# @abstract
def produce_part_b
raise NotImplementedError, "#{self.class} has not implemented method '#{__method__}'"
end

# @abstract
def produce_part_c
raise NotImplementedError, "#{self.class} has not implemented method '#{__method__}'"
end
end

# The Concrete Builder classes follow the Builder interface and provide specific
# implementations of the building steps. Your program may have several
# variations of Builders, implemented differently.
class ConcreteBuilder1 < Builder
# A fresh builder instance should contain a blank product object, which is
# used in further assembly.
def initialize
reset
end

def reset
@product = Product1.new
end

# Concrete Builders are supposed to provide their own methods for retrieving
# results. That's because various types of builders may create entirely
# different products that don't follow the same interface. Therefore, such
# methods cannot be declared in the base Builder interface (at least in a
# statically typed programming language).
#
# Usually, after returning the end result to the client, a builder instance is
# expected to be ready to start producing another product. That's why it's a
# usual practice to call the reset method at the end of the `getProduct`
# method body. However, this behavior is not mandatory, and you can make your
# builders wait for an explicit reset call from the client code before
# disposing of the previous result.
def product
product = @product
reset
product
end

def produce_part_a
@product.add('PartA1')
end

def produce_part_b
@product.add('PartB1')
end

def produce_part_c
@product.add('PartC1')
end
end

# It makes sense to use the Builder pattern only when your products are quite
# complex and require extensive configuration.
#
# Unlike in other creational patterns, different concrete builders can produce
# unrelated products. In other words, results of various builders may not always
# follow the same interface.
class Product1
def initialize
@parts = []
end

# @param [String] part
def add(part)
@parts << part
end

def list_parts
print "Product parts: #{@parts.join(', ')}"
end
end

# The Director is only responsible for executing the building steps in a
# particular sequence. It is helpful when producing products according to a
# specific order or configuration. Strictly speaking, the Director class is
# optional, since the client can control builders directly.
class Director
# @return [Builder]
attr_accessor :builder

def initialize
@builder = nil
end

# The Director works with any builder instance that the client code passes to
# it. This way, the client code may alter the final type of the newly
# assembled product.
def builder=(builder)
@builder = builder
end

# The Director can construct several product variations using the same
# building steps.

def build_minimal_viable_product
@builder.produce_part_a
end

def build_full_featured_product
@builder.produce_part_a
@builder.produce_part_b
@builder.produce_part_c
end
end

# The client code creates a builder object, passes it to the director and then
# initiates the construction process. The end result is retrieved from the
# builder object.

director = Director.new
builder = ConcreteBuilder1.new
director.builder = builder

puts 'Standard basic product: '
director.build_minimal_viable_product
builder.product.list_parts

puts "\n\n"

puts 'Standard full featured product: '
director.build_full_featured_product
builder.product.list_parts

puts "\n\n"

# Remember, the Builder pattern can be used without a Director class.
puts 'Custom product: '
builder.produce_part_a
builder.produce_part_b
builder.product.list_parts

output.txt: 执行结果

1
2
3
4
5
6
7
8
Standard basic product: 
Product parts: PartA1

Standard full featured product:
Product parts: PartA1, PartB1, PartC1

Custom product:
Product parts: PartA1, PartB1

在 Swift 中使用模式

复杂度: ★★☆

流行度: ★★★

使用示例: 生成器模式是 Swift 世界中的一个著名模式。 当你需要创建一个可能有许多配置选项的对象时, 该模式会特别有用。

识别方法: 生成器模式可以通过类来识别, 它拥有一个构建方法和多个配置结果对象的方法。 生成器方法通常支持方法链 (例如 someBuilder.setValueA(1).setValueB(2).create() )。

概念示例

本例说明了生成器设计模式的结构并重点回答了下面的问题:

  • 它由哪些类组成?
  • 这些类扮演了哪些角色?
  • 模式中的各个元素会以何种方式相互关联?

了解该模式的结构后, 你可以更轻松地理解下面基于真实世界的 Swift 应用案例。

Example.swift: 概念示例

1
2
3
4
5
6
7
8
9
10
11
12
13
14
15
16
17
18
19
20
21
22
23
24
25
26
27
28
29
30
31
32
33
34
35
36
37
38
39
40
41
42
43
44
45
46
47
48
49
50
51
52
53
54
55
56
57
58
59
60
61
62
63
64
65
66
67
68
69
70
71
72
73
74
75
76
77
78
79
80
81
82
83
84
85
86
87
88
89
90
91
92
93
94
95
96
97
98
99
100
101
102
103
104
105
106
107
108
109
110
111
112
113
114
115
116
117
118
119
120
121
122
123
124
125
126
127
128
129
130
131
132
133
134
135
136
137
import XCTest

/// The Builder interface specifies methods for creating the different parts of
/// the Product objects.
protocol Builder {

func producePartA()
func producePartB()
func producePartC()
}

/// The Concrete Builder classes follow the Builder interface and provide
/// specific implementations of the building steps. Your program may have
/// several variations of Builders, implemented differently.
class ConcreteBuilder1: Builder {

/// A fresh builder instance should contain a blank product object, which is
/// used in further assembly.
private var product = Product1()

func reset() {
product = Product1()
}

/// All production steps work with the same product instance.
func producePartA() {
product.add(part: "PartA1")
}

func producePartB() {
product.add(part: "PartB1")
}

func producePartC() {
product.add(part: "PartC1")
}

/// Concrete Builders are supposed to provide their own methods for
/// retrieving results. That's because various types of builders may create
/// entirely different products that don't follow the same interface.
/// Therefore, such methods cannot be declared in the base Builder interface
/// (at least in a statically typed programming language).
///
/// Usually, after returning the end result to the client, a builder
/// instance is expected to be ready to start producing another product.
/// That's why it's a usual practice to call the reset method at the end of
/// the `getProduct` method body. However, this behavior is not mandatory,
/// and you can make your builders wait for an explicit reset call from the
/// client code before disposing of the previous result.
func retrieveProduct() -> Product1 {
let result = self.product
reset()
return result
}
}

/// The Director is only responsible for executing the building steps in a
/// particular sequence. It is helpful when producing products according to a
/// specific order or configuration. Strictly speaking, the Director class is
/// optional, since the client can control builders directly.
class Director {

private var builder: Builder?

/// The Director works with any builder instance that the client code passes
/// to it. This way, the client code may alter the final type of the newly
/// assembled product.
func update(builder: Builder) {
self.builder = builder
}

/// The Director can construct several product variations using the same
/// building steps.
func buildMinimalViableProduct() {
builder?.producePartA()
}

func buildFullFeaturedProduct() {
builder?.producePartA()
builder?.producePartB()
builder?.producePartC()
}
}

/// It makes sense to use the Builder pattern only when your products are quite
/// complex and require extensive configuration.
///
/// Unlike in other creational patterns, different concrete builders can produce
/// unrelated products. In other words, results of various builders may not
/// always follow the same interface.
class Product1 {

private var parts = [String]()

func add(part: String) {
self.parts.append(part)
}

func listParts() -> String {
return "Product parts: " + parts.joined(separator: ", ") + "\n"
}
}

/// The client code creates a builder object, passes it to the director and then
/// initiates the construction process. The end result is retrieved from the
/// builder object.
class Client {
// ...
static func someClientCode(director: Director) {
let builder = ConcreteBuilder1()
director.update(builder: builder)

print("Standard basic product:")
director.buildMinimalViableProduct()
print(builder.retrieveProduct().listParts())

print("Standard full featured product:")
director.buildFullFeaturedProduct()
print(builder.retrieveProduct().listParts())

// Remember, the Builder pattern can be used without a Director class.
print("Custom product:")
builder.producePartA()
builder.producePartC()
print(builder.retrieveProduct().listParts())
}
// ...
}

/// Let's see how it all comes together.
class BuilderConceptual: XCTestCase {

func testBuilderConceptual() {
let director = Director()
Client.someClientCode(director: director)
}
}

Output.txt: 执行结果

1
2
3
4
5
6
7
8
Standard basic product:
Product parts: PartA1

Standard full featured product:
Product parts: PartA1, PartB1, PartC1

Custom product:
Product parts: PartA1, PartC1

真实世界示例

Example.swift: 真实世界示例

1
2
3
4
5
6
7
8
9
10
11
12
13
14
15
16
17
18
19
20
21
22
23
24
25
26
27
28
29
30
31
32
33
34
35
36
37
38
39
40
41
42
43
44
45
46
47
48
49
50
51
52
53
54
55
56
57
58
59
60
61
62
63
64
65
66
67
68
69
70
71
72
73
74
75
76
77
78
79
80
81
82
83
84
85
86
87
88
89
90
91
92
93
94
95
96
97
98
99
100
101
102
103
104
105
106
107
108
109
110
111
112
113
114
115
116
117
118
119
120
121
122
123
124
125
126
127
128
129
130
131
132
133
134
135
136
137
138
139
140
141
142
143
144
145
146
147
148
149
150
151
152
153
154
155
156
157
158
159
160
161
162
163
164
165
166
167
168
169
170
171
172
import Foundation
import XCTest


class BaseQueryBuilder<Model: DomainModel> {

typealias Predicate = (Model) -> (Bool)

func limit(_ limit: Int) -> BaseQueryBuilder<Model> {
return self
}

func filter(_ predicate: @escaping Predicate) -> BaseQueryBuilder<Model> {
return self
}

func fetch() -> [Model] {
preconditionFailure("Should be overridden in subclasses.")
}
}

class RealmQueryBuilder<Model: DomainModel>: BaseQueryBuilder<Model> {

enum Query {
case filter(Predicate)
case limit(Int)
/// ...
}

fileprivate var operations = [Query]()

@discardableResult
override func limit(_ limit: Int) -> RealmQueryBuilder<Model> {
operations.append(Query.limit(limit))
return self
}

@discardableResult
override func filter(_ predicate: @escaping Predicate) -> RealmQueryBuilder<Model> {
operations.append(Query.filter(predicate))
return self
}

override func fetch() -> [Model] {
print("RealmQueryBuilder: Initializing CoreDataProvider with \(operations.count) operations:")
return RealmProvider().fetch(operations)
}
}

class CoreDataQueryBuilder<Model: DomainModel>: BaseQueryBuilder<Model> {

enum Query {
case filter(Predicate)
case limit(Int)
case includesPropertyValues(Bool)
/// ...
}

fileprivate var operations = [Query]()

override func limit(_ limit: Int) -> CoreDataQueryBuilder<Model> {
operations.append(Query.limit(limit))
return self
}

override func filter(_ predicate: @escaping Predicate) -> CoreDataQueryBuilder<Model> {
operations.append(Query.filter(predicate))
return self
}

func includesPropertyValues(_ toggle: Bool) -> CoreDataQueryBuilder<Model> {
operations.append(Query.includesPropertyValues(toggle))
return self
}

override func fetch() -> [Model] {
print("CoreDataQueryBuilder: Initializing CoreDataProvider with \(operations.count) operations.")
return CoreDataProvider().fetch(operations)
}
}


/// Data Providers contain a logic how to fetch models. Builders accumulate
/// operations and then update providers to fetch the data.

class RealmProvider {

func fetch<Model: DomainModel>(_ operations: [RealmQueryBuilder<Model>.Query]) -> [Model] {

print("RealmProvider: Retrieving data from Realm...")

for item in operations {
switch item {
case .filter(_):
print("RealmProvider: executing the 'filter' operation.")
/// Use Realm instance to filter results.
break
case .limit(_):
print("RealmProvider: executing the 'limit' operation.")
/// Use Realm instance to limit results.
break
}
}

/// Return results from Realm
return []
}
}

class CoreDataProvider {

func fetch<Model: DomainModel>(_ operations: [CoreDataQueryBuilder<Model>.Query]) -> [Model] {

/// Create a NSFetchRequest

print("CoreDataProvider: Retrieving data from CoreData...")

for item in operations {
switch item {
case .filter(_):
print("CoreDataProvider: executing the 'filter' operation.")
/// Set a 'predicate' for a NSFetchRequest.
break
case .limit(_):
print("CoreDataProvider: executing the 'limit' operation.")
/// Set a 'fetchLimit' for a NSFetchRequest.
break
case .includesPropertyValues(_):
print("CoreDataProvider: executing the 'includesPropertyValues' operation.")
/// Set an 'includesPropertyValues' for a NSFetchRequest.
break
}
}

/// Execute a NSFetchRequest and return results.
return []
}
}


protocol DomainModel {
/// The protocol groups domain models to the common interface
}

private struct User: DomainModel {
let id: Int
let age: Int
let email: String
}


class BuilderRealWorld: XCTestCase {

func testBuilderRealWorld() {
print("Client: Start fetching data from Realm")
clientCode(builder: RealmQueryBuilder<User>())

print()

print("Client: Start fetching data from CoreData")
clientCode(builder: CoreDataQueryBuilder<User>())
}

fileprivate func clientCode(builder: BaseQueryBuilder<User>) {

let results = builder.filter({ $0.age < 20 })
.limit(1)
.fetch()

print("Client: I have fetched: " + String(results.count) + " records.")
}
}

Output.txt: 执行结果

1
2
3
4
5
6
7
8
9
10
11
12
13
Client: Start fetching data from Realm
RealmQueryBuilder: Initializing CoreDataProvider with 2 operations:
RealmProvider: Retrieving data from Realm...
RealmProvider: executing the 'filter' operation.
RealmProvider: executing the 'limit' operation.
Client: I have fetched: 0 records.

Client: Start fetching data from CoreData
CoreDataQueryBuilder: Initializing CoreDataProvider with 2 operations.
CoreDataProvider: Retrieving data from CoreData...
CoreDataProvider: executing the 'filter' operation.
CoreDataProvider: executing the 'limit' operation.
Client: I have fetched: 0 records.

在 TypeScript 中使用模式

复杂度: ★★☆

流行度: ★★★

使用示例: 生成器模式是 TypeScript 世界中的一个著名模式。 当你需要创建一个可能有许多配置选项的对象时, 该模式会特别有用。

识别方法: 生成器模式可以通过类来识别, 它拥有一个构建方法和多个配置结果对象的方法。 生成器方法通常支持方法链 (例如 someBuilder.setValueA(1).setValueB(2).create() )。

概念示例

本例说明了生成器设计模式的结构并重点回答了下面的问题:

  • 它由哪些类组成?
  • 这些类扮演了哪些角色?
  • 模式中的各个元素会以何种方式相互关联?

index.ts: 概念示例

1
2
3
4
5
6
7
8
9
10
11
12
13
14
15
16
17
18
19
20
21
22
23
24
25
26
27
28
29
30
31
32
33
34
35
36
37
38
39
40
41
42
43
44
45
46
47
48
49
50
51
52
53
54
55
56
57
58
59
60
61
62
63
64
65
66
67
68
69
70
71
72
73
74
75
76
77
78
79
80
81
82
83
84
85
86
87
88
89
90
91
92
93
94
95
96
97
98
99
100
101
102
103
104
105
106
107
108
109
110
111
112
113
114
115
116
117
118
119
120
121
122
123
124
125
126
127
128
129
130
131
132
133
134
135
136
137
138
139
140
141
/**
* The Builder interface specifies methods for creating the different parts of
* the Product objects.
*/
interface Builder {
producePartA(): void;
producePartB(): void;
producePartC(): void;
}

/**
* The Concrete Builder classes follow the Builder interface and provide
* specific implementations of the building steps. Your program may have several
* variations of Builders, implemented differently.
*/
class ConcreteBuilder1 implements Builder {
private product: Product1;

/**
* A fresh builder instance should contain a blank product object, which is
* used in further assembly.
*/
constructor() {
this.reset();
}

public reset(): void {
this.product = new Product1();
}

/**
* All production steps work with the same product instance.
*/
public producePartA(): void {
this.product.parts.push('PartA1');
}

public producePartB(): void {
this.product.parts.push('PartB1');
}

public producePartC(): void {
this.product.parts.push('PartC1');
}

/**
* Concrete Builders are supposed to provide their own methods for
* retrieving results. That's because various types of builders may create
* entirely different products that don't follow the same interface.
* Therefore, such methods cannot be declared in the base Builder interface
* (at least in a statically typed programming language).
*
* Usually, after returning the end result to the client, a builder instance
* is expected to be ready to start producing another product. That's why
* it's a usual practice to call the reset method at the end of the
* `getProduct` method body. However, this behavior is not mandatory, and
* you can make your builders wait for an explicit reset call from the
* client code before disposing of the previous result.
*/
public getProduct(): Product1 {
const result = this.product;
this.reset();
return result;
}
}

/**
* It makes sense to use the Builder pattern only when your products are quite
* complex and require extensive configuration.
*
* Unlike in other creational patterns, different concrete builders can produce
* unrelated products. In other words, results of various builders may not
* always follow the same interface.
*/
class Product1 {
public parts: string[] = [];

public listParts(): void {
console.log(`Product parts: ${this.parts.join(', ')}\n`);
}
}

/**
* The Director is only responsible for executing the building steps in a
* particular sequence. It is helpful when producing products according to a
* specific order or configuration. Strictly speaking, the Director class is
* optional, since the client can control builders directly.
*/
class Director {
private builder: Builder;

/**
* The Director works with any builder instance that the client code passes
* to it. This way, the client code may alter the final type of the newly
* assembled product.
*/
public setBuilder(builder: Builder): void {
this.builder = builder;
}

/**
* The Director can construct several product variations using the same
* building steps.
*/
public buildMinimalViableProduct(): void {
this.builder.producePartA();
}

public buildFullFeaturedProduct(): void {
this.builder.producePartA();
this.builder.producePartB();
this.builder.producePartC();
}
}

/**
* The client code creates a builder object, passes it to the director and then
* initiates the construction process. The end result is retrieved from the
* builder object.
*/
function clientCode(director: Director) {
const builder = new ConcreteBuilder1();
director.setBuilder(builder);

console.log('Standard basic product:');
director.buildMinimalViableProduct();
builder.getProduct().listParts();

console.log('Standard full featured product:');
director.buildFullFeaturedProduct();
builder.getProduct().listParts();

// Remember, the Builder pattern can be used without a Director class.
console.log('Custom product:');
builder.producePartA();
builder.producePartC();
builder.getProduct().listParts();
}

const director = new Director();
clientCode(director);

Output.txt: 执行结果

1
2
3
4
5
6
7
8
Standard basic product:
Product parts: PartA1

Standard full featured product:
Product parts: PartA1, PartB1, PartC1

Custom product:
Product parts: PartA1, PartC1

概念示例

当所需产品较为复杂且需要多个步骤才能完成时, 也可以使用生成器模式。 在这种情况下, 使用多个构造方法比仅仅使用一个复杂可怕的构造函数更简单。 分为多个步骤进行构建的潜在问题是, 构建不完整的和不稳定的产品可能会被暴露给客户端。 生成器模式能够在产品完成构建之前使其处于私密状态。

在下方的代码中, 我们可以看到 igloo­Builder冰屋生成器与 normal­Builder普通房屋生成器可建造不同类型房屋, 即 igloo冰屋和 normal­House普通房屋 。 每种房屋类型的建造步骤都是相同的。 主管 (可选) 结构体可对建造过程进行组织。

iBuilder.go: 生成器接口

1
2
3
4
5
6
7
8
9
10
11
12
13
14
15
16
17
18
19
package main

type iBuilder interface {
setWindowType()
setDoorType()
setNumFloor()
getHouse() house
}

func getBuilder(builderType string) iBuilder {
if builderType == "normal" {
return &normalBuilder{}
}

if builderType == "igloo" {
return &iglooBuilder{}
}
return nil
}

normalBuilder.go: 具体生成器

1
2
3
4
5
6
7
8
9
10
11
12
13
14
15
16
17
18
19
20
21
22
23
24
25
26
27
28
29
30
31
package main

type normalBuilder struct {
windowType string
doorType string
floor int
}

func newNormalBuilder() *normalBuilder {
return &normalBuilder{}
}

func (b *normalBuilder) setWindowType() {
b.windowType = "Wooden Window"
}

func (b *normalBuilder) setDoorType() {
b.doorType = "Wooden Door"
}

func (b *normalBuilder) setNumFloor() {
b.floor = 2
}

func (b *normalBuilder) getHouse() house {
return house{
doorType: b.doorType,
windowType: b.windowType,
floor: b.floor,
}
}

iglooBuilder.go: 具体生成器

1
2
3
4
5
6
7
8
9
10
11
12
13
14
15
16
17
18
19
20
21
22
23
24
25
26
27
28
29
30
31
package main

type iglooBuilder struct {
windowType string
doorType string
floor int
}

func newIglooBuilder() *iglooBuilder {
return &iglooBuilder{}
}

func (b *iglooBuilder) setWindowType() {
b.windowType = "Snow Window"
}

func (b *iglooBuilder) setDoorType() {
b.doorType = "Snow Door"
}

func (b *iglooBuilder) setNumFloor() {
b.floor = 1
}

func (b *iglooBuilder) getHouse() house {
return house{
doorType: b.doorType,
windowType: b.windowType,
floor: b.floor,
}
}

house.go: 产品

1
2
3
4
5
6
7
package main

type house struct {
windowType string
doorType string
floor int
}

director.go: 主管

1
2
3
4
5
6
7
8
9
10
11
12
13
14
15
16
17
18
19
20
21
22
package main

type director struct {
builder iBuilder
}

func newDirector(b iBuilder) *director {
return &director{
builder: b,
}
}

func (d *director) setBuilder(b iBuilder) {
d.builder = b
}

func (d *director) buildHouse() house {
d.builder.setDoorType()
d.builder.setWindowType()
d.builder.setNumFloor()
return d.builder.getHouse()
}

main.go: 客户端代码

1
2
3
4
5
6
7
8
9
10
11
12
13
14
15
16
17
18
19
20
21
22
23
package main

import "fmt"

func main() {
normalBuilder := getBuilder("normal")
iglooBuilder := getBuilder("igloo")

director := newDirector(normalBuilder)
normalHouse := director.buildHouse()

fmt.Printf("Normal House Door Type: %s\n", normalHouse.doorType)
fmt.Printf("Normal House Window Type: %s\n", normalHouse.windowType)
fmt.Printf("Normal House Num Floor: %d\n", normalHouse.floor)

director.setBuilder(iglooBuilder)
iglooHouse := director.buildHouse()

fmt.Printf("\nIgloo House Door Type: %s\n", iglooHouse.doorType)
fmt.Printf("Igloo House Window Type: %s\n", iglooHouse.windowType)
fmt.Printf("Igloo House Num Floor: %d\n", iglooHouse.floor)

}

output.txt: 执行结果

1
2
3
4
5
6
7
Normal House Door Type: Wooden Door
Normal House Window Type: Wooden Window
Normal House Num Floor: 2

Igloo House Door Type: Snow Door
Igloo House Window Type: Snow Window
Igloo House Num Floor: 1

根据: Golang By Example