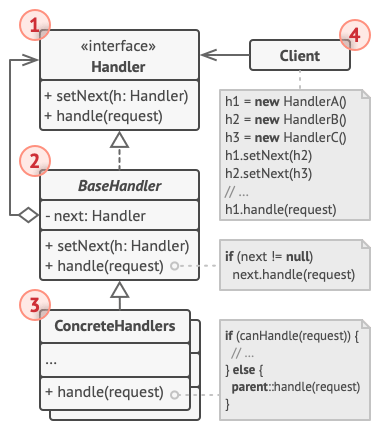
https://refactoringguru.cn/design-patterns/chain-of-responsibility

行为模式-责任链模式

亦称: 职责链模式、命令链、CoR、Chain of Command、Chain of Responsibility

意图

责任链模式是一种行为设计模式, 允许你将请求沿着处理者链进行发送。 收到请求后, 每个处理者均可对请求进行处理, 或将其传递给链上的下个处理者。

问题

假如你正在开发一个在线订购系统。 你希望对系统访问进行限制, 只允许认证用户创建订单。 此外, 拥有管理权限的用户也拥有所有订单的完全访问权限。

简单规划后, 你会意识到这些检查必须依次进行。 只要接收到包含用户凭据的请求, 应用程序就可尝试对进入系统的用户进行认证。 但如果由于用户凭据不正确而导致认证失败, 那就没有必要进行后续检查了。

请求必须经过一系列检查后才能由订购系统来处理。

在接下来的几个月里, 你实现了后续的几个检查步骤。

  • 一位同事认为直接将原始数据传递给订购系统存在安全隐患。 因此你新增了额外的验证步骤来清理请求中的数据。
  • 过了一段时间, 有人注意到系统无法抵御暴力密码破解方式的攻击。 为了防范这种情况, 你立刻添加了一个检查步骤来过滤来自同一 IP 地址的重复错误请求。
  • 又有人提议你可以对包含同样数据的重复请求返回缓存中的结果, 从而提高系统响应速度。 因此, 你新增了一个检查步骤, 确保只有没有满足条件的缓存结果时请求才能通过并被发送给系统。

代码变得越来越多, 也越来越混乱。

检查代码本来就已经混乱不堪, 而每次新增功能都会使其更加臃肿。 修改某个检查步骤有时会影响其他的检查步骤。 最糟糕的是, 当你希望复用这些检查步骤来保护其他系统组件时, 你只能复制部分代码, 因为这些组件只需部分而非全部的检查步骤。

系统会变得让人非常费解, 而且其维护成本也会激增。 你在艰难地和这些代码共处一段时间后, 有一天终于决定对整个系统进行重构。

解决方案

与许多其他行为设计模式一样, 责任链会将特定行为转换为被称作处理者的独立对象。 在上述示例中, 每个检查步骤都可被抽取为仅有单个方法的类, 并执行检查操作。 请求及其数据则会被作为参数传递给该方法。

模式建议你将这些处理者连成一条链。 链上的每个处理者都有一个成员变量来保存对于下一处理者的引用。 除了处理请求外, 处理者还负责沿着链传递请求。 请求会在链上移动, 直至所有处理者都有机会对其进行处理。

最重要的是: 处理者可以决定不再沿着链传递请求, 这可高效地取消所有后续处理步骤。

在我们的订购系统示例中, 处理者会在进行请求处理工作后决定是否继续沿着链传递请求。 如果请求中包含正确的数据, 所有处理者都将执行自己的主要行为, 无论该行为是身份验证还是数据缓存。

处理者依次排列, 组成一条链。

不过还有一种稍微不同的方式 (也是更经典一种), 那就是处理者接收到请求后自行决定是否能够对其进行处理。 如果自己能够处理, 处理者就不再继续传递请求。 因此在这种情况下, 每个请求要么最多有一个处理者对其进行处理, 要么没有任何处理者对其进行处理。 在处理图形用户界面元素栈中的事件时, 这种方式非常常见。

例如, 当用户点击按钮时, 按钮产生的事件将沿着 GUI 元素链进行传递, 最开始是按钮的容器 (如窗体或面板), 直至应用程序主窗口。 链上第一个能处理该事件的元素会对其进行处理。 此外, 该例还有另一个值得我们关注的地方: 它表明我们总能从对象树中抽取出链来。

对象树的枝干可以组成一条链。

所有处理者类均实现同一接口是关键所在。 每个具体处理者仅关心下一个包含 execute执行方法的处理者。 这样一来, 你就可以在运行时使用不同的处理者来创建链, 而无需将相关代码与处理者的具体类进行耦合。

真实世界类比

给技术支持打电话时你可能得应对多名接听人员。

最近, 你刚为自己的电脑购买并安装了一个新的硬件设备。 身为一名极客, 你显然在电脑上安装了多个操作系统, 所以你会试着启动所有操作系统来确认其是否支持新的硬件设备。 Windows 检测到了该硬件设备并对其进行了自动启用。 但是你喜爱的 Linux 系统并不支持新硬件设备。 抱着最后一点希望, 你决定拨打包装盒上的技术支持电话。

首先你会听到自动回复器的机器合成语音, 它提供了针对各种问题的九个常用解决方案, 但其中没有一个与你遇到的问题相关。 过了一会儿, 机器人将你转接到人工接听人员处。

这位接听人员同样无法提供任何具体的解决方案。 他不断地引用手册中冗长的内容, 并不会仔细聆听你的回应。 在第 10 次听到 “你是否关闭计算机后重新启动呢?” 这句话后, 你要求与一位真正的工程师通话。

最后, 接听人员将你的电话转接给了工程师, 他或许正缩在某幢办公大楼的阴暗地下室中, 坐在他所深爱的服务器机房里, 焦躁不安地期待着同一名真人交流。 工程师告诉了你新硬件设备驱动程序的下载网址, 以及如何在 Linux 系统上进行安装。 问题终于解决了! 你挂断了电话, 满心欢喜。

责任链模式结构

  1. 处理者 (Handler) 声明了所有具体处理者的通用接口。 该接口通常仅包含单个方法用于请求处理, 但有时其还会包含一个设置链上下个处理者的方法。

  2. 基础处理者 (Base Handler) 是一个可选的类, 你可以将所有处理者共用的样本代码放置在其中。

    通常情况下, 该类中定义了一个保存对于下个处理者引用的成员变量。 客户端可通过将处理者传递给上个处理者的构造函数或设定方法来创建链。 该类还可以实现默认的处理行为: 确定下个处理者存在后再将请求传递给它。

  3. 具体处理者 (Concrete Handlers) 包含处理请求的实际代码。 每个处理者接收到请求后, 都必须决定是否进行处理, 以及是否沿着链传递请求。

    处理者通常是独立且不可变的, 需要通过构造函数一次性地获得所有必要地数据。

  4. 客户端 (Client) 可根据程序逻辑一次性或者动态地生成链。 值得注意的是, 请求可发送给链上的任意一个处理者, 而非必须是第一个处理者。

伪代码

在本例中, 责任链模式负责为活动的 GUI 元素显示上下文帮助信息。

GUI 类使用组合模式生成。 每个元素都链接到自己的容器元素。 你可随时构建从当前元素开始的、 遍历其所有容器的元素链。

应用程序的 GUI 通常为对象树结构。 例如, 负责渲染程序主窗口的 对话框类就是对象树的根节点。 对话框包含 面板 , 而面板可能包含其他面板, 或是 按钮文本框等下层元素。

只要给一个简单的组件指定帮助文本, 它就可显示简短的上下文提示。 但更复杂的组件可自定义上下文帮助文本的显示方式, 例如显示手册摘录内容或在浏览器中打开一个网页。

帮助请求如何在 GUI 对象中移动。

当用户将鼠标指针移动到某个元素并按下 F1键时, 程序检测到指针下的组件并对其发送帮助请求。 该请求不断向上传递到该元素所有的容器, 直至某个元素能够显示帮助信息。

1
2
3
4
5
6
7
8
9
10
11
12
13
14
15
16
17
18
19
20
21
22
23
24
25
26
27
28
29
30
31
32
33
34
35
36
37
38
39
40
41
42
43
44
45
46
47
48
49
50
51
52
53
54
55
56
57
58
59
60
61
62
63
64
65
66
67
68
69
70
71
72
73
74
75
76
77
// 处理者接口声明了一个创建处理者链的方法。还声明了一个执行请求的方法。
interface ComponentWithContextualHelp is
method showHelp()


// 简单组件的基础类。
abstract class Component implements ComponentWithContextualHelp is
field tooltipText: string

// 组件容器在处理者链中作为“下一个”链接。
protected field container: Container

// 如果组件设定了帮助文字,那它将会显示提示信息。如果组件没有帮助文字
// 且其容器存在,那它会将调用传递给容器。
method showHelp() is
if (tooltipText != null)
// 显示提示信息。
else
container.showHelp()


// 容器可以将简单组件和其他容器作为其子项目。链关系将在这里建立。该类将从
// 其父类处继承 showHelp(显示帮助)的行为。
abstract class Container extends Component is
protected field children: array of Component

method add(child) is
children.add(child)
child.container = this


// 原始组件应该能够使用帮助操作的默认实现...
class Button extends Component is
// ...

// 但复杂组件可能会对默认实现进行重写。如果无法以新的方式来提供帮助文字,
// 那组件总是还能调用基础实现的(参见 Component 类)。
class Panel extends Container is
field modalHelpText: string

method showHelp() is
if (modalHelpText != null)
// 显示包含帮助文字的模态窗口。
else
super.showHelp()

// ...同上...
class Dialog extends Container is
field wikiPageURL: string

method showHelp() is
if (wikiPageURL != null)
// 打开百科帮助页面。
else
super.showHelp()


// 客户端代码。
class Application is
// 每个程序都能以不同方式对链进行配置。
method createUI() is
dialog = new Dialog("预算报告")
dialog.wikiPageURL = "http://..."
panel = new Panel(0, 0, 400, 800)
panel.modalHelpText = "本面板用于..."
ok = new Button(250, 760, 50, 20, "确认")
ok.tooltipText = "这是一个确认按钮..."
cancel = new Button(320, 760, 50, 20, "取消")
// ...
panel.add(ok)
panel.add(cancel)
dialog.add(panel)

// 想象这里会发生什么。
method onF1KeyPress() is
component = this.getComponentAtMouseCoords()
component.showHelp()

责任链模式适合应用场景

当程序需要使用不同方式处理不同种类请求,而且请求类型和顺序预先未知时,可以使用责任链模式。

该模式能将多个处理者连接成一条链。 接收到请求后, 它会 “询问” 每个处理者是否能够对其进行处理。 这样所有处理者都有机会来处理请求。

当必须按顺序执行多个处理者时,可以使用该模式。

无论你以何种顺序将处理者连接成一条链, 所有请求都会严格按照顺序通过链上的处理者。

如果所需处理者及其顺序必须在运行时进行改变,可以使用责任链模式。

如果在处理者类中有对引用成员变量的设定方法, 你将能动态地插入和移除处理者, 或者改变其顺序。

实现方式

  1. 声明处理者接口并描述请求处理方法的签名。

    确定客户端如何将请求数据传递给方法。 最灵活的方式是将请求转换为对象, 然后将其以参数的形式传递给处理函数。

  2. 为了在具体处理者中消除重复的样本代码, 你可以根据处理者接口创建抽象处理者基类。

    该类需要有一个成员变量来存储指向链上下个处理者的引用。 你可以将其设置为不可变类。 但如果你打算在运行时对链进行改变, 则需要定义一个设定方法来修改引用成员变量的值。

    为了使用方便, 你还可以实现处理方法的默认行为。 如果还有剩余对象, 该方法会将请求传递给下个对象。 具体处理者还能够通过调用父对象的方法来使用这一行为。

  3. 依次创建具体处理者子类并实现其处理方法。 每个处理者在接收到请求后都必须做出两个决定:

    • 是否自行处理这个请求。
    • 是否将该请求沿着链进行传递。
  4. 客户端可以自行组装链, 或者从其他对象处获得预先组装好的链。 在后一种情况下, 你必须实现工厂类以根据配置或环境设置来创建链。

  5. 客户端可以触发链中的任意处理者, 而不仅仅是第一个。 请求将通过链进行传递, 直至某个处理者拒绝继续传递, 或者请求到达链尾。

  6. 由于链的动态性, 客户端需要准备好处理以下情况:

    • 链中可能只有单个链接。
    • 部分请求可能无法到达链尾。
    • 其他请求可能直到链尾都未被处理。

责任链模式优缺点

优点

  • 你可以控制请求处理的顺序。
  • 单一职责原则。 你可对发起操作和执行操作的类进行解耦。
  • 开闭原则。 你可以在不更改现有代码的情况下在程序中新增处理者。

缺点

  • 部分请求可能未被处理。

与其他模式的关系

  • 责任链模式命令模式中介者模式观察者模式用于处理请求发送者和接收者之间的不同连接方式:

    • 责任链按照顺序将请求动态传递给一系列的潜在接收者, 直至其中一名接收者对请求进行处理。
    • 命令在发送者和请求者之间建立单向连接。
    • 中介者清除了发送者和请求者之间的直接连接, 强制它们通过一个中介对象进行间接沟通。
    • 观察者允许接收者动态地订阅或取消接收请求。
  • 责任链通常和组合模式结合使用。 在这种情况下, 叶组件接收到请求后, 可以将请求沿包含全体父组件的链一直传递至对象树的底部。

  • 责任链的管理者可使用命令模式实现。 在这种情况下, 你可以对由请求代表的同一个上下文对象执行许多不同的操作。

    还有另外一种实现方式, 那就是请求自身就是一个命令对象。 在这种情况下, 你可以对由一系列不同上下文连接而成的链执行相同的操作。

  • 责任链装饰模式的类结构非常相似。 两者都依赖递归组合将需要执行的操作传递给一系列对象。 但是, 两者有几点重要的不同之处。

    责任链的管理者可以相互独立地执行一切操作, 还可以随时停止传递请求。 另一方面, 各种装饰可以在遵循基本接口的情况下扩展对象的行为。 此外, 装饰无法中断请求的传递。

代码示例

责任链是一种行为设计模式, 允许你将请求沿着处理者链进行发送, 直至其中一个处理者对其进行处理。

该模式允许多个对象来对请求进行处理, 而无需让发送者类与具体接收者类相耦合。 链可在运行时由遵循标准处理者接口的任意处理者动态生成。

在 C# 中使用模式

复杂度: ★★☆

流行度: ★☆☆

使用示例: 责任链模式在 C# 程序中并不常见, 因为它仅在代码与对象链打交道时才能发挥作用。

识别方法: 该模式可通过一组对象的行为方法间接调用其他对象的相同方法来识别, 而且所有对象都会遵循相同的接口。

概念示例

本例说明了责任链设计模式的结构并重点回答了下面的问题:

  • 它由哪些类组成?
  • 这些类扮演了哪些角色?
  • 模式中的各个元素会以何种方式相互关联?

Program.cs: 概念示例

1
2
3
4
5
6
7
8
9
10
11
12
13
14
15
16
17
18
19
20
21
22
23
24
25
26
27
28
29
30
31
32
33
34
35
36
37
38
39
40
41
42
43
44
45
46
47
48
49
50
51
52
53
54
55
56
57
58
59
60
61
62
63
64
65
66
67
68
69
70
71
72
73
74
75
76
77
78
79
80
81
82
83
84
85
86
87
88
89
90
91
92
93
94
95
96
97
98
99
100
101
102
103
104
105
106
107
108
109
110
111
112
113
114
115
116
117
118
119
120
121
122
123
124
125
126
127
128
129
130
131
132
133
134
using System;
using System.Collections.Generic;

namespace RefactoringGuru.DesignPatterns.ChainOfResponsibility.Conceptual
{
// The Handler interface declares a method for building the chain of
// handlers. It also declares a method for executing a request.
public interface IHandler
{
IHandler SetNext(IHandler handler);

object Handle(object request);
}

// The default chaining behavior can be implemented inside a base handler
// class.
abstract class AbstractHandler : IHandler
{
private IHandler _nextHandler;

public IHandler SetNext(IHandler handler)
{
this._nextHandler = handler;

// Returning a handler from here will let us link handlers in a
// convenient way like this:
// monkey.SetNext(squirrel).SetNext(dog);
return handler;
}

public virtual object Handle(object request)
{
if (this._nextHandler != null)
{
return this._nextHandler.Handle(request);
}
else
{
return null;
}
}
}

class MonkeyHandler : AbstractHandler
{
public override object Handle(object request)
{
if ((request as string) == "Banana")
{
return $"Monkey: I'll eat the {request.ToString()}.\n";
}
else
{
return base.Handle(request);
}
}
}

class SquirrelHandler : AbstractHandler
{
public override object Handle(object request)
{
if (request.ToString() == "Nut")
{
return $"Squirrel: I'll eat the {request.ToString()}.\n";
}
else
{
return base.Handle(request);
}
}
}

class DogHandler : AbstractHandler
{
public override object Handle(object request)
{
if (request.ToString() == "MeatBall")
{
return $"Dog: I'll eat the {request.ToString()}.\n";
}
else
{
return base.Handle(request);
}
}
}

class Client
{
// The client code is usually suited to work with a single handler. In
// most cases, it is not even aware that the handler is part of a chain.
public static void ClientCode(AbstractHandler handler)
{
foreach (var food in new List<string> { "Nut", "Banana", "Cup of coffee" })
{
Console.WriteLine($"Client: Who wants a {food}?");

var result = handler.Handle(food);

if (result != null)
{
Console.Write($" {result}");
}
else
{
Console.WriteLine($" {food} was left untouched.");
}
}
}
}

class Program
{
static void Main(string[] args)
{
// The other part of the client code constructs the actual chain.
var monkey = new MonkeyHandler();
var squirrel = new SquirrelHandler();
var dog = new DogHandler();

monkey.SetNext(squirrel).SetNext(dog);

// The client should be able to send a request to any handler, not
// just the first one in the chain.
Console.WriteLine("Chain: Monkey > Squirrel > Dog\n");
Client.ClientCode(monkey);
Console.WriteLine();

Console.WriteLine("Subchain: Squirrel > Dog\n");
Client.ClientCode(squirrel);
}
}
}

Output.txt: 执行结果

1
2
3
4
5
6
7
8
9
10
11
12
13
14
15
16
17
Chain: Monkey > Squirrel > Dog

Client: Who wants a Nut?
Squirrel: I'll eat the Nut.
Client: Who wants a Banana?
Monkey: I'll eat the Banana.
Client: Who wants a Cup of coffee?
Cup of coffee was left untouched.

Subchain: Squirrel > Dog

Client: Who wants a Nut?
Squirrel: I'll eat the Nut.
Client: Who wants a Banana?
Banana was left untouched.
Client: Who wants a Cup of coffee?
Cup of coffee was left untouched.

在 C++ 中使用模式

复杂度: ★★☆

流行度: ★☆☆

使用示例: 责任链模式在 C++ 程序中并不常见, 因为它仅在代码与对象链打交道时才能发挥作用。

识别方法: 该模式可通过一组对象的行为方法间接调用其他对象的相同方法来识别, 而且所有对象都会遵循相同的接口。

概念示例

本例说明了责任链设计模式的结构并重点回答了下面的问题:

  • 它由哪些类组成?
  • 这些类扮演了哪些角色?
  • 模式中的各个元素会以何种方式相互关联?

main.cc: 概念示例

1
2
3
4
5
6
7
8
9
10
11
12
13
14
15
16
17
18
19
20
21
22
23
24
25
26
27
28
29
30
31
32
33
34
35
36
37
38
39
40
41
42
43
44
45
46
47
48
49
50
51
52
53
54
55
56
57
58
59
60
61
62
63
64
65
66
67
68
69
70
71
72
73
74
75
76
77
78
79
80
81
82
83
84
85
86
87
88
89
90
91
92
93
94
95
96
97
98
99
100
101
102
103
104
105
106
107
108
109
110
111
112
/**
* The Handler interface declares a method for building the chain of handlers.
* It also declares a method for executing a request.
*/
class Handler {
public:
virtual Handler *SetNext(Handler *handler) = 0;
virtual std::string Handle(std::string request) = 0;
};
/**
* The default chaining behavior can be implemented inside a base handler class.
*/
class AbstractHandler : public Handler {
/**
* @var Handler
*/
private:
Handler *next_handler_;

public:
AbstractHandler() : next_handler_(nullptr) {
}
Handler *SetNext(Handler *handler) override {
this->next_handler_ = handler;
// Returning a handler from here will let us link handlers in a convenient
// way like this:
// $monkey->setNext($squirrel)->setNext($dog);
return handler;
}
std::string Handle(std::string request) override {
if (this->next_handler_) {
return this->next_handler_->Handle(request);
}

return {};
}
};
/**
* All Concrete Handlers either handle a request or pass it to the next handler
* in the chain.
*/
class MonkeyHandler : public AbstractHandler {
public:
std::string Handle(std::string request) override {
if (request == "Banana") {
return "Monkey: I'll eat the " + request + ".\n";
} else {
return AbstractHandler::Handle(request);
}
}
};
class SquirrelHandler : public AbstractHandler {
public:
std::string Handle(std::string request) override {
if (request == "Nut") {
return "Squirrel: I'll eat the " + request + ".\n";
} else {
return AbstractHandler::Handle(request);
}
}
};
class DogHandler : public AbstractHandler {
public:
std::string Handle(std::string request) override {
if (request == "MeatBall") {
return "Dog: I'll eat the " + request + ".\n";
} else {
return AbstractHandler::Handle(request);
}
}
};
/**
* The client code is usually suited to work with a single handler. In most
* cases, it is not even aware that the handler is part of a chain.
*/
void ClientCode(Handler &handler) {
std::vector<std::string> food = {"Nut", "Banana", "Cup of coffee"};
for (const std::string &f : food) {
std::cout << "Client: Who wants a " << f << "?\n";
const std::string result = handler.Handle(f);
if (!result.empty()) {
std::cout << " " << result;
} else {
std::cout << " " << f << " was left untouched.\n";
}
}
}
/**
* The other part of the client code constructs the actual chain.
*/
int main() {
MonkeyHandler *monkey = new MonkeyHandler;
SquirrelHandler *squirrel = new SquirrelHandler;
DogHandler *dog = new DogHandler;
monkey->SetNext(squirrel)->SetNext(dog);

/**
* The client should be able to send a request to any handler, not just the
* first one in the chain.
*/
std::cout << "Chain: Monkey > Squirrel > Dog\n\n";
ClientCode(*monkey);
std::cout << "\n";
std::cout << "Subchain: Squirrel > Dog\n\n";
ClientCode(*squirrel);

delete monkey;
delete squirrel;
delete dog;

return 0;
}

Output.txt: 执行结果

1
2
3
4
5
6
7
8
9
10
11
12
13
14
15
16
17
Chain: Monkey > Squirrel > Dog

Client: Who wants a Nut?
Squirrel: I'll eat the Nut.
Client: Who wants a Banana?
Monkey: I'll eat the Banana.
Client: Who wants a Cup of coffee?
Cup of coffee was left untouched.

Subchain: Squirrel > Dog

Client: Who wants a Nut?
Squirrel: I'll eat the Nut.
Client: Who wants a Banana?
Banana was left untouched.
Client: Who wants a Cup of coffee?
Cup of coffee was left untouched.

在 Java 中使用模式

复杂度: ★★☆

流行度: ★☆☆

使用示例: 责任链模式在 Java 程序中并不常见, 因为它仅在代码与对象链打交道时才能发挥作用。

该模式最流行的使用案例之一是在 GUI 类中将事件向上传递给父组件。 另一个值得注意的使用案例是依次访问过滤器。

下面是该模式在核心 Java 程序库中的一些示例:

识别方法: 该模式可通过一组对象的行为方法间接调用其他对象的相同方法来识别, 而且所有对象都会遵循相同的接口。

过滤访问

本例展示了包含用户数据的请求如何依次通过处理者链来执行各种不同的行为 (例如认证、 授权与验证)。

本例与许多作者给出的该模式的标准版本有些不同。 绝大多数模式示例都会寻找正确的处理者, 并在处理后退出链。 但在这里我们会执行每个处理者, 直至某个处理者无法处理请求。 请注意, 尽管流程略有不同, 但这仍是责任链模式。

middleware

middleware/Middleware.java: 基础验证接口

1
2
3
4
5
6
7
8
9
10
11
12
13
14
15
16
17
18
19
20
21
22
23
24
25
26
27
28
29
30
31
32
package refactoring_guru.chain_of_responsibility.example.middleware;

/**
* Base middleware class.
*/
public abstract class Middleware {
private Middleware next;

/**
* Builds chains of middleware objects.
*/
public Middleware linkWith(Middleware next) {
this.next = next;
return next;
}

/**
* Subclasses will implement this method with concrete checks.
*/
public abstract boolean check(String email, String password);

/**
* Runs check on the next object in chain or ends traversing if we're in
* last object in chain.
*/
protected boolean checkNext(String email, String password) {
if (next == null) {
return true;
}
return next.check(email, password);
}
}

middleware/ThrottlingMiddleware.java: 检查请求数量限制

1
2
3
4
5
6
7
8
9
10
11
12
13
14
15
16
17
18
19
20
21
22
23
24
25
26
27
28
29
30
31
32
33
34
35
36
37
38
package refactoring_guru.chain_of_responsibility.example.middleware;

/**
* ConcreteHandler. Checks whether there are too many failed login requests.
*/
public class ThrottlingMiddleware extends Middleware {
private int requestPerMinute;
private int request;
private long currentTime;

public ThrottlingMiddleware(int requestPerMinute) {
this.requestPerMinute = requestPerMinute;
this.currentTime = System.currentTimeMillis();
}

/**
* Please, not that checkNext() call can be inserted both in the beginning
* of this method and in the end.
*
* This gives much more flexibility than a simple loop over all middleware
* objects. For instance, an element of a chain can change the order of
* checks by running its check after all other checks.
*/
public boolean check(String email, String password) {
if (System.currentTimeMillis() > currentTime + 60_000) {
request = 0;
currentTime = System.currentTimeMillis();
}

request++;

if (request > requestPerMinute) {
System.out.println("Request limit exceeded!");
Thread.currentThread().stop();
}
return checkNext(email, password);
}
}

middleware/UserExistsMiddleware.java: 检查用户登录信息

1
2
3
4
5
6
7
8
9
10
11
12
13
14
15
16
17
18
19
20
21
22
23
24
25
26
package refactoring_guru.chain_of_responsibility.example.middleware;

import refactoring_guru.chain_of_responsibility.example.server.Server;

/**
* ConcreteHandler. Checks whether a user with the given credentials exists.
*/
public class UserExistsMiddleware extends Middleware {
private Server server;

public UserExistsMiddleware(Server server) {
this.server = server;
}

public boolean check(String email, String password) {
if (!server.hasEmail(email)) {
System.out.println("This email is not registered!");
return false;
}
if (!server.isValidPassword(email, password)) {
System.out.println("Wrong password!");
return false;
}
return checkNext(email, password);
}
}

middleware/RoleCheckMiddleware.java: 检查用户角色

1
2
3
4
5
6
7
8
9
10
11
12
13
14
15
package refactoring_guru.chain_of_responsibility.example.middleware;

/**
* ConcreteHandler. Checks a user's role.
*/
public class RoleCheckMiddleware extends Middleware {
public boolean check(String email, String password) {
if (email.equals("admin@example.com")) {
System.out.println("Hello, admin!");
return true;
}
System.out.println("Hello, user!");
return checkNext(email, password);
}
}

server

server/Server.java: 授权目标

1
2
3
4
5
6
7
8
9
10
11
12
13
14
15
16
17
18
19
20
21
22
23
24
25
26
27
28
29
30
31
32
33
34
35
36
37
38
39
40
41
42
43
44
45
46
47
48
49
package refactoring_guru.chain_of_responsibility.example.server;

import refactoring_guru.chain_of_responsibility.example.middleware.Middleware;

import java.util.HashMap;
import java.util.Map;

/**
* Server class.
*/
public class Server {
private Map<String, String> users = new HashMap<>();
private Middleware middleware;

/**
* Client passes a chain of object to server. This improves flexibility and
* makes testing the server class easier.
*/
public void setMiddleware(Middleware middleware) {
this.middleware = middleware;
}

/**
* Server gets email and password from client and sends the authorization
* request to the chain.
*/
public boolean logIn(String email, String password) {
if (middleware.check(email, password)) {
System.out.println("Authorization have been successful!");

// Do something useful here for authorized users.

return true;
}
return false;
}

public void register(String email, String password) {
users.put(email, password);
}

public boolean hasEmail(String email) {
return users.containsKey(email);
}

public boolean isValidPassword(String email, String password) {
return users.get(email).equals(password);
}
}

Demo.java: 客户端代码

1
2
3
4
5
6
7
8
9
10
11
12
13
14
15
16
17
18
19
20
21
22
23
24
25
26
27
28
29
30
31
32
33
34
35
36
37
38
39
40
41
42
43
44
45
46
47
package refactoring_guru.chain_of_responsibility.example;

import refactoring_guru.chain_of_responsibility.example.middleware.Middleware;
import refactoring_guru.chain_of_responsibility.example.middleware.RoleCheckMiddleware;
import refactoring_guru.chain_of_responsibility.example.middleware.ThrottlingMiddleware;
import refactoring_guru.chain_of_responsibility.example.middleware.UserExistsMiddleware;
import refactoring_guru.chain_of_responsibility.example.server.Server;

import java.io.BufferedReader;
import java.io.IOException;
import java.io.InputStreamReader;

/**
* Demo class. Everything comes together here.
*/
public class Demo {
private static BufferedReader reader = new BufferedReader(new InputStreamReader(System.in));
private static Server server;

private static void init() {
server = new Server();
server.register("admin@example.com", "admin_pass");
server.register("user@example.com", "user_pass");

// All checks are linked. Client can build various chains using the same
// components.
Middleware middleware = new ThrottlingMiddleware(2);
middleware.linkWith(new UserExistsMiddleware(server))
.linkWith(new RoleCheckMiddleware());

// Server gets a chain from client code.
server.setMiddleware(middleware);
}

public static void main(String[] args) throws IOException {
init();

boolean success;
do {
System.out.print("Enter email: ");
String email = reader.readLine();
System.out.print("Input password: ");
String password = reader.readLine();
success = server.logIn(email, password);
} while (!success);
}
}

OutputDemo.png: 执行结果

1
2
3
4
5
6
7
8
9
10
Enter email: admin@example.com
Input password: admin_pass
Hello, admin!
Authorization have been successful!


Enter email: user@example.com
Input password: user_pass
Hello, user!
Authorization have been successful!

在 PHP 中使用模式

复杂度: ★★☆

流行度: ★☆☆

使用示例: 责任链模式在 PHP 程序中并不常见, 因为它仅在代码与对象链打交道时才能发挥作用。 可以说在 PHP 中, 该模式最著名的例子之一是 PSR-15 中所描述的 HTTP 请求中间件

识别方法: 该模式可通过一组对象的行为方法间接调用其他对象的相同方法来识别, 而且所有对象都会遵循相同的接口。

概念示例

本例说明了责任链设计模式的结构并重点回答了下面的问题:

  • 它由哪些类组成?
  • 这些类扮演了哪些角色?
  • 模式中的各个元素会以何种方式相互关联?

了解该模式的结构后, 你可以更容易地理解下面基于真实世界的 PHP 应用案例。

index.php: 概念示例

1
2
3
4
5
6
7
8
9
10
11
12
13
14
15
16
17
18
19
20
21
22
23
24
25
26
27
28
29
30
31
32
33
34
35
36
37
38
39
40
41
42
43
44
45
46
47
48
49
50
51
52
53
54
55
56
57
58
59
60
61
62
63
64
65
66
67
68
69
70
71
72
73
74
75
76
77
78
79
80
81
82
83
84
85
86
87
88
89
90
91
92
93
94
95
96
97
98
99
100
101
102
103
104
105
106
107
108
109
110
111
112
113
114
115
116
117
118
119
120
<?php

namespace RefactoringGuru\ChainOfResponsibility\Conceptual;

/**
* The Handler interface declares a method for building the chain of handlers.
* It also declares a method for executing a request.
*/
interface Handler
{
public function setNext(Handler $handler): Handler;

public function handle(string $request): ?string;
}

/**
* The default chaining behavior can be implemented inside a base handler class.
*/
abstract class AbstractHandler implements Handler
{
/**
* @var Handler
*/
private $nextHandler;

public function setNext(Handler $handler): Handler
{
$this->nextHandler = $handler;
// Returning a handler from here will let us link handlers in a
// convenient way like this:
// $monkey->setNext($squirrel)->setNext($dog);
return $handler;
}

public function handle(string $request): ?string
{
if ($this->nextHandler) {
return $this->nextHandler->handle($request);
}

return null;
}
}

/**
* All Concrete Handlers either handle a request or pass it to the next handler
* in the chain.
*/
class MonkeyHandler extends AbstractHandler
{
public function handle(string $request): ?string
{
if ($request === "Banana") {
return "Monkey: I'll eat the " . $request . ".\n";
} else {
return parent::handle($request);
}
}
}

class SquirrelHandler extends AbstractHandler
{
public function handle(string $request): ?string
{
if ($request === "Nut") {
return "Squirrel: I'll eat the " . $request . ".\n";
} else {
return parent::handle($request);
}
}
}

class DogHandler extends AbstractHandler
{
public function handle(string $request): ?string
{
if ($request === "MeatBall") {
return "Dog: I'll eat the " . $request . ".\n";
} else {
return parent::handle($request);
}
}
}

/**
* The client code is usually suited to work with a single handler. In most
* cases, it is not even aware that the handler is part of a chain.
*/
function clientCode(Handler $handler)
{
foreach (["Nut", "Banana", "Cup of coffee"] as $food) {
echo "Client: Who wants a " . $food . "?\n";
$result = $handler->handle($food);
if ($result) {
echo " " . $result;
} else {
echo " " . $food . " was left untouched.\n";
}
}
}

/**
* The other part of the client code constructs the actual chain.
*/
$monkey = new MonkeyHandler();
$squirrel = new SquirrelHandler();
$dog = new DogHandler();

$monkey->setNext($squirrel)->setNext($dog);

/**
* The client should be able to send a request to any handler, not just the
* first one in the chain.
*/
echo "Chain: Monkey > Squirrel > Dog\n\n";
clientCode($monkey);
echo "\n";

echo "Subchain: Squirrel > Dog\n\n";
clientCode($squirrel);

Output.txt: 执行结果

1
2
3
4
5
6
7
8
9
10
11
12
13
14
15
16
17
Chain: Monkey > Squirrel > Dog

Client: Who wants a Nut?
Squirrel: I'll eat the Nut.
Client: Who wants a Banana?
Monkey: I'll eat the Banana.
Client: Who wants a Cup of coffee?
Cup of coffee was left untouched.

Subchain: Squirrel > Dog

Client: Who wants a Nut?
Squirrel: I'll eat the Nut.
Client: Who wants a Banana?
Banana was left untouched.
Client: Who wants a Cup of coffee?
Cup of coffee was left untouched.

真实世界示例

在 PHP 世界中, 责任链 (Co­R) 模式在 HTTP 请求中间件中的使用是最广为人知的。 绝大多数流行的 PHP 框架都会使用该模式来实现 HTTP 请求中间件, 它甚至被标准化而成为了 PSR-15 的一个组成部分。

它的运作方式是这样的: HTTP 请求必须通过一个中间件对象堆栈才能被程序处理。 每个中间件可以拒绝进一步处理该请求, 也可以将其传递给下一个中间件。 当请求成功通过所有中间件后, 程序的主处理者才能最终对其进行处理。

你可能已经注意到这种方法在某种程度上来说颠倒了该模式的原始意图。 的确, 在通常的实现中, 只有在当前处理者无法对请求进行处理时, 请求才能沿着链进行传递; 而中间件认为程序可以处理该请求时, 才会沿着链将其传递下去。 尽管如此, 由于中间件是相互连接的, 所以整个概念仍被认为是责任链模式的示例。

index.php: 真实世界示例

1
2
3
4
5
6
7
8
9
10
11
12
13
14
15
16
17
18
19
20
21
22
23
24
25
26
27
28
29
30
31
32
33
34
35
36
37
38
39
40
41
42
43
44
45
46
47
48
49
50
51
52
53
54
55
56
57
58
59
60
61
62
63
64
65
66
67
68
69
70
71
72
73
74
75
76
77
78
79
80
81
82
83
84
85
86
87
88
89
90
91
92
93
94
95
96
97
98
99
100
101
102
103
104
105
106
107
108
109
110
111
112
113
114
115
116
117
118
119
120
121
122
123
124
125
126
127
128
129
130
131
132
133
134
135
136
137
138
139
140
141
142
143
144
145
146
147
148
149
150
151
152
153
154
155
156
157
158
159
160
161
162
163
164
165
166
167
168
169
170
171
172
173
174
175
176
177
178
179
180
181
182
183
184
185
186
187
188
189
190
191
192
193
194
195
196
197
198
199
200
201
202
203
204
205
206
207
208
209
210
211
212
213
214
215
216
217
218
219
<?php

namespace RefactoringGuru\ChainOfResponsibility\RealWorld;

/**
* The classic CoR pattern declares a single role for objects that make up a
* chain, which is a Handler. In our example, let's differentiate between
* middleware and a final application's handler, which is executed when a
* request gets through all the middleware objects.
*
* The base Middleware class declares an interface for linking middleware
* objects into a chain.
*/
abstract class Middleware
{
/**
* @var Middleware
*/
private $next;

/**
* This method can be used to build a chain of middleware objects.
*/
public function linkWith(Middleware $next): Middleware
{
$this->next = $next;

return $next;
}

/**
* Subclasses must override this method to provide their own checks. A
* subclass can fall back to the parent implementation if it can't process a
* request.
*/
public function check(string $email, string $password): bool
{
if (!$this->next) {
return true;
}

return $this->next->check($email, $password);
}
}

/**
* This Concrete Middleware checks whether a user with given credentials exists.
*/
class UserExistsMiddleware extends Middleware
{
private $server;

public function __construct(Server $server)
{
$this->server = $server;
}

public function check(string $email, string $password): bool
{
if (!$this->server->hasEmail($email)) {
echo "UserExistsMiddleware: This email is not registered!\n";

return false;
}

if (!$this->server->isValidPassword($email, $password)) {
echo "UserExistsMiddleware: Wrong password!\n";

return false;
}

return parent::check($email, $password);
}
}

/**
* This Concrete Middleware checks whether a user associated with the request
* has sufficient permissions.
*/
class RoleCheckMiddleware extends Middleware
{
public function check(string $email, string $password): bool
{
if ($email === "admin@example.com") {
echo "RoleCheckMiddleware: Hello, admin!\n";

return true;
}
echo "RoleCheckMiddleware: Hello, user!\n";

return parent::check($email, $password);
}
}

/**
* This Concrete Middleware checks whether there are too many failed login
* requests.
*/
class ThrottlingMiddleware extends Middleware
{
private $requestPerMinute;

private $request;

private $currentTime;

public function __construct(int $requestPerMinute)
{
$this->requestPerMinute = $requestPerMinute;
$this->currentTime = time();
}

/**
* Please, note that the parent::check call can be inserted both at the
* beginning of this method and at the end.
*
* This gives much more flexibility than a simple loop over all middleware
* objects. For instance, a middleware can change the order of checks by
* running its check after all the others.
*/
public function check(string $email, string $password): bool
{
if (time() > $this->currentTime + 60) {
$this->request = 0;
$this->currentTime = time();
}

$this->request++;

if ($this->request > $this->requestPerMinute) {
echo "ThrottlingMiddleware: Request limit exceeded!\n";
die();
}

return parent::check($email, $password);
}
}

/**
* This is an application's class that acts as a real handler. The Server class
* uses the CoR pattern to execute a set of various authentication middleware
* before launching some business logic associated with a request.
*/
class Server
{
private $users = [];

/**
* @var Middleware
*/
private $middleware;

/**
* The client can configure the server with a chain of middleware objects.
*/
public function setMiddleware(Middleware $middleware): void
{
$this->middleware = $middleware;
}

/**
* The server gets the email and password from the client and sends the
* authorization request to the middleware.
*/
public function logIn(string $email, string $password): bool
{
if ($this->middleware->check($email, $password)) {
echo "Server: Authorization has been successful!\n";

// Do something useful for authorized users.

return true;
}

return false;
}

public function register(string $email, string $password): void
{
$this->users[$email] = $password;
}

public function hasEmail(string $email): bool
{
return isset($this->users[$email]);
}

public function isValidPassword(string $email, string $password): bool
{
return $this->users[$email] === $password;
}
}

/**
* The client code.
*/
$server = new Server();
$server->register("admin@example.com", "admin_pass");
$server->register("user@example.com", "user_pass");

// All middleware are chained. The client can build various configurations of
// chains depending on its needs.
$middleware = new ThrottlingMiddleware(2);
$middleware
->linkWith(new UserExistsMiddleware($server))
->linkWith(new RoleCheckMiddleware());

// The server gets a chain from the client code.
$server->setMiddleware($middleware);

// ...

do {
echo "\nEnter your email:\n";
$email = readline();
echo "Enter your password:\n";
$password = readline();
$success = $server->logIn($email, $password);
} while (!$success);

Output.txt: 执行结果

1
2
3
4
5
6
7
8
9
10
11
12
13
14
15
16
17
18
19
20
21
22
23
24
25
26
Enter your email:
asd
Enter your password:
123
UserExistsMiddleware: This email is not registered!

Enter your email:
admin@example.com
Enter your password:
wrong
UserExistsMiddleware: Wrong password!

Enter your email:
admin@example.com
Enter your password:
letmein
ThrottlingMiddleware: Request limit exceeded!


Enter your email:
admin@example.com
Enter your password:
admin_pass
RoleCheckMiddleware: Hello, admin!
Server: Authorization has been successful!

在 Python 中使用模式

复杂度: ★★☆

流行度: ★☆☆

使用示例: 责任链模式在 Python 程序中并不常见, 因为它仅在代码与对象链打交道时才能发挥作用。

识别方法: 该模式可通过一组对象的行为方法间接调用其他对象的相同方法来识别, 而且所有对象都会遵循相同的接口。

概念示例

本例说明了责任链设计模式的结构并重点回答了下面的问题:

  • 它由哪些类组成?
  • 这些类扮演了哪些角色?
  • 模式中的各个元素会以何种方式相互关联?

main.py: 概念示例

1
2
3
4
5
6
7
8
9
10
11
12
13
14
15
16
17
18
19
20
21
22
23
24
25
26
27
28
29
30
31
32
33
34
35
36
37
38
39
40
41
42
43
44
45
46
47
48
49
50
51
52
53
54
55
56
57
58
59
60
61
62
63
64
65
66
67
68
69
70
71
72
73
74
75
76
77
78
79
80
81
82
83
84
85
86
87
88
89
90
91
92
93
94
95
96
97
98
99
100
101
102
103
from __future__ import annotations
from abc import ABC, abstractmethod
from typing import Any, Optional


class Handler(ABC):
"""
The Handler interface declares a method for building the chain of handlers.
It also declares a method for executing a request.
"""

@abstractmethod
def set_next(self, handler: Handler) -> Handler:
pass

@abstractmethod
def handle(self, request) -> Optional[str]:
pass


class AbstractHandler(Handler):
"""
The default chaining behavior can be implemented inside a base handler
class.
"""

_next_handler: Handler = None

def set_next(self, handler: Handler) -> Handler:
self._next_handler = handler
# Returning a handler from here will let us link handlers in a
# convenient way like this:
# monkey.set_next(squirrel).set_next(dog)
return handler

@abstractmethod
def handle(self, request: Any) -> str:
if self._next_handler:
return self._next_handler.handle(request)

return None


"""
All Concrete Handlers either handle a request or pass it to the next handler in
the chain.
"""


class MonkeyHandler(AbstractHandler):
def handle(self, request: Any) -> str:
if request == "Banana":
return f"Monkey: I'll eat the {request}"
else:
return super().handle(request)


class SquirrelHandler(AbstractHandler):
def handle(self, request: Any) -> str:
if request == "Nut":
return f"Squirrel: I'll eat the {request}"
else:
return super().handle(request)


class DogHandler(AbstractHandler):
def handle(self, request: Any) -> str:
if request == "MeatBall":
return f"Dog: I'll eat the {request}"
else:
return super().handle(request)


def client_code(handler: Handler) -> None:
"""
The client code is usually suited to work with a single handler. In most
cases, it is not even aware that the handler is part of a chain.
"""

for food in ["Nut", "Banana", "Cup of coffee"]:
print(f"\nClient: Who wants a {food}?")
result = handler.handle(food)
if result:
print(f" {result}", end="")
else:
print(f" {food} was left untouched.", end="")


if __name__ == "__main__":
monkey = MonkeyHandler()
squirrel = SquirrelHandler()
dog = DogHandler()

monkey.set_next(squirrel).set_next(dog)

# The client should be able to send a request to any handler, not just the
# first one in the chain.
print("Chain: Monkey > Squirrel > Dog")
client_code(monkey)
print("\n")

print("Subchain: Squirrel > Dog")
client_code(squirrel)

Output.txt: 执行结果

1
2
3
4
5
6
7
8
9
10
11
12
13
14
15
16
17
Chain: Monkey > Squirrel > Dog

Client: Who wants a Nut?
Squirrel: I'll eat the Nut
Client: Who wants a Banana?
Monkey: I'll eat the Banana
Client: Who wants a Cup of coffee?
Cup of coffee was left untouched.

Subchain: Squirrel > Dog

Client: Who wants a Nut?
Squirrel: I'll eat the Nut
Client: Who wants a Banana?
Banana was left untouched.
Client: Who wants a Cup of coffee?
Cup of coffee was left untouched.

在 Ruby 中使用模式

复杂度: ★★☆

流行度: ★☆☆

使用示例: 责任链模式在 Ruby 程序中并不常见, 因为它仅在代码与对象链打交道时才能发挥作用。

识别方法: 该模式可通过一组对象的行为方法间接调用其他对象的相同方法来识别, 而且所有对象都会遵循相同的接口。

概念示例

本例说明了责任链设计模式的结构并重点回答了下面的问题:

  • 它由哪些类组成?
  • 这些类扮演了哪些角色?
  • 模式中的各个元素会以何种方式相互关联?

main.rb: 概念示例

1
2
3
4
5
6
7
8
9
10
11
12
13
14
15
16
17
18
19
20
21
22
23
24
25
26
27
28
29
30
31
32
33
34
35
36
37
38
39
40
41
42
43
44
45
46
47
48
49
50
51
52
53
54
55
56
57
58
59
60
61
62
63
64
65
66
67
68
69
70
71
72
73
74
75
76
77
78
79
80
81
82
83
84
85
86
87
88
89
90
91
92
93
94
95
96
97
98
99
100
101
102
103
104
105
106
107
108
109
110
111
112
113
114
115
116
117
# The Handler interface declares a method for building the chain of handlers. It
# also declares a method for executing a request.
class Handler
# @abstract
#
# @param [Handler] handler
def next_handler=(handler)
raise NotImplementedError, "#{self.class} has not implemented method '#{__method__}'"
end

# @abstract
#
# @param [String] request
#
# @return [String, nil]
def handle(request)
raise NotImplementedError, "#{self.class} has not implemented method '#{__method__}'"
end
end

# The default chaining behavior can be implemented inside a base handler class.
class AbstractHandler < Handler
# @return [Handler]
attr_writer :next_handler

# @param [Handler] handler
#
# @return [Handler]
def next_handler(handler)
@next_handler = handler
# Returning a handler from here will let us link handlers in a convenient
# way like this:
# monkey.next_handler(squirrel).next_handler(dog)
handler
end

# @abstract
#
# @param [String] request
#
# @return [String, nil]
def handle(request)
return @next_handler.handle(request) if @next_handler

nil
end
end

# All Concrete Handlers either handle a request or pass it to the next handler
# in the chain.
class MonkeyHandler < AbstractHandler
# @param [String] request
#
# @return [String, nil]
def handle(request)
if request == 'Banana'
"Monkey: I'll eat the #{request}"
else
super(request)
end
end
end

class SquirrelHandler < AbstractHandler
# @param [String] request
#
# @return [String, nil]
def handle(request)
if request == 'Nut'
"Squirrel: I'll eat the #{request}"
else
super(request)
end
end
end

class DogHandler < AbstractHandler
# @param [String] request
#
# @return [String, nil]
def handle(request)
if request == 'MeatBall'
"Dog: I'll eat the #{request}"
else
super(request)
end
end
end

# The client code is usually suited to work with a single handler. In most
# cases, it is not even aware that the handler is part of a chain.
def client_code(handler)
['Nut', 'Banana', 'Cup of coffee'].each do |food|
puts "\nClient: Who wants a #{food}?"
result = handler.handle(food)
if result
print " #{result}"
else
print " #{food} was left untouched."
end
end
end

monkey = MonkeyHandler.new
squirrel = SquirrelHandler.new
dog = DogHandler.new

monkey.next_handler(squirrel).next_handler(dog)

# The client should be able to send a request to any handler, not just the first
# one in the chain.
puts 'Chain: Monkey > Squirrel > Dog'
client_code(monkey)
puts "\n\n"

puts 'Subchain: Squirrel > Dog'
client_code(squirrel)

output.txt: 执行结果

1
2
3
4
5
6
7
8
9
10
11
12
13
14
15
16
17
Chain: Monkey > Squirrel > Dog

Client: Who wants a Nut?
Squirrel: I'll eat the Nut
Client: Who wants a Banana?
Monkey: I'll eat the Banana
Client: Who wants a Cup of coffee?
Cup of coffee was left untouched.

Subchain: Squirrel > Dog

Client: Who wants a Nut?
Squirrel: I'll eat the Nut
Client: Who wants a Banana?
Banana was left untouched.
Client: Who wants a Cup of coffee?
Cup of coffee was left untouched.

在 Swift 中使用模式

复杂度: ★★☆

流行度: ★☆☆

使用示例: 责任链模式在 Swift 程序中并不常见, 因为它仅在代码与对象链打交道时才能发挥作用。

识别方法: 该模式可通过一组对象的行为方法间接调用其他对象的相同方法来识别, 而且所有对象都会遵循相同的接口。

概念示例

本例说明了责任链设计模式的结构并重点回答了下面的问题:

  • 它由哪些类组成?
  • 这些类扮演了哪些角色?
  • 模式中的各个元素会以何种方式相互关联?

了解该模式的结构后, 你可以更容易地理解下面基于真实世界的 Swift 应用案例。

Example.swift: 概念示例

1
2
3
4
5
6
7
8
9
10
11
12
13
14
15
16
17
18
19
20
21
22
23
24
25
26
27
28
29
30
31
32
33
34
35
36
37
38
39
40
41
42
43
44
45
46
47
48
49
50
51
52
53
54
55
56
57
58
59
60
61
62
63
64
65
66
67
68
69
70
71
72
73
74
75
76
77
78
79
80
81
82
83
84
85
86
87
88
89
90
91
92
93
94
95
96
97
98
99
100
101
102
103
104
105
106
107
108
109
110
111
112
113
114
115
116
117
import XCTest

/// The Handler interface declares a method for building the chain of handlers.
/// It also declares a method for executing a request.
protocol Handler: class {

@discardableResult
func setNext(handler: Handler) -> Handler

func handle(request: String) -> String?

var nextHandler: Handler? { get set }
}

extension Handler {

func setNext(handler: Handler) -> Handler {
self.nextHandler = handler

/// Returning a handler from here will let us link handlers in a
/// convenient way like this:
/// monkey.setNext(handler: squirrel).setNext(handler: dog)
return handler
}

func handle(request: String) -> String? {
return nextHandler?.handle(request: request)
}
}

/// All Concrete Handlers either handle a request or pass it to the next handler
/// in the chain.
class MonkeyHandler: Handler {

var nextHandler: Handler?

func handle(request: String) -> String? {
if (request == "Banana") {
return "Monkey: I'll eat the " + request + ".\n"
} else {
return nextHandler?.handle(request: request)
}
}
}

class SquirrelHandler: Handler {

var nextHandler: Handler?

func handle(request: String) -> String? {

if (request == "Nut") {
return "Squirrel: I'll eat the " + request + ".\n"
} else {
return nextHandler?.handle(request: request)
}
}
}

class DogHandler: Handler {

var nextHandler: Handler?

func handle(request: String) -> String? {
if (request == "MeatBall") {
return "Dog: I'll eat the " + request + ".\n"
} else {
return nextHandler?.handle(request: request)
}
}
}

/// The client code is usually suited to work with a single handler. In most
/// cases, it is not even aware that the handler is part of a chain.
class Client {
// ...
static func someClientCode(handler: Handler) {

let food = ["Nut", "Banana", "Cup of coffee"]

for item in food {

print("Client: Who wants a " + item + "?\n")

guard let result = handler.handle(request: item) else {
print(" " + item + " was left untouched.\n")
return
}

print(" " + result)
}
}
// ...
}

/// Let's see how it all works together.
class ChainOfResponsibilityConceptual: XCTestCase {

func test() {

/// The other part of the client code constructs the actual chain.

let monkey = MonkeyHandler()
let squirrel = SquirrelHandler()
let dog = DogHandler()
monkey.setNext(handler: squirrel).setNext(handler: dog)

/// The client should be able to send a request to any handler, not just
/// the first one in the chain.

print("Chain: Monkey > Squirrel > Dog\n\n")
Client.someClientCode(handler: monkey)
print()
print("Subchain: Squirrel > Dog\n\n")
Client.someClientCode(handler: squirrel)
}
}

Output.txt: 执行结果

1
2
3
4
5
6
7
8
9
10
11
12
13
14
15
16
17
18
19
20
21
22
23
24
25
26
Chain: Monkey > Squirrel > Dog


Client: Who wants a Nut?

Squirrel: I'll eat the Nut.

Client: Who wants a Banana?

Monkey: I'll eat the Banana.

Client: Who wants a Cup of coffee?

Cup of coffee was left untouched.


Subchain: Squirrel > Dog


Client: Who wants a Nut?

Squirrel: I'll eat the Nut.

Client: Who wants a Banana?

Banana was left untouched.

真实世界示例

Example.swift: 真实世界示例

1
2
3
4
5
6
7
8
9
10
11
12
13
14
15
16
17
18
19
20
21
22
23
24
25
26
27
28
29
30
31
32
33
34
35
36
37
38
39
40
41
42
43
44
45
46
47
48
49
50
51
52
53
54
55
56
57
58
59
60
61
62
63
64
65
66
67
68
69
70
71
72
73
74
75
76
77
78
79
80
81
82
83
84
85
86
87
88
89
90
91
92
93
94
95
96
97
98
99
100
101
102
103
104
105
106
107
108
109
110
111
112
113
114
115
116
117
118
119
120
121
122
123
124
125
126
127
128
129
130
131
132
133
134
135
136
137
138
139
140
141
142
143
144
145
146
147
148
149
150
151
152
153
154
155
156
157
158
159
160
161
162
163
164
165
166
167
168
169
170
171
172
173
174
175
176
177
178
179
180
181
182
183
184
185
186
187
188
189
190
191
192
193
194
195
196
197
198
199
200
201
202
203
204
205
206
207
208
209
210
211
212
213
214
215
216
217
218
219
220
221
222
223
224
225
226
227
228
229
230
231
232
233
234
235
236
237
238
239
240
241
242
243
244
245
246
247
248
249
250
import Foundation
import UIKit
import XCTest


protocol Handler {

var next: Handler? { get }

func handle(_ request: Request) -> LocalizedError?
}

class BaseHandler: Handler {

var next: Handler?

init(with handler: Handler? = nil) {
self.next = handler
}

func handle(_ request: Request) -> LocalizedError? {
return next?.handle(request)
}
}

class LoginHandler: BaseHandler {

override func handle(_ request: Request) -> LocalizedError? {

guard request.email?.isEmpty == false else {
return AuthError.emptyEmail
}

guard request.password?.isEmpty == false else {
return AuthError.emptyPassword
}

return next?.handle(request)
}
}

class SignUpHandler: BaseHandler {

private struct Limit {
static let passwordLength = 8
}

override func handle(_ request: Request) -> LocalizedError? {

guard request.email?.contains("@") == true else {
return AuthError.invalidEmail
}

guard (request.password?.count ?? 0) >= Limit.passwordLength else {
return AuthError.invalidPassword
}

guard request.password == request.repeatedPassword else {
return AuthError.differentPasswords
}

return next?.handle(request)
}
}

class LocationHandler: BaseHandler {

override func handle(_ request: Request) -> LocalizedError? {
guard isLocationEnabled() else {
return AuthError.locationDisabled
}
return next?.handle(request)
}

func isLocationEnabled() -> Bool {
return true /// Calls special method
}
}

class NotificationHandler: BaseHandler {

override func handle(_ request: Request) -> LocalizedError? {
guard isNotificationsEnabled() else {
return AuthError.notificationsDisabled
}
return next?.handle(request)
}

func isNotificationsEnabled() -> Bool {
return false /// Calls special method
}
}

enum AuthError: LocalizedError {

case emptyFirstName
case emptyLastName

case emptyEmail
case emptyPassword

case invalidEmail
case invalidPassword
case differentPasswords

case locationDisabled
case notificationsDisabled

var errorDescription: String? {
switch self {
case .emptyFirstName:
return "First name is empty"
case .emptyLastName:
return "Last name is empty"
case .emptyEmail:
return "Email is empty"
case .emptyPassword:
return "Password is empty"
case .invalidEmail:
return "Email is invalid"
case .invalidPassword:
return "Password is invalid"
case .differentPasswords:
return "Password and repeated password should be equal"
case .locationDisabled:
return "Please turn location services on"
case .notificationsDisabled:
return "Please turn notifications on"
}
}
}


protocol Request {

var firstName: String? { get }
var lastName: String? { get }

var email: String? { get }
var password: String? { get }
var repeatedPassword: String? { get }
}

extension Request {

/// Default implementations

var firstName: String? { return nil }
var lastName: String? { return nil }

var email: String? { return nil }
var password: String? { return nil }
var repeatedPassword: String? { return nil }
}

struct SignUpRequest: Request {

var firstName: String?
var lastName: String?

var email: String?
var password: String?
var repeatedPassword: String?
}

struct LoginRequest: Request {

var email: String?
var password: String?
}


protocol AuthHandlerSupportable: AnyObject {

var handler: Handler? { get set }
}

class BaseAuthViewController: UIViewController, AuthHandlerSupportable {

/// Base class or extensions can be used to implement a base behavior
var handler: Handler?

init(handler: Handler) {
self.handler = handler
super.init(nibName: nil, bundle: nil)
}

required init?(coder aDecoder: NSCoder) {
super.init(coder: aDecoder)
}
}

class LoginViewController: BaseAuthViewController {

func loginButtonSelected() {
print("Login View Controller: User selected Login button")

let request = LoginRequest(email: "smth@gmail.com", password: "123HardPass")

if let error = handler?.handle(request) {
print("Login View Controller: something went wrong")
print("Login View Controller: Error -> " + (error.errorDescription ?? ""))
} else {
print("Login View Controller: Preconditions are successfully validated")
}
}
}

class SignUpViewController: BaseAuthViewController {

func signUpButtonSelected() {
print("SignUp View Controller: User selected SignUp button")

let request = SignUpRequest(firstName: "Vasya",
lastName: "Pupkin",
email: "vasya.pupkin@gmail.com",
password: "123HardPass",
repeatedPassword: "123HardPass")

if let error = handler?.handle(request) {
print("SignUp View Controller: something went wrong")
print("SignUp View Controller: Error -> " + (error.errorDescription ?? ""))
} else {
print("SignUp View Controller: Preconditions are successfully validated")
}
}
}


class ChainOfResponsibilityRealWorld: XCTestCase {

func testChainOfResponsibilityRealWorld() {

print("Client: Let's test Login flow!")

let loginHandler = LoginHandler(with: LocationHandler())
let loginController = LoginViewController(handler: loginHandler)

loginController.loginButtonSelected()

print("\nClient: Let's test SignUp flow!")

let signUpHandler = SignUpHandler(with: LocationHandler(with: NotificationHandler()))
let signUpController = SignUpViewController(handler: signUpHandler)

signUpController.signUpButtonSelected()
}
}

Output.txt: 执行结果

1
2
3
4
5
6
7
8
Client: Let's test Login flow!
Login View Controller: User selected Login button
Login View Controller: Preconditions are successfully validated

Client: Let's test SignUp flow!
SignUp View Controller: User selected SignUp button
SignUp View Controller: something went wrong
SignUp View Controller: Error -> Please turn notifications on

在 TypeScript 中使用模式

复杂度: ★★☆

流行度: ★☆☆

使用示例: 责任链模式在 TypeScript 程序中并不常见, 因为它仅在代码与对象链打交道时才能发挥作用。

识别方法: 该模式可通过一组对象的行为方法间接调用其他对象的相同方法来识别, 而且所有对象都会遵循相同的接口。

概念示例

本例说明了责任链设计模式的结构并重点回答了下面的问题:

  • 它由哪些类组成?
  • 这些类扮演了哪些角色?
  • 模式中的各个元素会以何种方式相互关联?

index.ts: 概念示例

1
2
3
4
5
6
7
8
9
10
11
12
13
14
15
16
17
18
19
20
21
22
23
24
25
26
27
28
29
30
31
32
33
34
35
36
37
38
39
40
41
42
43
44
45
46
47
48
49
50
51
52
53
54
55
56
57
58
59
60
61
62
63
64
65
66
67
68
69
70
71
72
73
74
75
76
77
78
79
80
81
82
83
84
85
86
87
88
89
90
91
92
93
94
95
96
97
98
99
100
101
102
103
104
/**
* The Handler interface declares a method for building the chain of handlers.
* It also declares a method for executing a request.
*/
interface Handler {
setNext(handler: Handler): Handler;

handle(request: string): string;
}

/**
* The default chaining behavior can be implemented inside a base handler class.
*/
abstract class AbstractHandler implements Handler
{
private nextHandler: Handler;

public setNext(handler: Handler): Handler {
this.nextHandler = handler;
// Returning a handler from here will let us link handlers in a
// convenient way like this:
// monkey.setNext(squirrel).setNext(dog);
return handler;
}

public handle(request: string): string {
if (this.nextHandler) {
return this.nextHandler.handle(request);
}

return null;
}
}

/**
* All Concrete Handlers either handle a request or pass it to the next handler
* in the chain.
*/
class MonkeyHandler extends AbstractHandler {
public handle(request: string): string {
if (request === 'Banana') {
return `Monkey: I'll eat the ${request}.`;
}
return super.handle(request);

}
}

class SquirrelHandler extends AbstractHandler {
public handle(request: string): string {
if (request === 'Nut') {
return `Squirrel: I'll eat the ${request}.`;
}
return super.handle(request);
}
}

class DogHandler extends AbstractHandler {
public handle(request: string): string {
if (request === 'MeatBall') {
return `Dog: I'll eat the ${request}.`;
}
return super.handle(request);
}
}

/**
* The client code is usually suited to work with a single handler. In most
* cases, it is not even aware that the handler is part of a chain.
*/
function clientCode(handler: Handler) {
const foods = ['Nut', 'Banana', 'Cup of coffee'];

for (const food of foods) {
console.log(`Client: Who wants a ${food}?`);

const result = handler.handle(food);
if (result) {
console.log(` ${result}`);
} else {
console.log(` ${food} was left untouched.`);
}
}
}

/**
* The other part of the client code constructs the actual chain.
*/
const monkey = new MonkeyHandler();
const squirrel = new SquirrelHandler();
const dog = new DogHandler();

monkey.setNext(squirrel).setNext(dog);

/**
* The client should be able to send a request to any handler, not just the
* first one in the chain.
*/
console.log('Chain: Monkey > Squirrel > Dog\n');
clientCode(monkey);
console.log('');

console.log('Subchain: Squirrel > Dog\n');
clientCode(squirrel);

Output.txt: 执行结果

1
2
3
4
5
6
7
8
9
10
11
12
13
14
15
16
17
Chain: Monkey > Squirrel > Dog

Client: Who wants a Nut?
Squirrel: I'll eat the Nut.
Client: Who wants a Banana?
Monkey: I'll eat the Banana.
Client: Who wants a Cup of coffee?
Cup of coffee was left untouched.

Subchain: Squirrel > Dog

Client: Who wants a Nut?
Squirrel: I'll eat the Nut.
Client: Who wants a Banana?
Banana was left untouched.
Client: Who wants a Cup of coffee?
Cup of coffee was left untouched.

概念示例

让我们来看看一个医院应用的责任链模式例子。 医院中会有多个部门, 如:

  • 前台
  • 医生
  • 药房
  • 收银

病人来访时, 他们首先都会去前台, 然后是看医生、 取药, 最后结账。 也就是说, 病人需要通过一条部门链, 每个部门都在完成其职能后将病人进一步沿着链条输送。

此模式适用于有多个候选选项处理相同请求的情形, 适用于不希望客户端选择接收者 (因为多个对象都可处理请求) 的情形, 还适用于想将客户端同接收者解耦时。 客户端只需要链中的首个元素即可。

正如示例中的医院, 患者在到达后首先去的就是前台。 然后根据患者的当前状态, 前台会将其指向链上的下一个处理者。

department.go: 处理者接口

1
2
3
4
5
6
package main

type department interface {
execute(*patient)
setNext(department)
}

reception.go: 具体处理者

1
2
3
4
5
6
7
8
9
10
11
12
13
14
15
16
17
18
19
20
21
22
package main

import "fmt"

type reception struct {
next department
}

func (r *reception) execute(p *patient) {
if p.registrationDone {
fmt.Println("Patient registration already done")
r.next.execute(p)
return
}
fmt.Println("Reception registering patient")
p.registrationDone = true
r.next.execute(p)
}

func (r *reception) setNext(next department) {
r.next = next
}

doctor.go: 具体处理者

1
2
3
4
5
6
7
8
9
10
11
12
13
14
15
16
17
18
19
20
21
22
package main

import "fmt"

type doctor struct {
next department
}

func (d *doctor) execute(p *patient) {
if p.doctorCheckUpDone {
fmt.Println("Doctor checkup already done")
d.next.execute(p)
return
}
fmt.Println("Doctor checking patient")
p.doctorCheckUpDone = true
d.next.execute(p)
}

func (d *doctor) setNext(next department) {
d.next = next
}

medical.go: 具体处理者

1
2
3
4
5
6
7
8
9
10
11
12
13
14
15
16
17
18
19
20
21
22
package main

import "fmt"

type medical struct {
next department
}

func (m *medical) execute(p *patient) {
if p.medicineDone {
fmt.Println("Medicine already given to patient")
m.next.execute(p)
return
}
fmt.Println("Medical giving medicine to patient")
p.medicineDone = true
m.next.execute(p)
}

func (m *medical) setNext(next department) {
m.next = next
}

cashier.go: 具体处理者

1
2
3
4
5
6
7
8
9
10
11
12
13
14
15
16
17
18
package main

import "fmt"

type cashier struct {
next department
}

func (c *cashier) execute(p *patient) {
if p.paymentDone {
fmt.Println("Payment Done")
}
fmt.Println("Cashier getting money from patient patient")
}

func (c *cashier) setNext(next department) {
c.next = next
}

patient.go

1
2
3
4
5
6
7
8
9
package main

type patient struct {
name string
registrationDone bool
doctorCheckUpDone bool
medicineDone bool
paymentDone bool
}

main.go: 客户端代码

1
2
3
4
5
6
7
8
9
10
11
12
13
14
15
16
17
18
19
20
21
22
package main

func main() {

cashier := &cashier{}

//Set next for medical department
medical := &medical{}
medical.setNext(cashier)

//Set next for doctor department
doctor := &doctor{}
doctor.setNext(medical)

//Set next for reception department
reception := &reception{}
reception.setNext(doctor)

patient := &patient{name: "abc"}
//Patient visiting
reception.execute(patient)
}

output.txt: 执行结果

1
2
3
4
5
Serching recursively for keyword rose in folder Folder2
Searching for keyword rose in file File2
Searching for keyword rose in file File3
Serching recursively for keyword rose in folder Folder1
Searching for keyword rose in file File1

根据: Golang By Example